

So for everyone that's been following my Abarth's thread, they'll know I posted up a picture of a new subwoofer to install in my Abarth to give a bit more depth and range to the audio in the car.
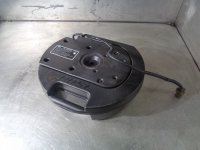
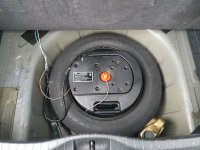
This came in the form of a BOSE spare wheel subwoofer. They're a factory fit item from a Mazda 3 in my particular example, however they were lumped into a number of Mazda models plus other marques along the way.
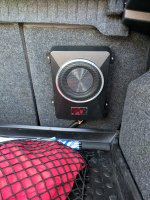
The advantage of using one of these - it's very discreet. You'll not loose any boot space to a great bit sub enclosure. The amplifier is also built in, so no messy wiring and external amplifiers to worry about.
They are also very cheap. I had this one for a little over £40. You tell me where you can get a sub, enclosure and amplifier for that little...
Broadly speaking it'll fit any model that has a spare wheel well in the boot floor. I've no issues at all with it in the Stilo.
Of course being BOSE they're a good quality item and the amp and enclosure are properly tuned to make the best of the speaker. If you're into your audio you'll know just how important it is to have a properly sized and ported base bin to get the best sound from it.
Don't expect window rattling, earth shattering base. Personally, I'm 30. I dont want that but I do want a little punch to get a more complete audio range and listening experience. For the size though, these do have a nice little kick to them.
All of this is taken care of for you in one nice neat little tub.
note: I should add that this is not the factory BOSE option available too the Stilo, although I've yet to set eyes on a car that was fitted with that stuff.
So there are two phases to the installation, electrical and physical. Lets deal with electrics first.
Electrical
So, let's do this..... The wiring on these is a little different as they're designed to the factory integrated, so you're going to have to do a little (and I do mean only a little) chopping and connecting.
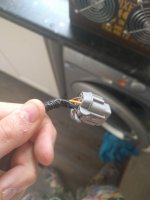
Note from the picture that the unit comes with a short, probably 1ft, pigtail of a wiring lead that connects to the plug socket on the unit.
Bizarrely there are 5 wires on the vehicle side of this connector but only 4 wires on the sub size of the lead.
That's because the vehicle side wiring provided a left and right audio feed but being a mono sub, it only needs one or the other.
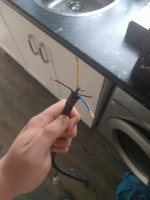
You'll see in the pics below, I've chopped the vehicle side plug off and gotten to work. The wiring colours go as follows:
Power;
Blue with red stripe = +12v
Black = ground / earth
Audio;
Yellow = positive line in
Brown = negative line in
The redundant wire, which doesn't have a wire on the sub side of the loom is back with brown stripe. Ignore this wire. You'll see i've cut this back short and left it.
Sourcing power is a little bit different to a normal amp, as there is no remote switch function. The amp is therefore always ON. That means you need to connect it to a switched 12v feed with the ignition.
If your car has the rear fuse panel then you dont have far to look to find one. I ran my power feed down the drivers side of the car to the fuse box by your right knee and used an "add-a-fuse" to create an additional feed off a fuse that was switched with the ignition.
I used only 10amp fuse - which sounds small - but I was happy to start small and work bigger if needed. No point having a fuse that's way too big as it'll not offer you the protection you're looking for. So far 10a has been sufficient. I'll update if that changes.
Picking your audio feeds
OK, so next hurdle in wiring is picking your audio feeds. If you have an aftermarket headunit they you simply want to wire it into the subwoofer or a rear channel RCA.
For a factory unit you'll need to use a line out converter - typically available at Halfords. I used one of these. It wires into your rear speaker channels to give a low level output - similar to that of an RCA pre-out.
Remember you only need 1 feed as it's mono, so you only need one RCA (either red or white) or 1 speaker channel. I wired mine into a rear channel, as the sub goes to the rear. - it's convention.
To wire in the line out converter I've not pictured it but I bought a small ISO extension cable from Maplin for £5. This gives you a small six inch or so extension set for the speaker wires, so I could cut and solder the line out converter to this without chopping the car's loom.
With all the wires - obviously - you'll need to run these into the boot space to reach the sub enclosure and connect them all up.
Personally, I soldered mine together to make one long wiring harness for the sub from head unit back into the boot.
Best practice is to run the audio feed down one side of the car and power down the other - to avoid interference. I have done just this. You can divert the wires off down different sides under the rear seats very easily.
REMEMBER - if you do use any connectors rather that soldering and particularly for your power wires, make sure these are rated for a current greater than your fuse. You need your fuse to be the weakest link for safety.
For your earth wire, there is an earth point behind the passenger side rear light cluster. You'll have to get the carpet out to access it but that's the best place going for your earth cable. You'll have to pardon the pic as you'll see my earth was hooked up to the anchor bolt whilst I tested the install worked before securing all wiring in place!
Physical Install
This bit is actually really easy. Be sure to orientate the speaker correctly, as the unit does have a directional arrow on it indicating where is front.
You'll need to remove the massive plastic tool tray, of course.
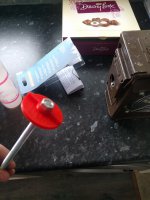
The securing bolt from the tool tray is too short for the BOSE speaker, so you need to make it longer. Get some M8 threaded bar (B&Q about £2.50) and use an M8 locking nut to make up an extended securing bolt.
I cheated slightly, as you'll see, I used my 3D printer to make up a slightly smaller head for the securing bolt, as the speaker has a smaller diameter depression in it and I didnt want the lugs sticking up in the carpet. That's what the red disc is. You can modify yours to suit though, or simply use a large washer and nut.
Last thing to do is plug in the harness.
It really is that simple to install!
This came in the form of a BOSE spare wheel subwoofer. They're a factory fit item from a Mazda 3 in my particular example, however they were lumped into a number of Mazda models plus other marques along the way.
The advantage of using one of these - it's very discreet. You'll not loose any boot space to a great bit sub enclosure. The amplifier is also built in, so no messy wiring and external amplifiers to worry about.
They are also very cheap. I had this one for a little over £40. You tell me where you can get a sub, enclosure and amplifier for that little...
Broadly speaking it'll fit any model that has a spare wheel well in the boot floor. I've no issues at all with it in the Stilo.
Of course being BOSE they're a good quality item and the amp and enclosure are properly tuned to make the best of the speaker. If you're into your audio you'll know just how important it is to have a properly sized and ported base bin to get the best sound from it.
Don't expect window rattling, earth shattering base. Personally, I'm 30. I dont want that but I do want a little punch to get a more complete audio range and listening experience. For the size though, these do have a nice little kick to them.
All of this is taken care of for you in one nice neat little tub.
note: I should add that this is not the factory BOSE option available too the Stilo, although I've yet to set eyes on a car that was fitted with that stuff.
So there are two phases to the installation, electrical and physical. Lets deal with electrics first.
Electrical
So, let's do this..... The wiring on these is a little different as they're designed to the factory integrated, so you're going to have to do a little (and I do mean only a little) chopping and connecting.
Note from the picture that the unit comes with a short, probably 1ft, pigtail of a wiring lead that connects to the plug socket on the unit.
Bizarrely there are 5 wires on the vehicle side of this connector but only 4 wires on the sub size of the lead.
That's because the vehicle side wiring provided a left and right audio feed but being a mono sub, it only needs one or the other.
You'll see in the pics below, I've chopped the vehicle side plug off and gotten to work. The wiring colours go as follows:
Power;
Blue with red stripe = +12v
Black = ground / earth
Audio;
Yellow = positive line in
Brown = negative line in
The redundant wire, which doesn't have a wire on the sub side of the loom is back with brown stripe. Ignore this wire. You'll see i've cut this back short and left it.
Sourcing power is a little bit different to a normal amp, as there is no remote switch function. The amp is therefore always ON. That means you need to connect it to a switched 12v feed with the ignition.
If your car has the rear fuse panel then you dont have far to look to find one. I ran my power feed down the drivers side of the car to the fuse box by your right knee and used an "add-a-fuse" to create an additional feed off a fuse that was switched with the ignition.
I used only 10amp fuse - which sounds small - but I was happy to start small and work bigger if needed. No point having a fuse that's way too big as it'll not offer you the protection you're looking for. So far 10a has been sufficient. I'll update if that changes.
Picking your audio feeds
OK, so next hurdle in wiring is picking your audio feeds. If you have an aftermarket headunit they you simply want to wire it into the subwoofer or a rear channel RCA.
For a factory unit you'll need to use a line out converter - typically available at Halfords. I used one of these. It wires into your rear speaker channels to give a low level output - similar to that of an RCA pre-out.
Remember you only need 1 feed as it's mono, so you only need one RCA (either red or white) or 1 speaker channel. I wired mine into a rear channel, as the sub goes to the rear. - it's convention.
To wire in the line out converter I've not pictured it but I bought a small ISO extension cable from Maplin for £5. This gives you a small six inch or so extension set for the speaker wires, so I could cut and solder the line out converter to this without chopping the car's loom.
With all the wires - obviously - you'll need to run these into the boot space to reach the sub enclosure and connect them all up.
Personally, I soldered mine together to make one long wiring harness for the sub from head unit back into the boot.
Best practice is to run the audio feed down one side of the car and power down the other - to avoid interference. I have done just this. You can divert the wires off down different sides under the rear seats very easily.
REMEMBER - if you do use any connectors rather that soldering and particularly for your power wires, make sure these are rated for a current greater than your fuse. You need your fuse to be the weakest link for safety.
For your earth wire, there is an earth point behind the passenger side rear light cluster. You'll have to get the carpet out to access it but that's the best place going for your earth cable. You'll have to pardon the pic as you'll see my earth was hooked up to the anchor bolt whilst I tested the install worked before securing all wiring in place!
Physical Install
This bit is actually really easy. Be sure to orientate the speaker correctly, as the unit does have a directional arrow on it indicating where is front.
You'll need to remove the massive plastic tool tray, of course.
The securing bolt from the tool tray is too short for the BOSE speaker, so you need to make it longer. Get some M8 threaded bar (B&Q about £2.50) and use an M8 locking nut to make up an extended securing bolt.
I cheated slightly, as you'll see, I used my 3D printer to make up a slightly smaller head for the securing bolt, as the speaker has a smaller diameter depression in it and I didnt want the lugs sticking up in the carpet. That's what the red disc is. You can modify yours to suit though, or simply use a large washer and nut.
Last thing to do is plug in the harness.
It really is that simple to install!
")