Technical Bench Bleeding New Master Cylinder? Is It Worth It

Currently reading:
Technical Bench Bleeding New Master Cylinder? Is It Worth It

Mj500

Member
Joined
Nov 13, 2021
Messages
16
Points
54
Hi All,

For a standard system of drums all round, when fitting a new master cylinder, do you guys ever both bench bleeding it first? Or will going with gravity initially then 2 man technique do the job adequately to remove all air?

Thanks in advance,
Mike
 
Hi All,

For a standard system of drums all round, when fitting a new master cylinder, do you guys ever both bench bleeding it first? Or will going with gravity initially then 2 man technique do the job adequately to remove all air?

Thanks in advance,
Mike
I tend to work on my own, so bench bleeding can help and if only changing master cylinder, I have often done that, then loosely reconnected the pipes whilst keeping reservoir topped up, then nipped up the unions and reached out from inside the car, pressed the brake pedal down , opened the union nearest to the driver and bled till clean , then done the ones further away last. If happy with the pedal, secure the unions, wash off with water and dry, then apply emergency stop pressure to check all unions for leaks and top up fluid. You don't have to be a monkey to do it and it is always easier with two of you.:)
 
I agree with Rusty , however after 50 years in the motortrade I have found some cars can be a right pain, so bench bleeding can help.
I usually work on my own, but my good lady will help with final 'round the car' brake bleeding. To initially pull brake fluid through I made a very simple tool out of a 'no longer required' (but check with 'her who must be obeyed first!') trigger-type squirty-bottle trigger mechanism. Extend the pick-up tube (of the trigger mechanism) with a soft pipe that will fit onto the bleed nipple. Have a container that you can squirt brake fluid into, open the bleed-valve--normal system, furthest from the master cylinder first, and the operate the trigger to pull brake fluid through. Eventually, brake-fluid will flow through, although air will come with it as air will also get pulled through round the bleed-nipple threads. When you have a reasonably steady flow of brake-fluid, shut the bleed nipple and move onto the next wheel. You may have to try one or two different trigger-mechanisms to obtain a pick-up tube diameter that is a tight fit in the 'flexible-to-the-bleed-nipple' pipe. It is a very simple tool, will cost just about nothing and does work. When I have brake-fluid flowing out of all the wheel cylinders, Ann then helps me with the final brake bleeding.
 
I usually work on my own, but my good lady will help with final 'round the car' brake bleeding. To initially pull brake fluid through I made a very simple tool out of a 'no longer required' (but check with 'her who must be obeyed first!') trigger-type squirty-bottle trigger mechanism. Extend the pick-up tube (of the trigger mechanism) with a soft pipe that will fit onto the bleed nipple. Have a container that you can squirt brake fluid into, open the bleed-valve--normal system, furthest from the master cylinder first, and the operate the trigger to pull brake fluid through. Eventually, brake-fluid will flow through, although air will come with it as air will also get pulled through round the bleed-nipple threads. When you have a reasonably steady flow of brake-fluid, shut the bleed nipple and move onto the next wheel. You may have to try one or two different trigger-mechanisms to obtain a pick-up tube diameter that is a tight fit in the 'flexible-to-the-bleed-nipple' pipe. It is a very simple tool, will cost just about nothing and does work. When I have brake-fluid flowing out of all the wheel cylinders, Ann then helps me with the final brake bleeding.
Sucking the fluid at the wheel cylinders can work as the hobbler suggests.
My preference is to push to fluid through the system from the master cylinder, whether by gravity or a pressure tool on the reservoir, the reason being on a lot of older / tired systems when you suck the fluid it can cause the back seal on the master cylinder to pull in slightly allowing air in so you might never get a good pedal on some vehicles.
In the old days I found the Girling brakes used on Fords the brake pedal could be vigorously pumped with no problem , but try it on a Morris Minor with Lockheed brakes and again you would never get a pedal.
In the initial question it was referring to bench bleeding the master cylinder, so presumable if only disturbing that cylinder and not the wheel cylinders you could be lucky and not have to get under the car at all yet still have a good hard pedal.
 
Whilst at college in the late 1960s we were showed films of manufacturers building cars using a large gravity tank of brake fluid high up in the factory connected to the master cylinders and the workers simply opened the bleeders and the fluid flowed through pushing the air out very quickly.
 
Hi Guys, I didn't bench bleed the master cylinder in the end and just went for a good old long gravity bleed, followed by the 2 man approach. Initially I had some frustration as I couldn't get a brake pedal at all, chased the problem to being one of my new front cylinders had a slight oil seep, so got that changed, bled up again, after a bit of messing around (needed to lengthen some new return springs and check all the new self adjusters were grippy enough, of which some weren't which is very frustrating) I now have semi reasonable breaks. Although i'm not 100% sure what they're supposed to be like as i've not driven anyone else's 500, the pedal does still feel quite long to me.

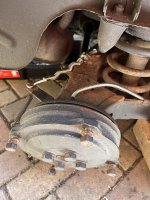
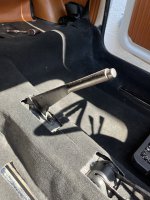
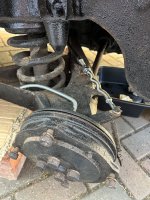
This brings me onto my next point, during the full brake overhaul I completely lost any handbrake tension, so I went ahead and changed my handbrake cable too and the results of this still aren't great, as you can see in the pictures, i've got it fully adjusted and it still takes 7 clicks to be fully on, could this be a symptom of the brakes not being bled properly as I know it adjusts itself in sync with the shoe self adjusters.
 

Attachments

  • IMG_5702.JPG
    IMG_5702.JPG
    2.2 MB · Views: 40
  • IMG_5703.JPG
    IMG_5703.JPG
    2.6 MB · Views: 41
  • IMG_5701.JPG
    IMG_5701.JPG
    2.6 MB · Views: 41
Hi Guys, I didn't bench bleed the master cylinder in the end and just went for a good old long gravity bleed, followed by the 2 man approach. Initially I had some frustration as I couldn't get a brake pedal at all, chased the problem to being one of my new front cylinders had a slight oil seep, so got that changed, bled up again, after a bit of messing around (needed to lengthen some new return springs and check all the new self adjusters were grippy enough, of which some weren't which is very frustrating) I now have semi reasonable breaks. Although i'm not 100% sure what they're supposed to be like as i've not driven anyone else's 500, the pedal does still feel quite long to me.

This brings me onto my next point, during the full brake overhaul I completely lost any handbrake tension, so I went ahead and changed my handbrake cable too and the results of this still aren't great, as you can see in the pictures, i've got it fully adjusted and it still takes 7 clicks to be fully on, could this be a symptom of the brakes not being bled properly as I know it adjusts itself in sync with the shoe self adjusters.
To the best of my memory, the handbrake cable is double ended--i.e. it goes from the rear brake on one side, round a roller under the handbrake lever and then out to the rear brake on the other side---the rear brakes would have to be WELL out of adjustment to need 7 clicks. Check that the handbrake cable has gone round the roller correctly.
 
If the footbrake is poor and no air in system I would check and manually adjust foot brake mechanism first and assuming no issues re cable routing etc. then adjust handbrake. Any slack in drums is multiplied at the handbrake lever.
 
If the footbrake is poor and no air in system I would check and manually adjust foot brake mechanism first and assuming no issues re cable routing etc. then adjust handbrake. Any slack in drums is multiplied at the handbrake lever.
That's the problem with the 500(and the 126)---automatic adjusters on the brakes, so you can't "adjust the foot brake". One dodge that does sometimes work is to (making sure that there is no other traffic) drive fairly briskly in reverse and then stand on the brakes a few times---repeat operation 3 or 4 times
 
When I say "manually adjust brakes" I include winding up automatic adjusters. !!! (no such thing as can't ;))
This may sound strange, but I assure you even on perfect auto adjusters it can sometimes improve the pedal.
You will need to know exactly how the automatic adjusters work on your model of car!
This must be done with care not to over do it, so what ever form of adjuster if correctly clicked on a little, then check the drum will go on easily, apply foot and handbrake several times, check for even slight binding and release if necessary, repeat this operation with care until you reach the optimum.
This MUST be done with common sense, a little at a time, if you over do it and force the drum on you will be in lots of trouble trying to release it.
With patience and practice, one click then put drum on and check and repeat etc.
If you follow that rule and find you have caused it to bind you will still be able to gentle tap the drum using a copper hammer and wriggle it off.Then you must back off the adjuster and recheck.
When you finish and all brake drums will still revolve freely, then give a good road test for a few miles using the foot and handbrake several times, then run your hands over the wheels to check for any running hotter, if so jack up car and correct it!
N.B. if your car has worn brake drums with a wear ridge it is best not to do this as you may run into problems.
If you don't feel 100% competent to do what I have said, then do not do it!
I have done this since 1969 in the motortrade, so as a fully qualified motor engineer I have that, over fifty years of experience behind me.
In an ideal World this operation should not be necessary, but life and cars are not perfect, we just try to make them as good as we can . It is one of many little "tricks" learnt over the years that kept my regular customers returning and often saying how "their cars felt so much better after I had serviced them", something rarely heard from Main Dealer customers, who are usually still choking reading their bills to talk;)
In the days when you could buy Fiat 500 parts NEW from the factory, one was able to buy the AUTOMATIC adjusters as a kit of parts. They were done up tight on the brake shoe with a special 2-part factory tool. When I say tight, I mean tight until they could not be tightened any more----that was the ONLY "adjustment". The 2 spring-loaded friction washers (1 either side of the shoe) was what held the shoe in the 'adjusted' position, obtained through usage of the brakes. The modern 'pattern' brake shoes come complete with the automatic adjusters already fitted at the manufacturers---there IS NO PROVISION for adjusting the tension of the spring on the friction washers. The main causes of brake shoe problems with pattern parts is (a) the lining on the new shoes seems to be a little bit thinner than the original factory supplied shoes, (b) the 'pattern' replacement shoe-return springs are too short; not by much, but enough that the extra tension on the spring when it is extended (when the brakes are being used) is enough to pull the shoe too far back off the drum---therefore more pedal movement is required to bring the shoes back into contact with the drum and, (c) I am not convinced that the modern 'friction washers' are as 'grippy' as the original 'Factory' parts . Having fitted many, many new brake shoes onto 500s, from the days when 'Factory' parts weres still available (and the 500 was a current model) to modern times when I have had to fight the imperfections of 'pattern' parts, I can assure you, there is no "click" adjustment on Fiat 500 (and 126) brake shoes.
 
In the days when you could buy Fiat 500 parts NEW from the factory, one was able to buy the AUTOMATIC adjusters as a kit of parts. They were done up tight on the brake shoe with a special 2-part factory tool. When I say tight, I mean tight until they could not be tightened any more----that was the ONLY "adjustment". The 2 spring-loaded friction washers (1 either side of the shoe) was what held the shoe in the 'adjusted' position, obtained through usage of the brakes. The modern 'pattern' brake shoes come complete with the automatic adjusters already fitted at the manufacturers---there IS NO PROVISION for adjusting the tension of the spring on the friction washers. The main causes of brake shoe problems with pattern parts is (a) the lining on the new shoes seems to be a little bit thinner than the original factory supplied shoes, (b) the 'pattern' replacement shoe-return springs are too short; not by much, but enough that the extra tension on the spring when it is extended (when the brakes are being used) is enough to pull the shoe too far back off the drum---therefore more pedal movement is required to bring the shoes back into contact with the drum and, (c) I am not convinced that the modern 'friction washers' are as 'grippy' as the original 'Factory' parts . Having fitted many, many new brake shoes onto 500s, from the days when 'Factory' parts weres still available (and the 500 was a current model) to modern times when I have had to fight the imperfections of 'pattern' parts, I can assure you, there is no "click" adjustment on Fiat 500 (and 126) brake shoes.
I think you find I was talking about automatic adjusters in general.
If specifically referring to the friction type arrangement used on some Fiats ( and Ladas incidentally) it was possible to pry/move the friction adjuster on the shoe in relation to the fixed pillar on the back plate to reduce the distance it needed to travel for the shoe to come in contact with the drum, thereby "manually" adjusting them.
I agree pattern shoes are more trouble as the spring/friction pad was less effective allowing them to pull away from the drum again, allowing the normal pull off brake shoe springs to overcome the adjuster tension springs grip. The correct cure was genuine quality parts, the cheap cure was weaker pull off springs.
 
If you like old original bits then I have one set of four old brake shoes that do not have the adjusters fitted, a number of the removable adjusters and a number of new adjuster friction washers. 😀
 
I certainly ran into most of the described problems when changing my brake shoes over, I had one shoe where the self adjuster pads were not grippy enough on the shoe so every time the brake pedal was applied without the hub in place the shoe would simply slip & slide around but would never fully grip. All the new pattern springs were too short and pulled the shoes on the adjusters too aggressively back so I used the old springs and a couple of the new ones which I slightly lengthened...

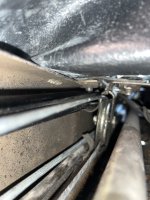
Regarding the handbrake, I did a few forward and reverse drives with sharp braking to no avail so went into the tunnel of the car again and took a look at the cable running around the pulley. As suggested it doesn't quite sit right on the top edge and as much as a I try to reseat it it doesn't want to sit where it should, my theory is that as due to the age of the handbrake the shims/packers that used to keep it straight have now worn and there is a lot of lateral movement in the handbrake when you pull it upwards and it can be wiggled around quite freely which is causing the pulley misalignment when its applied.

In general though I'm really enjoying having the car back on the road and very much enjoying some summer usage :)
 

Attachments

  • IMG_5717.JPG
    IMG_5717.JPG
    1.7 MB · Views: 22
  • IMG_3958.jpg
    IMG_3958.jpg
    1.3 MB · Views: 23
Back
Top