So after stripping out the seats, sill trims, pillar covers, center console, hood brackets, wind deflector, rear bulkhead trim and cover, I eventually found the connector fastened to a little bracket underneath the fuel tank near the fuel lines. What a mission. Got There though. Still cant find any new arms for this model though with the 10mm abs sensor hole. Fiat have stopped making them and all other manufacturers just list the other arm with bigger sensor.
I dodnt holed up much hope for being able to rebush the old arms either as I thing the bushes are different as well.........TBC
OK. I think I warned you about this
")
Buy new trailing-arms from Auto-Doc. ( I have no association with them, but they are magnificent ! The address says 'Berlin', but it's Berlin Poland
)They are easy to replace and cost about euro 10 more than a revision-set. Solve all your problems in 1 project.
You are right that the new arms have a bigger hole. Nothing to do about that .... oh yeah ?
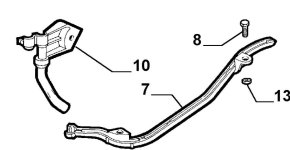
I did a left and right trailing-arm replacement ( from Auto-Doc ). I damaged the right ABS sensor at removal. Tried to be nice about it, but that didn't work. Destroyed the sensor. The left side was really simple: Hit the sensor squarely once with a small weighted hammer ( from the inside where it protrudes from the arm ). It will pop right out.
Replace the tailing-arm.
The next part takes more balls than brains
The existing sensor is a 90 degree installation with a lobe and small bolt. You can install it, but it is not deep enough to hang-out over the interior sensor part of the wheel-hub. You put it all back together and the ABS light stays on. That sucks.
So you have to trim the plastic so that it's 180 degrees. Use a little wire cutter. Nothing serious. It's old plastic that breaks away easily. ( more balls than brains ).
Buy some of this or an equivalent:
https://www.bison.nl/nl/product/kombi-stick-portion-pack/6306555
Take 2 portions and prepare them separately. You don't have a lot of time, not much more than a few minutes.
Take 1 prepared portion and stuff it into the sensor hole on the tailing-arm. Use the other portion to make a collar for the sensor.
This part is important: take a flat piece of something ( I use the coffee stir things from the coffee-bar. 1.5 x 4 mm. Just smaller than the sensor ) and push it through the epoxy in the hole. Pull it out and push the sensor in. If all has gone well, the sensor-blade pushes through until it is actually not far enough to be completely over the wheel-bearing sensor. You now have about 60 seconds to put some pressure behind it and get the blade exactly where you want it: +/- 3mm above the interior wheel sensor. You should have a little bit of wiggle room to get it in place. Make sure to remove any epoxy on the inside. The distance between the sensor blade and the wheel-hub sensor is not really critical: enough space so that road debris does not accumulate.
I have done this 3 times; once as failure, twice as success
Good luck!
grtz
ER