i found this on another forum, i found it very useful, hope u do to!
How to change the cambelt on the 1.2 16V FIRE engine
All the manuals suggest you need special tool to do the cambelt on these engines. You don’t. The only specialist tools you need are a thickish single knitting needle and a felt tip pen.
1) make sure the engine is cold.
1) Remove the resonator and air box etc from the engine.
3) Remove the keys from the ignition!!
4) Remove the first 2 spark plugs (the ones closest to the cambelt side).
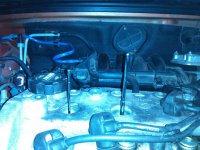
5) Insert the knitting needle into one hole. Make sure it is straight. Make sure it is sitting on the piston. Then mark the side of it using the felt pen.
6) Put needle into other spark plug hole. Mark the side of the needle with the pen.
7) If the pen marks are different then your pistons aren’t at the same height.
8) To get the at the same height put the car in fifth gear and push the car forward and inch or so. This will make the engine turn very slightly. Continue to do this until the pistons are at exactly the same height.
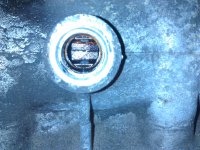
9) Remove the hex plug from the front of the camshaft housing.
10) Put your finger in the hole and you may be able to feel a horizontal slot in the camshaft.
11) If you can’t feel the slot then something isn’t right! It might help to make yourself familiar with what the slot feels like before it is lined up properly.
12) Ensure the slot is exactly central. If it isn’t the put the car in gear and push the car a tiny amount to ensure the slot is perfectly central.
13) Measure the piston heights again to ensure everything is ok.
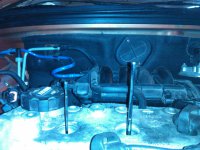
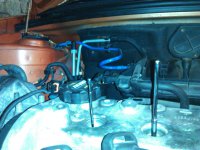
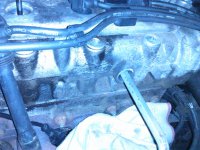
14) When happy, put a 3/8ths drive extension bar in the camshaft slot to lock the cam. This will ensure nothing moves.
15) make sure the keys aren’t in the ignition and now put the car in first gear and make sure the handbrake is on. Whatever you do, the engine must not be turned!!
16) Jack drivers side of car up. Remove drivers side wheel.
17) Unbolt exhaust heat shield and then unbolt the 3 bolts holding the alernator and PAS belt pulleys onto the crank. Unbolting the pulley means you don’t have to move the alternator or the pas pump which can often be seized. Then remove the 2 loose belts.
18) Remove the plastic cambelt cover. There is one 10mm bolt and a 13mm at the top, I think a 13mm near the exhaust manifold and one smaller one further down at the side.
19) You are now ready to remove the cambelt.
20) Undo the nut on the tensioner.
21) Remove cambelt.
22) Put new belt on, ensuring it is tightish between the camshaft pulley and the lower pulley.
23) To tension the belt the pulley has a concentric sprung centre. You set this correctly you need some circlip pliers.
24) Turn the centre of the pulley until the 2 notches on the pulley centre line up. This make sure the spring tension is correct. When they line up, tighten the nut that holds the tensioner in place.
25) Ensure the belt is sat correctly on the toothed wheels.
26) Another way to check the belt tension is to try to turn the belt through 90 degrees along it’s longest section. If there is some resistance and it will only just twist by 90 degrees then you have done it correctly.
27) Once you have done this then you can put everything back together.
28) To get the pas belt and alternator belt back on can be a fiddle, needing a bit of juggling! You can move the alternator to assist you.
29) Put the cambelt cover back on.
30) Then put the exhaust heat shield back on.
31) Put the spark plugs back in with their HT leads.
32) Remove the 3/8ths drive extension bar from the front of the cam housing and put the plug back in.
33) Put resonator back on.
34) Put wheel back on.
35) Take out of gear.
36) Start engine! Run it for between 30 and 60 secs.
37) Remove the top half of the cambelt cover and check the tension of the belt.
38) If it has moved you will need to start the job again.
39) You can run the engine before the resonator, belt cover etc are bolted back on but that’s your decision and it could save time. Just make sure there are no loose crank sensor cables the can get caught in the cambelt!!
40) Job done. Best to check the tension in maybe a weeks time as well!!!
41) You’ve just saved yourself at least £100 minimum compared to Fiat prices(I was quoted £300)!!!
How to change the cambelt on the 1.2 16V FIRE engine
All the manuals suggest you need special tool to do the cambelt on these engines. You don’t. The only specialist tools you need are a thickish single knitting needle and a felt tip pen.
1) make sure the engine is cold.
1) Remove the resonator and air box etc from the engine.
3) Remove the keys from the ignition!!
4) Remove the first 2 spark plugs (the ones closest to the cambelt side).
5) Insert the knitting needle into one hole. Make sure it is straight. Make sure it is sitting on the piston. Then mark the side of it using the felt pen.
6) Put needle into other spark plug hole. Mark the side of the needle with the pen.
7) If the pen marks are different then your pistons aren’t at the same height.
8) To get the at the same height put the car in fifth gear and push the car forward and inch or so. This will make the engine turn very slightly. Continue to do this until the pistons are at exactly the same height.
9) Remove the hex plug from the front of the camshaft housing.
10) Put your finger in the hole and you may be able to feel a horizontal slot in the camshaft.
11) If you can’t feel the slot then something isn’t right! It might help to make yourself familiar with what the slot feels like before it is lined up properly.
12) Ensure the slot is exactly central. If it isn’t the put the car in gear and push the car a tiny amount to ensure the slot is perfectly central.
13) Measure the piston heights again to ensure everything is ok.
14) When happy, put a 3/8ths drive extension bar in the camshaft slot to lock the cam. This will ensure nothing moves.
15) make sure the keys aren’t in the ignition and now put the car in first gear and make sure the handbrake is on. Whatever you do, the engine must not be turned!!
16) Jack drivers side of car up. Remove drivers side wheel.
17) Unbolt exhaust heat shield and then unbolt the 3 bolts holding the alernator and PAS belt pulleys onto the crank. Unbolting the pulley means you don’t have to move the alternator or the pas pump which can often be seized. Then remove the 2 loose belts.
18) Remove the plastic cambelt cover. There is one 10mm bolt and a 13mm at the top, I think a 13mm near the exhaust manifold and one smaller one further down at the side.
19) You are now ready to remove the cambelt.
20) Undo the nut on the tensioner.
21) Remove cambelt.
22) Put new belt on, ensuring it is tightish between the camshaft pulley and the lower pulley.
23) To tension the belt the pulley has a concentric sprung centre. You set this correctly you need some circlip pliers.
24) Turn the centre of the pulley until the 2 notches on the pulley centre line up. This make sure the spring tension is correct. When they line up, tighten the nut that holds the tensioner in place.
25) Ensure the belt is sat correctly on the toothed wheels.
26) Another way to check the belt tension is to try to turn the belt through 90 degrees along it’s longest section. If there is some resistance and it will only just twist by 90 degrees then you have done it correctly.
27) Once you have done this then you can put everything back together.
28) To get the pas belt and alternator belt back on can be a fiddle, needing a bit of juggling! You can move the alternator to assist you.
29) Put the cambelt cover back on.
30) Then put the exhaust heat shield back on.
31) Put the spark plugs back in with their HT leads.
32) Remove the 3/8ths drive extension bar from the front of the cam housing and put the plug back in.
33) Put resonator back on.
34) Put wheel back on.
35) Take out of gear.
36) Start engine! Run it for between 30 and 60 secs.
37) Remove the top half of the cambelt cover and check the tension of the belt.
38) If it has moved you will need to start the job again.
39) You can run the engine before the resonator, belt cover etc are bolted back on but that’s your decision and it could save time. Just make sure there are no loose crank sensor cables the can get caught in the cambelt!!
40) Job done. Best to check the tension in maybe a weeks time as well!!!
41) You’ve just saved yourself at least £100 minimum compared to Fiat prices(I was quoted £300)!!!
")