Technical 100HP Electrical Diagrams / Info

Currently reading:
Technical 100HP Electrical Diagrams / Info

DesmoFiat

New member
Joined
Oct 5, 2015
Messages
25
Points
7
Hi,
Does anyone have some info on Electrical Diagrams. I see the 1.4 doesn't seem to be covered by the Haynes manuals. Not sure if the ELearn downloads cover it either (did try to install imgburn but my Antivirus threw a wobbly and said NO!)


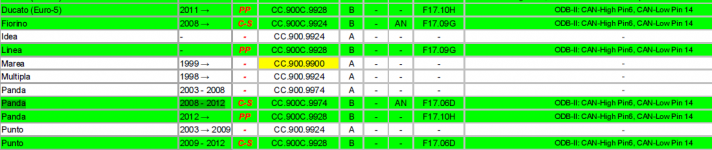
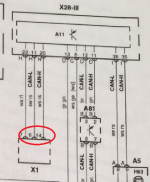
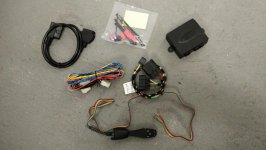
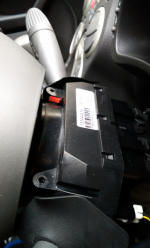
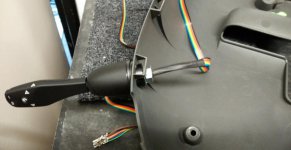
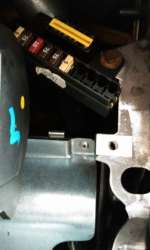
Ideally I could do with the 100HP Wiring Diagram for the Clutch Switch, Brake Switch and also Speed & Tacho signals so I can install my Cruise Control.


Any help greatly appreciated.


Cheers!
 
Would love to post lots of pics and info but without knowing which is the Speed Signal and which is the Tacho Signal I am unable to complete the wiring so not much point in starting!


Already been to the Fiat Service Dept and aside from having a free coffee and being amazed by how massive the Fiat "500"X is, I learnt nothing.


"Got the info you need but we can't give it to you..."


Not sure what is so bad for Fiat if I know the identity of two wires... Probably better to know what they are than to guess and set fire to the car!


So I have the complete CC Kit, the tools to do it and a small amount of enthusiasm left but no wiring diagram.


D'oh !
 
I haven't bought one as yet as Haynes state:


500& Panda Hatchbacks. Also covers most mechanical features of Convertible.Petrol: 1.1 litre (1108cc) & 1.2 litre (1242cc). Turbo-diesel: 1.3 litre (1248cc)‘MultiJet’

..but you are right maybe the other models may be similar. If I get no joy I may as well buy one.

I did have a reply from Fiat Customer Services though from my online enquiry informing them that Fiat would not release this information to me.

The options they suggested reminded me of the Wise Woman in Blackadder:

1.Use the technicalinformation.fiat.com website to obtain the info. (In the next sentence they informed me that I cannot Register if I was not a VAT registered mechanic... Which I am not..)

2.Go to another Fiat Dealer and try again. (Surely if one says Fiat do not give out this type of information then they all should have the same response....?!!)

3.Phone Fiat Customer Services. (I.e Give up or spend an eternity on Hold listening to Enya and Chris de Burgh getting more and more angry with the fob offs.)
 
Last edited:
I borrowed my Haynes manual from the library to see if worth buying for the 100HP...still not sure if it's worth it though I did use the wiring diagram to identify wiring for the horn.
 
Thought these would come in handy. Printed them of in college from their Autodata. Not sure if there accurate.

2ir7qkg.jpg

2iralw5.jpg

jic1sm.jpg
 
Hey thanks for posting the Diagrams.


Do you know the which model they relate to?
 
Apparently for the 100hp. Autodata can be abit inconsistent. Will double check today if I get a chance.
 
Great, thanks.


I see on the Diagrams that a CAN Bus is included and I didn't think that the 100HP used a CAN Bus system.


The CC module I have is compatible with a CAN Bus and therefore should be able to be plugged in to the CAN Bus without the need to connect up the Speed & Tacho Signal wires etc separately. But I don't think that is the case with the 100HP.


If you do get chance to check again the VSS (Vehicle Speed Signal) & Tacho Signal are the ones I am after.
 
Last edited:
Thanks for info A3j.


I have been doing some more searching and found an application list and it does seem to state that the Panda 2003-2008 uses the Analogue CC Kit (AP900) and the 2008-2012 Panda uses the CAN Bus one (AP900C).


Mine is a 2009 so in theory I should be able to connect to the wires that go to Pin 6 & 14 on the back of the OBDII connector.


Which should make things a bit easier...


Cheers.
 

Attachments

  • App List.png
    App List.png
    39.2 KB · Views: 106
Makes sense with the Diagram from MC...


Showing Pin 6 & 14 (X1 being the OBDII port)


...I'll get my Multimeter out...!
 

Attachments

  • OBDII Connector X1.png
    OBDII Connector X1.png
    189 KB · Views: 91
Not a big fan of mucking about with Canbus wiring and the 100hp seems to be very sensitive to any sort of changes to the point that you can't even fit LED bulbs without adding other bits and pieces to stop it throwing up error codes.
 
Sounds like a Fiat!
My plan is to modify a OBDII cable and connect it to the CC loom. I can then plug it in to the OBDII port to access Pins 6 & 14 and then I should only need to connect the power to the ignition.
So should be the minimal risk possible.
 
I have been progressing the cruise control on my 100HP...
Thanks for the inputs on this post.

I have got together all the bits I should need and given it a go.... (This is a guide only and I am not responsible for any probs if you give it a go!)

The Cruise Control Kit:


I'm not sure how the pics will upload so I may have to post in bits... and maybe it should be moved to a New Thread...
The Kit is:
1. AP900C (the C part means the Module is switchable between analogue and CAN systems - therefore suggest getting the C version as it does both.)
2. Command Module CM35 - Stalk with 2 memory function
3. Main Loom (standard with the kit)
4. Throttle pedal T Harness / Loom (Specific for the Panda but also does 500) Part No. 190-5002380
5. A OBDII Lead from Ebay (with a 90Degree outlet so it fits neatly behind dash panel) Plan to cut it in half and then just have the wires for Pin 6 & 14 CAN comms.
 

Attachments

  • Kit Start.jpg
    Kit Start.jpg
    74.3 KB · Views: 87
Last edited:
I next looked at the Stalk location and decided on trying to fit it on the lower Steering cowling as it looked the best option as clearance behind the cowling also.
Had to drill a suitable Dia 10mm hole. (I bought a second hand cowling from Ebay but it was a different design to mine - maybe an earlier model so was no good anyway. Although it did use it to mock up and try the stalk mounting)
The flat cable could be tucked behind the polystyrene padding.


The lower cowling is removed first (3 Screws for underneath and then some awkward clips holding the top and lower ones together) then there are two screws holding the top cowl in place fixed from the under side.
I also had to cut away some of the strengthening web where the stalk nut was (used a small craft knife).
 

Attachments

  • Top Cowl Screws.png
    Top Cowl Screws.png
    411.5 KB · Views: 61
  • Stalk.jpg
    Stalk.jpg
    62.5 KB · Views: 63
  • Marking Hole.jpg
    Marking Hole.jpg
    59.3 KB · Views: 59
Last edited:
Next I looked for a good place for the CC AP900C Module..


There is a metal brace over the Fuse Box so I removed this brace, by drilling out the two rivets holding it, and drilled some holes for the module and also four others for some cable ties to hold the mass of wires on the main loom.
I also moved the OBDII socket up out of the way so I could get better access.
 

Attachments

  • AP900 Location.png
    AP900 Location.png
    418.9 KB · Views: 52
  • AP900 Mounting.png
    AP900 Mounting.png
    256.4 KB · Views: 51
Last edited:
Next I modified the OBDII Lead to attach to the AP900C Loom...
I used a Multimeter to identify pin outs 6 & 14 and cut off the rest.
 

Attachments

  • OBDII Cable Meter.jpg
    OBDII Cable Meter.jpg
    97.9 KB · Views: 41
  • Finished OBDII Cable.jpg
    Finished OBDII Cable.jpg
    79.1 KB · Views: 36
Back
Top