

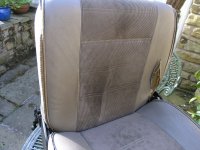
Ok it takes a battering more than any other part of the car... the seat. Or to be precise the drivers seat. Ripped vinyl can spoil anyone's holiday but there is hope... in the shape of someone's passenger seat.
So here's a quick informational broadcast.
Step 1. remove the seats from your panda (sisley or other), you may be able to do this in the car but i think it'll be hell.
Step 2. make sure you've got a selection of flat Screw drivers and a set of garden furniture to work on, failing that any table will probably do but avoid doing this during the family supper if your choice is the dining table.
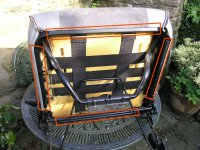
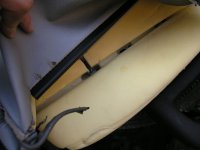
Step 3. Assess the situation. the bottom cover is held in place by 4 plastic 'u' shaped wide clips as highlighted below. I would personally recommend leaving the rear clip until last as it's the strongest and it has a securing clip to make sure it doesn't move.
step 4. start one end of the plastic clip by inserting the flat screw driver and twisting so that the clip can be pulled away and over the securing tooth. there are 3 on the left and right and 4 smaller ones on the front. Using either a careful application of the screw driver or using your fingers continue along the clip until the entire length of the clip is clear of the frame. left and right are the same and kinda tough and care should be taken not to over stress the plastic and cause it to snap in the middle when bending open.
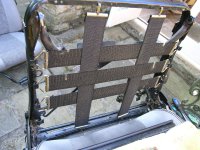
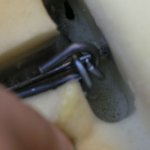
Step 5. The rear Clip is held in place by 2 clips. the larger outer one is there to make sure the clip stays in place even with your passengers kicking the driver in the arse all the time. this would be a daunting task but someone has kindly left one of the bars across the back of the seat frame to use as a rest for a screwdriver. Using 2 screw drivers first start one end and open it up... then use the second and secure the gap, then repeat the process a little further down until you have clear the whole length.
Step 6. Spending all the loot from the back of the seat.
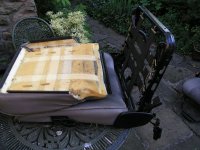
*Hint* If you are removing a damaged seat cover try to remove the whole cover and sponge unit together as there is a positioning bar in the foam that holds the cover in place so it doesn't sag. you could remove the cover but i suspect that most covers get over stressed and rip because the foam beneath has become damaged and isn't supporting the fabric and drivers bottom at all well anyway... So if possible just change the whole unit.
So here's a quick informational broadcast.
Step 1. remove the seats from your panda (sisley or other), you may be able to do this in the car but i think it'll be hell.
Step 2. make sure you've got a selection of flat Screw drivers and a set of garden furniture to work on, failing that any table will probably do but avoid doing this during the family supper if your choice is the dining table.
Step 3. Assess the situation. the bottom cover is held in place by 4 plastic 'u' shaped wide clips as highlighted below. I would personally recommend leaving the rear clip until last as it's the strongest and it has a securing clip to make sure it doesn't move.
step 4. start one end of the plastic clip by inserting the flat screw driver and twisting so that the clip can be pulled away and over the securing tooth. there are 3 on the left and right and 4 smaller ones on the front. Using either a careful application of the screw driver or using your fingers continue along the clip until the entire length of the clip is clear of the frame. left and right are the same and kinda tough and care should be taken not to over stress the plastic and cause it to snap in the middle when bending open.
Step 5. The rear Clip is held in place by 2 clips. the larger outer one is there to make sure the clip stays in place even with your passengers kicking the driver in the arse all the time. this would be a daunting task but someone has kindly left one of the bars across the back of the seat frame to use as a rest for a screwdriver. Using 2 screw drivers first start one end and open it up... then use the second and secure the gap, then repeat the process a little further down until you have clear the whole length.
Step 6. Spending all the loot from the back of the seat.
*Hint* If you are removing a damaged seat cover try to remove the whole cover and sponge unit together as there is a positioning bar in the foam that holds the cover in place so it doesn't sag. you could remove the cover but i suspect that most covers get over stressed and rip because the foam beneath has become damaged and isn't supporting the fabric and drivers bottom at all well anyway... So if possible just change the whole unit.
")