ever get the tacho working?


You are using an out of date browser. It may not display this or other websites correctly.
You should upgrade or use an alternative browser.
You should upgrade or use an alternative browser.
General And so it begins MK2
- Thread starter Harllequin
- Start date
Currently reading:
General And so it begins MK2
OP
OP
Harllequin
Member
One rule about Tacho. We dont talk about the tacho :bang:
I'll take that as a no then")
I'm off tomorrow....
I'm off tomorrow....
OP
OP
Harllequin
Member
I'm about to set off for Bristol where I'll be stuck untill tomorroe at 5pm
Alas this month is a busy one for work. I'm all over the country.
Alas this month is a busy one for work. I'm all over the country.
ah well, happy globetrotting
OP
OP
Harllequin
Member
Well I think thats al the tin worm dead that needs to be.
I'm all ready for the re-spray. I think I'll wait a month or 2 to make sure nothing is going to blister up or show through then it's a full strip and spray.
Dont worry though I'm not going to do an ARG mk2 This time its going to remain the colour it is now
I took the pic from the spare room window so I could get the roof in as well
Attachments

OP
OP
Harllequin
Member
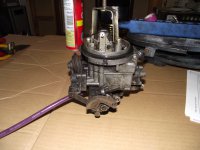
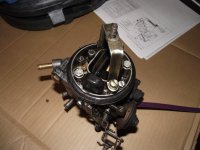
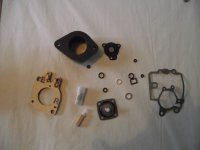
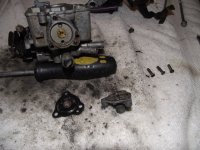
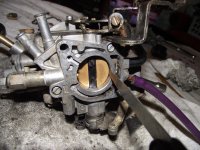
Got the Carb repair kit today.
To recap.
BEX has not been a nice little car to keep running.
Problems were this: -
Would run well on choke.
Once hot would run OK but not the best.
Turn on the head lights and it would run poorly.
I changed the plugs, leads, rotor arm, Dizzy cap, coil, connection to the coil, earths, alternator. All in that order. (note to self, get the hedgehog pics onto this post)
It still ran like a bag of
That now points me in the direction of the carb so I ordered a refurb kit.
I'll be taking it off the car tomorrow. I noticed the Haynes have a good section on overhaul. If any of you guys want any more pics of the carb in bits please let me know now and I'll add them while I do the re furb.
Failing a request for pics I'll just post up my random set as I crack on with it.
Tacho working yet?:devil:
OP
OP
Harllequin
Member
It workes great until the car gets hot, then I think it gets tired and needs a bit of a rest as it rests its little white needle back on the return stop.
:bang:
OP
OP
Harllequin
Member
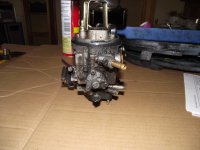
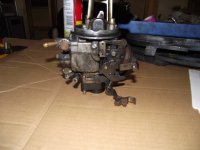
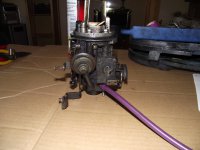
Picture heavy bit again
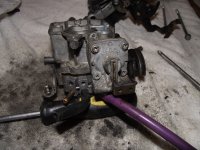
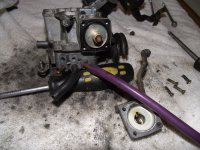
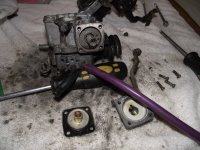
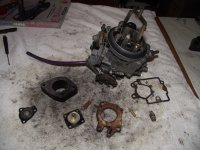
Well the carb was not actually that bad to do. While I had it in bits I gave the whole thing a good clean with carb cleaner.
Adjusted the fast idle and the float level. Put it all back on and then re setup the mixture. I've not had the car very far since so I'll not tempt fate.
IT DID HOWEVER MAKE IT ALL THE WAY TO THE MOT STATION AND PASSED WITH NO ADVISORIES :slayer: :worship: :nerner:
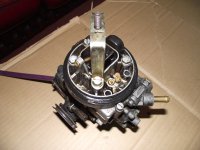
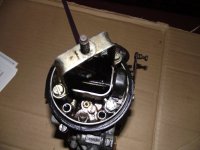
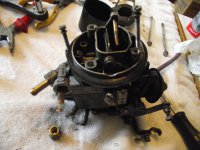
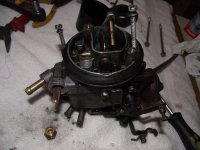
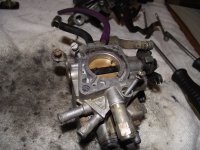
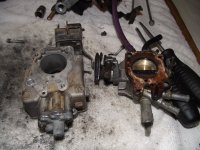
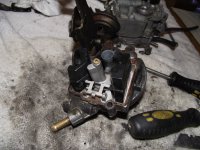
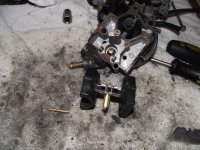
Anyway pics bit now. I've included a pic of all the bits that came in the kit.
Also included pics of all around the carb in case anyone wants to look at it before they have a go.
I'll post the pics later the uploader seems to be poorly.
Well the carb was not actually that bad to do. While I had it in bits I gave the whole thing a good clean with carb cleaner.
Adjusted the fast idle and the float level. Put it all back on and then re setup the mixture. I've not had the car very far since so I'll not tempt fate.
IT DID HOWEVER MAKE IT ALL THE WAY TO THE MOT STATION AND PASSED WITH NO ADVISORIES
:slayer: :worship: :nerner:Anyway pics bit now. I've included a pic of all the bits that came in the kit.
Also included pics of all around the carb in case anyone wants to look at it before they have a go.
I'll post the pics later the uploader seems to be poorly.
OP
OP
Harllequin
Member
Here we go a few pics
Attachments
-
 DSCF9932.JPG2.8 MB · Views: 26
 -
 DSCF9933.JPG2.6 MB · Views: 24
 -
 DSCF9934.JPG2.5 MB · Views: 25
 -
 DSCF9935.JPG2.8 MB · Views: 22
 -
 DSCF9936.JPG2.5 MB · Views: 23
 -
 DSCF9937.JPG2.5 MB · Views: 18
 -
 DSCF9938.JPG2.6 MB · Views: 27
 -
 DSCF9939.JPG1.9 MB · Views: 20
 -
 DSCF9940.JPG1.9 MB · Views: 19
 -
 DSCF9941.JPG2.9 MB · Views: 20
 -
 DSCF9942.JPG2.2 MB · Views: 24
 -
 DSCF9943.JPG2.6 MB · Views: 23
 -
 DSCF9944.JPG2.9 MB · Views: 18
 -
 DSCF9945.JPG3.1 MB · Views: 23
 -
 DSCF9946.JPG3.3 MB · Views: 16
 -
 DSCF9947.JPG3.2 MB · Views: 19
 -
 DSCF9948.JPG3 MB · Views: 22
 -
 DSCF9949.JPG3.1 MB · Views: 18
 -
 DSCF9950.JPG3.1 MB · Views: 11
 -
 DSCF9951.JPG2.3 MB · Views: 15
 -
 DSCF9952.JPG3.1 MB · Views: 18
 -
 DSCF9953.JPG3.3 MB · Views: 14
OP
OP
Harllequin
Member
Well the cylinder head went again on BEX, good one this time, burned through th gasket AND the head!!
Well I thought, thats ok since I've got that other panda in the garage to restore I'll just take the engine and gearbox unit from that one and swap it over
WRONG!!!!!
That engine was shot as well. Ran on on the other car but the lack of an exhaust masked quite nicely the fact that it was running like a bag of hammers!!!
I've stripped it down to discover one of the valves has got a nice V cut in it and the stem oil seal is shot!! This will explain the bad fouling of the plug.
So I've stripped it all down and the head is now in the old dishwasher in the garage
The rebuild will start once the cycle has finished :devil:
The broken valve is now in my old cylinder head just to keep everything together
Well I thought, thats ok since I've got that other panda in the garage to restore
I'll just take the engine and gearbox unit from that one and swap it over WRONG!!!!!
That engine was shot as well. Ran on on the other car but the lack of an exhaust masked quite nicely the fact that it was running like a bag of hammers!!!
I've stripped it down to discover one of the valves has got a nice V cut in it and the stem oil seal is shot!! This will explain the bad fouling of the plug.
So I've stripped it all down and the head is now in the old dishwasher in the garage
The rebuild will start once the cycle has finished :devil:
The broken valve is now in my old cylinder head just to keep everything together
Attachments

OP
OP
Harllequin
Member
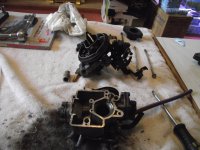
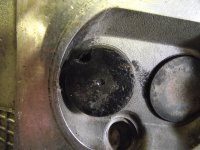
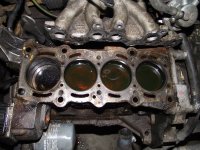
Well since no quick engine swap was going to get BEX going again I decided to do a full check up and rebuild where needed.
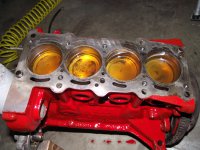
First off the engine block. The one from The Grey (new project panda) had problems with the block, the first pic is of the block still in BEX, the cylinders had been part filled with oil and as you can see the NO.1 cylinder had a leak.
So I cleaned up BEX's old block and painted it ready to go in while I ran the same test. So far so good no oil loss
Attachments
OP
OP
Harllequin
Member
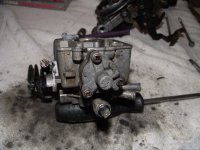
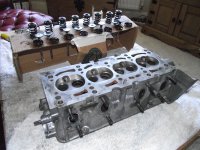
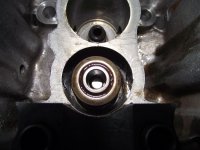
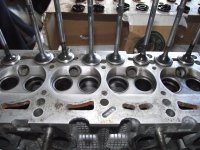
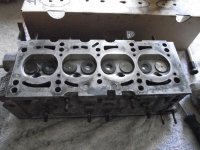
OK time to move onto the head.
Since one of the valves was broken from the engine in The Grey I used a valve from BEX's old head. While doing this I decided to decoke the head and re grind the valves and change the valve stem oil seals.
Stripping the head out was easy enough. Knowing I didn't want to miss place stuff I made a cardboard holder for everything. Once it was all stripped out the old dishwasher in the garage got its first work out.
Filled with degreaser I set it on pots and pans wash and went for a beer :slayer:
Bloody good job it did of cleaning the head up.
Next I used my bench grinder to clean all the build up crap from the valves themselves. Took a while to do but well worth it, there must have been at least 2mm of crap to take off from some of the valves!!
The first pic is of what I used to take the head appart and the second is my cardboard stand and post dishwasher head.
Attachments

Dishwasher for cleaning engine parts eh! Right, next time Barbara's out at art class....:devil:
OP
OP
Harllequin
Member
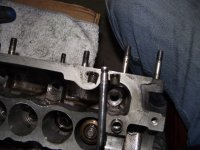
I didn’t get any pics of changing the valve stem oil seals sorry
All it took was pulling / chiselling the old ones off and pushing the new ones on and home with a 10mm deep reach socket.
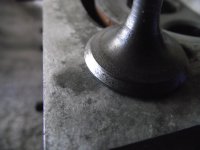
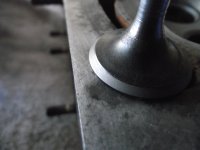
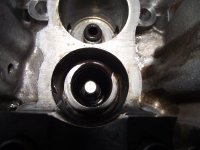
Grinding in the valves is a slow job but well worth the time and effort.
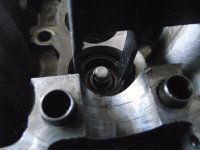
The first pic is of the valve with the crap cleaned from it and ready to be ground in.
The second pic is me grinding the valve into place. All you need is a valve grinding tool, sounds really flash but all it is, is a dowel with a sucker on the end, the same tool you use to lift the guides out. Stick the valve onto the sucker, apply the grinding paste and with the valve in place apply a little bit of downward force and twizzle the dowel between your hands. Use the coarse paste first then the fine one.
The third pic is of the ground valve all nice and smooth like. You should use an engineers marker to check the seat but I didn’t have any so used the soot from a paraffin lamp as you would a gun mechanism to ensure the valve and seat were all ground in. if any marker / soot remain after you twizzle the valve in the seat then you need to grind a bit more.
Do that for all the valves. Great job to do in front of the TV, took me 2 pints and an episode and a half of the gadget show (minus the adverts)
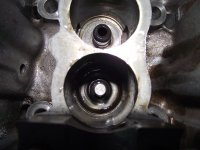
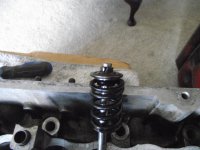
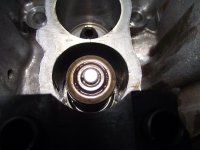
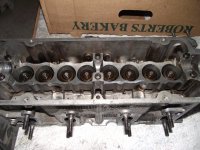
Next put it all back together. Pics 4 to 9 are the valve bits going back in.
Pics 10 and 11 are how the collet pins go into place on the valve stem.
Pic 12 is a line up of the ground in valves next to their seats.
Pics 13 and 14 are of the valves all back in place with springs.
Pic 15 is the re assembled head ready to check the clearances.
:yum:
All it took was pulling / chiselling the old ones off and pushing the new ones on and home with a 10mm deep reach socket.
Grinding in the valves is a slow job but well worth the time and effort.
The first pic is of the valve with the crap cleaned from it and ready to be ground in.
The second pic is me grinding the valve into place. All you need is a valve grinding tool, sounds really flash but all it is, is a dowel with a sucker on the end, the same tool you use to lift the guides out. Stick the valve onto the sucker, apply the grinding paste and with the valve in place apply a little bit of downward force and twizzle the dowel between your hands. Use the coarse paste first then the fine one.
The third pic is of the ground valve all nice and smooth like. You should use an engineers marker to check the seat but I didn’t have any so used the soot from a paraffin lamp as you would a gun mechanism to ensure the valve and seat were all ground in. if any marker / soot remain after you twizzle the valve in the seat then you need to grind a bit more.
Do that for all the valves. Great job to do in front of the TV, took me 2 pints and an episode and a half of the gadget show (minus the adverts)
Next put it all back together. Pics 4 to 9 are the valve bits going back in.
Pics 10 and 11 are how the collet pins go into place on the valve stem.
Pic 12 is a line up of the ground in valves next to their seats.
Pics 13 and 14 are of the valves all back in place with springs.
Pic 15 is the re assembled head ready to check the clearances.
:yum:
Attachments
-
 Valve to be ground.JPG2.5 MB · Views: 16
 -
 Valve ground.JPG2.5 MB · Views: 21
 -
 valve assembly 4.JPG2.7 MB · Views: 18
 -
 valve assembly 3.JPG2.6 MB · Views: 16
 -
 valve assembly 2.JPG2.4 MB · Views: 18
 -
 valve assembly 1.JPG2.8 MB · Views: 18
 -
 Grinding the valve.JPG2.7 MB · Views: 19
 -
 All valves ground.JPG2.1 MB · Views: 17
 -
 Collet pins.JPG2.5 MB · Views: 13
 -
 Collet pins off.JPG3.4 MB · Views: 16
 -
 valve assembly 6.JPG2.4 MB · Views: 15
 -
 valve assembly 5.JPG2.7 MB · Views: 16
 -
 All valves in place 1.JPG2.8 MB · Views: 25
 -
 All valves in place 2.JPG2.7 MB · Views: 20
 -
 Head finished.JPG2.4 MB · Views: 20
OP
OP
Harllequin
Member
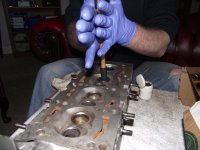
Lastly for today I checked the valve clearances following the re grinding.
Order from 1 to 4 E= Exhaust, I= Inlet E should be 0.40 I should be 0.30 +/_ 0.05
1/ E0.40 I0.20
2/ E0.50 I0.35
3/ E0.40 I0.30
4/ E0.50 I0.45
That would have sounded very good while running I bet.
I took the shims out and the ons from the other head and now BEX's head has the following.
1/ E0.38 I0.27
2/ E0.40 I0.30
3/ E0.40 I0.32
4/ E0.43 I0.27
With that all done it's just time to wait to see if the oil does not drain from the block and hope the clutch kit comes tomorrow to get it all back together
Great thread very useful!
Now probably a stupid question but can you not mount the dowel in an electric drill to do grinding? Or is that a bit too imprecise?
Also I see the base of some of the valves are pretty pitted. At what point should the valves be replaced?
Now probably a stupid question but can you not mount the dowel in an electric drill to do grinding? Or is that a bit too imprecise?
Also I see the base of some of the valves are pretty pitted. At what point should the valves be replaced?
OP
OP
Harllequin
Member
Mounting in a drill would be a bit too severe. You can 'Feel' it better while doing it by hand
The base of the valves are not too important on these engines, its not like you need to worry too much about detonation like you would on a turboed car
The main bits you need lovely and polished are the faces that come together.
The base of the valves are not too important on these engines, its not like you need to worry too much about detonation like you would on a turboed car
The main bits you need lovely and polished are the faces that come together.
OP
OP
Harllequin
Member
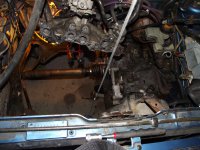
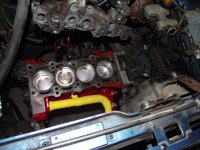
Well today I swaped the block out, I didnt want to drop the whole unit so thought I'd give spliting the block from the box and see how it goes.
Well it came out not too bad at all. I had to take the alternator pully off for a bit more room then slide the box out of the gearbox. All in all not a bad couple of hours
Tomorrow I'll put it all back together and free the garage up again :slayer:
Well it came out not too bad at all. I had to take the alternator pully off for a bit more room then slide the box out of the gearbox. All in all not a bad couple of hours
Tomorrow I'll put it all back together and free the garage up again :slayer:
Attachments
Similar threads
- Replies
- 11
- Views
- 593
- Replies
- 0
- Views
- 254
- Replies
- 19
- Views
- 714