Okay, this will be a short compilation of information i dug up when i did my rear disc brake conversion. This is merely a guide that should point you in the right direction, and explains how i did the conversion myself, so use it as a list of pointers, not as an official service procedure manual. I don't guarantee the procedures here are safe, that they won't destroy your car, kill you, burn your car or anything like that. Always pay attention to what you do and use common sense, you're dealing with the brakes here, and they are the most important part of the car because they stop you before you go into that tree. Read this guide and use these informations at your own risk and responsibility. Always triple check the parts before you buy them and don't blame me if you buy the wrong parts. If you have the slightest doubt you can do this, then don't do this. If you see i said something wrong in here, please report it to me so i can fix it.
You should see this as just another online resource that could help you, but could harm you if anything written in it is wrong. Act accordingly.
First off, you'll need to set aside a lot of time for preparations and research. Once you have all the needed parts, you will be looking at one to a few days labour if you're doing it yourself with the appropriate tools, depending on the skills and experience you have and some other factors such as luck
As far as parts are concerned, i'll try to break it down into several categories:
- Calipers
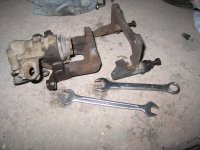
I did my conversion using two rear calipers that the breaker told me came off a uno turbo, but apparently came from a Marea. To the best of my knowledge, you could use calipers from:
Marea 2.0 or 2.4TD
Tipo 2.0
Tempra 2.0
Alfa 155 1.8
The important thing to note is that you will need REAR calipers. In theory, front calipers could be used, but they don't have a handbrake mechanism, so you will need rear ones.
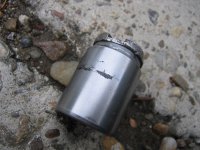
Once you source the calipers, they might need some repairs/refurbishing (unless you bought refurbed or new calipers). Basically, the only thing that must be preserved in the caliper is the brake piston. If it has any deep scratches (ESPECIALLY if the scratches run down the length of the caliper), you're boned, and you'll probably need to buy another piston (rare to find) or buy an another caliper and hope you have more luck with it.
example of a "totaled" piston:
If repairing them yourself, you should replace all the rubber ring things, and it can take a few days to find those parts and carry out the repairs.
- Mounting plates
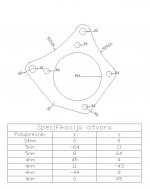
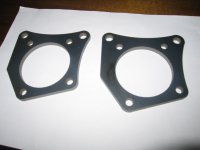
You will need a way to mount the calipers to the car. So, you should go out and buy a uno turbo mounting plate. If you can't find it (my case ), you'll have to make your own. I'll include the "technical" drawing here for reference. You can use it to order water-cut plates like i did or go for some other cutting technique. Mine were 6mm thick and work allright. Sorry for the non-english version, but "Specifikacija otvora" means drilling positions, and "Poluprecnik" means radius. That was pretty much all that the water-cut guys needed from me
- Brake pads
Order original uno turbo pads or go aftermarket
- Brake discs
You'll need original uno turbo rear disks or equivalent. These are 227mm in diameter and fit a range of fiat cars, you shouldn't have a problem sourcing those.
- Brake hoses
I've had those custom made for me. You should take your own measurements, but just for reference, mine were 45cm in length, male connectors on both ends.
- Bolts
Well, the bolts you'll need are M10, but you should go for shorter ones, i think 25mm length would be fine with a washer. You'll need 4 of those, 2 for each side. The bolts that keep the mounting plate to the car are already there, holding the drum. You can reuse those on your mounting plate. The bolts should be long enough to go through both the mounting plate and the caliper, but not all the way through (or else it will contact the disk). Would be best to find a bolt that's exactly the length of width of mounting plate + width of the flat mounting part of the caliper. In reality, you'll need a longer screw and a washer probably.
- Hubs
I used uno turbo hubs instead of the cento hubs. If you go for cento hubs, you'll need a spacer, but i didn't go that route so i can't help you much. UT hubs are a bolt on replacement.
- Handbrake cable
This is something i still haven't solved, but it shouldn't be a hard task. I reused the sei cable, but cut around 5-10cm of the cable guide (leaving the cable inside intact) so the cable guide is a little shorter. An alternative would be to ask for a seicento handbrake cable, just 5-10 cm longer.
The procedure outlined:
Jack up the car, put it (the side you'll be working on) on an axle stand or something similar, remove the wheel. undo the 2 bolts keeping the drum in place (and keep them, you'll need them later), remove the drum.
Under it you'll see the drum brake mechanism and the hub. Undo the hub nut (you'll need a 30mm hub tool for that) - these are very tight so pay attention, you don't want to injure yourself...make sure the axle stand is stable enough (i used large chunks of wood so my support was rock solid, but if you think your axle stand won't be up to the task, try loosening the nut a little with the car on the ground and the wheel on and finish the job with the car on the stand). Many people recommend that you always use new hub nuts. You could reuse it on your own responsibility, but you should definitely reuse the small washer that sits between it and the hub. Remove the hub carefully. Best way is to reach with your hand behind it and find where it sits on the small axle thing and push on that so you don't damage the bearings. Remove 3 of the 4 bolts that bolt the drum mechanism to the car and keep them (you will reuse them in about 10 minutes).
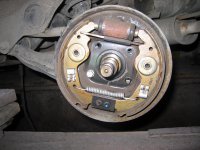
Drum, hub and 3 bolts removed:
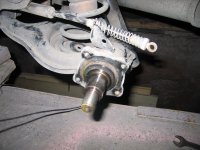
Remove the handbrake cable from the drum mechanism. What i did in my case was remove the part of the brake line that is on the rear suspension arm. Disconnect it and remove the last bolt keeping the drum mechanism, then remove the drum mechanism from the car.
Drum mechanism and slave brake cylinder removed:
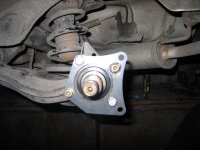
(Warning: brake fluid leaks from the system at this time, you might want to catch it into some sort of a container and dispose of it when you're done). Bolt on the mounting plate where the drum mechanism used to be using the 4 bolts you just recovered.
Mounting plate bolted:
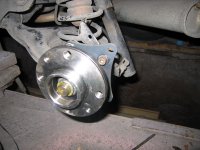
Put some grease on the short axle thingy and put the UT hub on. You should ask someone more experienced if you've never replaced a hub before. Re-use the washer you removed when you removed your old hub and tighten it using a new hub nut. It will take a lot of force to tighten it, again, consult someone more experienced to tell you just how tight to go.
New hub on:
When the new hub is on, put the new disk over the hub and secure it using the two smaller screws you recovered when you removed the drum. (TIP: before you screw in the smaller two screws, first screw in 2 wheel bolts to help you center the disk. Tighten them real good, screw in those 2 smaller screws, then undo the wheel bolts.)
Now for the hydraulics. (you can do this part first so the brake fluid doesn't leak all the time after removing the drum) Since i had brake hoses with two male connectors, i had to first screw in the hose into the caliper, and then screw the other part into the rest of the brake system, while rotating the caliper (the caliper was actually hanging off the hose in the process).
Pic:
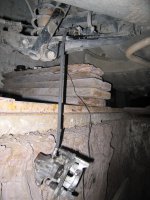
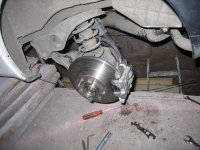
After you do that, make sure the piston is in the fully retracted position. If it isn't, use a piston compressing tool (which you don't have, so you'll have to lightly hammer it in with the aid of an extension like i did or use a crimp ). Put in the brake pads and then position the caliper on the disk, over the mounting plate, and screw in the upper bolt so that the caliper can rotate around it (don't tighten it completely). Bleed the system with the calipers rotated at such an angle so that the bleeding valve sits at the highest position. Bolt in the lower screw after you do it. Use washers if the screws are too long and contact the disk on the other side.
As far as the handbrake goes: my handbrake cable was too short (some people suggest that you can in fact use the cable already on the car, but i'd go and buy a cable that's 5-10cm longer than the factory made one). The temporary solution i had was to cut a part of the metal cable guide and that did the trick. You should cut the hoops on the cable ends so they can pass through the mounting hole in the caliper and run them to the handbrake mechanism on the caliper. You might need to play with the handbrake adjustment screw, but i think there is already a guide on how to that.
Re-fit the wheel, lower the car to the ground and test the brakes at low speeds first, and see that your handbrake works before going for a street test. Use common sense and be very careful. If possible, find a long stretch of asphalt with no traffic on it (i used a deserted road where there's nobody around) and bed in the brakes, and test them with high speed braking after the disks and pads are bed in. You want to be sure you can stop the car from 100kmph before going any faster than that. Be careful, the car might oversteer if you upgraded only the rear brakes (but it didn't in my case).
Excuse my English, it's not my native language, so i might have messed up some tech terms.
Have fun and before you actually do any of this, go back and read the introductory warning

You should see this as just another online resource that could help you, but could harm you if anything written in it is wrong. Act accordingly.
First off, you'll need to set aside a lot of time for preparations and research. Once you have all the needed parts, you will be looking at one to a few days labour if you're doing it yourself with the appropriate tools, depending on the skills and experience you have and some other factors such as luck
As far as parts are concerned, i'll try to break it down into several categories:
- Calipers

I did my conversion using two rear calipers that the breaker told me came off a uno turbo, but apparently came from a Marea. To the best of my knowledge, you could use calipers from:
Marea 2.0 or 2.4TD
Tipo 2.0
Tempra 2.0
Alfa 155 1.8
The important thing to note is that you will need REAR calipers. In theory, front calipers could be used, but they don't have a handbrake mechanism, so you will need rear ones.
Once you source the calipers, they might need some repairs/refurbishing (unless you bought refurbed or new calipers). Basically, the only thing that must be preserved in the caliper is the brake piston. If it has any deep scratches (ESPECIALLY if the scratches run down the length of the caliper), you're boned, and you'll probably need to buy another piston (rare to find) or buy an another caliper and hope you have more luck with it.
example of a "totaled" piston:

If repairing them yourself, you should replace all the rubber ring things, and it can take a few days to find those parts and carry out the repairs.
- Mounting plates
You will need a way to mount the calipers to the car. So, you should go out and buy a uno turbo mounting plate. If you can't find it (my case


- Brake pads
Order original uno turbo pads or go aftermarket
- Brake discs
You'll need original uno turbo rear disks or equivalent. These are 227mm in diameter and fit a range of fiat cars, you shouldn't have a problem sourcing those.
- Brake hoses
I've had those custom made for me. You should take your own measurements, but just for reference, mine were 45cm in length, male connectors on both ends.
- Bolts
Well, the bolts you'll need are M10, but you should go for shorter ones, i think 25mm length would be fine with a washer. You'll need 4 of those, 2 for each side. The bolts that keep the mounting plate to the car are already there, holding the drum. You can reuse those on your mounting plate. The bolts should be long enough to go through both the mounting plate and the caliper, but not all the way through (or else it will contact the disk). Would be best to find a bolt that's exactly the length of width of mounting plate + width of the flat mounting part of the caliper. In reality, you'll need a longer screw and a washer probably.
- Hubs
I used uno turbo hubs instead of the cento hubs. If you go for cento hubs, you'll need a spacer, but i didn't go that route so i can't help you much. UT hubs are a bolt on replacement.
- Handbrake cable
This is something i still haven't solved, but it shouldn't be a hard task. I reused the sei cable, but cut around 5-10cm of the cable guide (leaving the cable inside intact) so the cable guide is a little shorter. An alternative would be to ask for a seicento handbrake cable, just 5-10 cm longer.
The procedure outlined:
Jack up the car, put it (the side you'll be working on) on an axle stand or something similar, remove the wheel. undo the 2 bolts keeping the drum in place (and keep them, you'll need them later), remove the drum.
Under it you'll see the drum brake mechanism and the hub. Undo the hub nut (you'll need a 30mm hub tool for that) - these are very tight so pay attention, you don't want to injure yourself...make sure the axle stand is stable enough (i used large chunks of wood so my support was rock solid, but if you think your axle stand won't be up to the task, try loosening the nut a little with the car on the ground and the wheel on and finish the job with the car on the stand). Many people recommend that you always use new hub nuts. You could reuse it on your own responsibility, but you should definitely reuse the small washer that sits between it and the hub. Remove the hub carefully. Best way is to reach with your hand behind it and find where it sits on the small axle thing and push on that so you don't damage the bearings. Remove 3 of the 4 bolts that bolt the drum mechanism to the car and keep them (you will reuse them in about 10 minutes).
Drum, hub and 3 bolts removed:

Remove the handbrake cable from the drum mechanism. What i did in my case was remove the part of the brake line that is on the rear suspension arm. Disconnect it and remove the last bolt keeping the drum mechanism, then remove the drum mechanism from the car.
Drum mechanism and slave brake cylinder removed:

(Warning: brake fluid leaks from the system at this time, you might want to catch it into some sort of a container and dispose of it when you're done). Bolt on the mounting plate where the drum mechanism used to be using the 4 bolts you just recovered.
Mounting plate bolted:

Put some grease on the short axle thingy and put the UT hub on. You should ask someone more experienced if you've never replaced a hub before. Re-use the washer you removed when you removed your old hub and tighten it using a new hub nut. It will take a lot of force to tighten it, again, consult someone more experienced to tell you just how tight to go.
New hub on:

When the new hub is on, put the new disk over the hub and secure it using the two smaller screws you recovered when you removed the drum. (TIP: before you screw in the smaller two screws, first screw in 2 wheel bolts to help you center the disk. Tighten them real good, screw in those 2 smaller screws, then undo the wheel bolts.)
Now for the hydraulics. (you can do this part first so the brake fluid doesn't leak all the time after removing the drum) Since i had brake hoses with two male connectors, i had to first screw in the hose into the caliper, and then screw the other part into the rest of the brake system, while rotating the caliper (the caliper was actually hanging off the hose in the process).
Pic:

After you do that, make sure the piston is in the fully retracted position. If it isn't, use a piston compressing tool (which you don't have, so you'll have to lightly hammer it in with the aid of an extension like i did or use a crimp

As far as the handbrake goes: my handbrake cable was too short (some people suggest that you can in fact use the cable already on the car, but i'd go and buy a cable that's 5-10cm longer than the factory made one). The temporary solution i had was to cut a part of the metal cable guide and that did the trick. You should cut the hoops on the cable ends so they can pass through the mounting hole in the caliper and run them to the handbrake mechanism on the caliper. You might need to play with the handbrake adjustment screw, but i think there is already a guide on how to that.
Re-fit the wheel, lower the car to the ground and test the brakes at low speeds first, and see that your handbrake works before going for a street test. Use common sense and be very careful. If possible, find a long stretch of asphalt with no traffic on it (i used a deserted road where there's nobody around) and bed in the brakes, and test them with high speed braking after the disks and pads are bed in. You want to be sure you can stop the car from 100kmph before going any faster than that. Be careful, the car might oversteer if you upgraded only the rear brakes (but it didn't in my case).
Excuse my English, it's not my native language, so i might have messed up some tech terms.
Have fun and before you actually do any of this, go back and read the introductory warning

