After weeks of fruitless searching I eventually found a dealer who said he could supply Marea masks.  So I sent off my money and waited impatiently for them to arrive.
When the package finally arrived I opened it expectantly....only to find standard RGM Bravo/a masks. :bang:
After contemplating driving to Sunderland to stick them down someones throat -> :dead: I felt a project come on. :idea:
So I sent off my money and waited impatiently for them to arrive. When the package finally arrived I opened it expectantly....only to find standard RGM Bravo/a masks. :bang:
After contemplating driving to Sunderland to stick them down someones throat -> :dead: I felt a project come on. :idea:
Items Required
Items required:
- Small GRP kit
- Plastic Primer
- Hi-build Primer
- Paint
- Clear Lacquer (for metallic paints)
- Old cereal packet or similar
- Clear plastic bag (I used the one the masks came in)
- Masking tape
- P38
- Wet n Dry (400 and 1200)
- Body files or similar
- A sense of humour
From the Beginning
This is an old project and I never thought about taking any pics until I'd already moved the central headlight pillar, so no photo's on the marking and measuring.
- Place the masks on the car and mark out the position of the Marea lights.
- Cut out the pillar between the main beam and the headlights and slide it along to frame the main beam.
- Hold the pillar in place with some masking tape while you fix it in place permanently with some GRP on the inside.
.JPG")
Indicator
Next I opened out the indicator holes. I would have liked to make them a bit bigger but decided to keep a bit of the existing plastic in place to brace the next lot of GRP.
.JPG")
It worked out ok as you can still see the indicators from the front.
Headlight
Now I had to fill in the centre hole to frame the smaller Marea headlight.
I used the poly bag with the thin card from a box of shreddies to make a simple mould.
.JPG")
That left me with some GRP to work with. (If you are wondering why its blue I used a brush with some 'old & dry' blue engine lacquer on it.
).JPG")
I then opened it out to the basic shape. The picture below shows a test.
.JPG")
Final Preparation
The picture below shows the masks with the new headlight layout and a small cutout at the top filled in. I have also put on a coat of P38.
.JPG")
Next comes the bit where you need to put a bit of effort in. Smoothing down the P38 and final shaping of the holes. You may find you have to apply a couple of coats of P38 to get it just right.
.JPG")
Painting
1. Apply a couple of coats of plastic primer and smooth.
.JPG")
2. Then its a few coats of Hi-build smoothing after every second coat.
.JPG")
3. Same again for the colour coat.
.JPG")
4. ...and for the clear lacquer.
.JPG")
5. The lacquer has to go on within 24 hours of of the colour coat. It is only necessary if you are using metallic paint, but you can use it for a deeper shine with non-metallics.
6. After the final coat of lacquer give it a couple of days to set. You can then give it a final flattening with 1200 wet n dry followed by a polish with 'T Cut' or other polishing paste.
.JPG")
Fitting
The picture below shows the masks polished, waxed and ready to fit.
.jpg")
I fixed them in place using the adhesive supplied and black silicone. They are shown being held in place with tape and bits of my hedge.
.JPG")
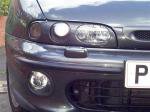
The Finished Item
I fitted my masks too soon after painting them and there was some wear where the bonnet touched them. So, if you can wait that long, give it a couple of weeks before fitting them.
Close up of one mask fitted.
.jpg")
Showing off the masks one year on at Skegness.

They have survived my driving and numerous car washes when I've been feeling lazy.