Disclaimer:
This guide is designed to give you an idea of how the brake change process goes. Incorrectly done brakes could lead to premature failure or failure to work causing an accident.
You do your own brakes at your own risk
I am not accepting any responsibility to any damage or injury that is caused to you or the property. If you are unsure about your capabilities of doing the brakes, then you should seek professional help.
As mentioned above, this is a Guide to show you what occurs on a brake change. Your work is your own risk
Also Never Replace One side of pads or disc – always do them in pairs
So if 1 side needs new pads – both sides must be done
If 1 side Needs a new disc, you need 2x discs and a new set of pads
Brake Fluid is corrosive to bodywork - it must be rised off quickly with plenty of water to prevent damage to the bodywork
Brake Fluid is also harmful to the Human Body, follow the precautions on the Bottle of Brake Fluid
or google how to handle brake fluid
Avoid contact with eyes, cuts, sores and digestion
Never Ignore a problem with brakes, should you notice a wet patch around a brake hose or pipe, find out why
For example it has a tiny nick in it - this bad news
I didn't do a regular check, as a result i had a damage pipe, and it did burst when i needed it most. DO NOT IGNORE BRAKE PROBLEMS
What do I need
One Little Note - The image are only thumbnails - If you click the Image, it should open up and be a larger version
Simple Really Here is a List of what i needed/used
- Brake Pads x4
- Brake disc x2
- Hammer
- Pliers
- Spanners and socket set
- Torque Wrench
- Wheel Wrench
- A jack
- 2x Car Stands
- A Brake Bleed Kit
- A Set of Long Clear pipes
- Suitable containers for waste brake fluid
- Wd40 came into play too
- Copper Grease
- Rope
- Spare Brake Fluid – due to a full system bleed should you need it
Jacking the Car up
Secure the car, slacken wheel bolts, Jack the car up and place onto car Stands and remove the wheels – leave the bolts and wheels in a safe place
if you are unsure on where to jack up or how to – please read your car Manual
NEVER – work on a car with just a Jack – ALWAYS ALWAYS ALWAYS use Stands.
I Prefer to stick the tyre i've removed off the car under the Front wishbone or the rear axle, SHOULD an axle fail, it'll drop onto the Rim/Tyre
Sure it might destroy the wheel and tyre, but its better then wrecking the whole car should something happen
Sure it might destroy the wheel and tyre, but its better then wrecking the whole car should something happen
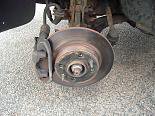
You should remain with this – an exposed view of the brake discs and Callipers etc

Stripping
To start, I release the Wheel locator studs, using a 12mm Deep Socket, simple unscrew these off – and leave them in a safe place

Release the calliper, as shown on the picture there is a tiny Clip that holds the Caliper Bar into place to prevent lateral Movement, simply pull this out and keep it in a safe place,
DO NOT LOOSE THAT CLIP

here is how the Clip sits on the bar - pretty simple
.jpg")
As the calliper is now released, simply Pivot it upwards as shown in the picture, and remove the Brake pads which should easily slide out


– Next it is time to push the piston back in. Now yes you could just push it back in to refill the reservoir tank, however If you have an ABS unit, this can push rubbish and old oil back into the ABS unit which could Upset it

Also with ABS Cars – NEVER switch on the ignition when there is a bleed valve open, There is a vacuum unit inside that has fluid inside, if there is valve open, this pouch of fluid is expelled and can render the ABS unit Un-usable
Its also good to keep replacing the brake fluid now and then, so Find a suitable fitting spanner for the bleed valve, attach a Bleed pipe/Clear Pipe onto the Nipple. With a big pair of Plumper pliers and the use of an old pad – press the piston back into the calliper body
Dont use the pliers on the Piston as this may damage it, hence use an old pad. Once the piston is pushed back in the fluid should expel, close the bleed valve. The pipe should be full of old brake fluid, Not bubbles. If you have Bubbles you need to do a Bleeding session
Next it is time to remove the calliper, Never let the calliper Dangle by the flexi pipe alone, Always support it somehow, personally i attach a rope around a suspension spring and suitable place on the calliper. Unclip the flexi pipe as well – for me it was in the way, a simple spring unclips off the end


These May be tight and refuse to budge
A spray with wd40 and some soak time may help
I also used a Hammer and tapped the Flat face of the bolt a few times. The shock of been hit by a hammer can help loosen Rust bonding and help slacken Tight threads
I used the cars tyre wrench on my socket wrench to provide me with more leverage.

The calliper will suddenly drop, hence why you should have tied up before hand. Once the calliper is loose I raised it up out the way

the Disc Should now be free to move easily off. Mine came off with no fight or struggle.

rebuilding
Clean the new disc’s with brake cleaner, as most come with a warehouse grease/film applied to stop them rusting in the box’s while in storage, Simple wipe them clean and Place onto the hub
the 2x studs that you took of first can now be placed back on – to prevent your lovely shiny disc slipping off

Now you can do 1 of 2 you can
A – clean the Pad Groves while its loose
B – clean the pad groves when you’ve secured the Caliper Setup Back on
This is your choice, but you will need to clean all the old grease, road grime and brake dust from these groves, as failure todo so may result in Brake squeal, sticky brakes or uneven pad wear as one works harder then the other
Simply With a wire brush or sand paper/wet and dry, clean these 4 channels (1 top and bottom per pad) so that its clean and metal is showing.


once clean Slip alittle Copper grease onto the Channels to ensure smooth movement of the new pads
If you haven’t attached the calliper setup back on – do so now
Now the Disc and calliper setup is secure, simply slot the new pads into place
drop the calliper back down inserting the Pin and the Pin retaining Clip into place
once the setup is complete, double check all bolts are present and tight, the bleed nipple isn’t leaking and tight, with its dust cap refitted. If it all passes off as okay, go and press the brake pedal a few times, this simply push’s the pads upto the disc ready for the beading in process
Now you have complete one side, Repeat to the Otherside you have todo
When you press the brake pedal - since the engine is off, it should go hard
If the Pedal doesn't go hard - ie spongy, then you need to bleed the brakes / could mean another fault
Once both sides are done pop road wheels back on – pop bolts on finger tight
Jack car down
Tension the wheel bolts back up using a Torque Wrench set to the correct Torque
I believe that my haynes manual says 86NM. However again i Take no responserbility should your bolts come loose and loose a wheel - its your job to make sure there tight and secure
Bedding In
New pads and disc’s wont work great that first few miles
its Vital to drive down a quiet road, gently braking to allow the new pads and disc’s to bed in. Get some speed up, Brake to a stop. get some speed up and Brake to stop
This can take quiet miles to fully bed in. sometimes that isn't always do-able, So in this time, make sure you have plenty room to apply the brakes.
When ever you can allow the pads to settle by letting them do there job
during the bedding in process you may find the car might pull, this should hopefully go away once bedded in, but take care if it does, if doesn’t seem to go away, Double check the Pad slides and the piston action
I hope this helped some people in what goes on or to save them money
Many Thanks for Reading my Guide
All comments welcome!