Are your headlights letting the front of your car down and running at reduced effectiveness? Mine were, so rather than buying a new set, here's what I did.
Some Kit
First, I bought this for about £13 (May 2013):
[ame="http://www.amazon.co.uk/3M-Headlight-Restoration-Discoloured-Headlights/dp/B0078IHJ1K/ref=sr_1_1?ie=UTF8&qid=1369173690&sr=8-1&keywords=3m+headlight+restoration+kit"]3M Headlight Restoration Kit to Restore Dull/ Faded/ Discoloured Headlights: Amazon.co.uk: Car & Motorbike@@AMEPARAM@@http://ecx.images-amazon.com/images/I/411pO-sRPlL.@@AMEPARAM@@411pO-sRPlL[/ame]
I'll come back to the reasoning at the end. By the way, I have no connection with 3M, I just like their products.
Result
Here's how they looked at the start. Note all the crazing and pitting on the outside, this doesn't clean off.
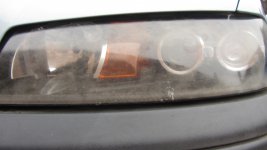
Here's how it looked after no more than 1/2 hour of work (per headlight):

I was hugely impressed. They are transformed, and I won't be buying new lights now.
If you look very carefully, you'll see that they are not absolutely perfect. You won't be able to get rid of anything inside the lens (such as water drying marks from condensation), nor absolutely everything on the outside, but I think you'll be very happy if you try this.
Method
The kit contains a few bits and bobs:
P500
P800
P3000 Trizact
Rubbing compound
Compounding sponge
Backing pad
Cordless drill
Plant mister with clean water
Stage 1: Masking
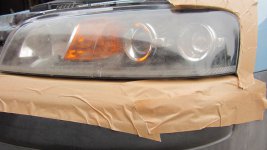
It's worth masking your bumper and wing edges to prevent a big mess, and to prevent paintwork from being sanded:
Stage 2: Coarse sanding
Mount the P500 on the backing pad, then into your drill
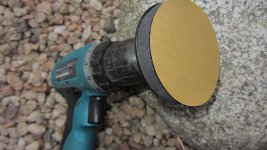
You have to keep a mist of water on the lens as you sand back and forth to build up a nice slurry.
The aim here is to sand out all the defects and leave a uniform frosted finish, a bit like this:
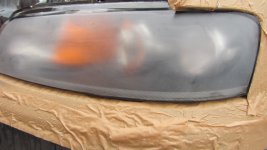
Once you're happy, clean the lens off with fresh water and wipe dry. You don't want to leave any coarse grit for the next stage. It's important to dry the lens off, a water film can hide any defects.
Stage 2: Medium sanding
Repeat of stage 1 with the P800 disks
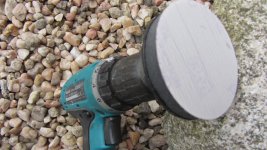
Again, keep it a bit wet and build up a nice slurry as you go back and forth. The aim is a uniform finish, with the marks from stage 1 removed.
The end result should look a bit like this:
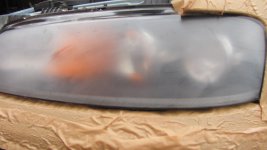
Rinse off all the slurry, make sure it's nice and clean, and dry for next stage. It's important to dry so that you can really see what's going on, a water film tends to hide defects.
Stage 3: Fine sanding
Stick the P3000 Trizact disk on your drill. This is a really nice abrasive, the sheet itself is a sponge, it works brilliantly.
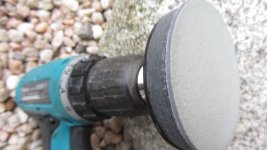
Repeat above process, making sure all the marks from stage 2 are removed. Rinse clean, and dry.
You should end up with this:
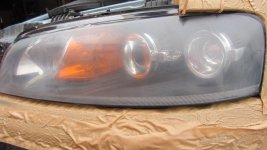
It's getting good, but not good enough yet, still lightly frosted
Stage 4: polishing
This is the stage that really brings your headlight back to life.
Mount the compounding waffle sponge on the backing pad, then put a "dime" sized bit of rubbing compound on the sponge.
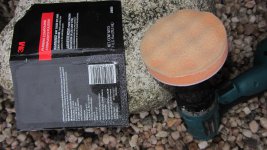
Give it some....go back and forth, keeping the sponge from going dry by periodically adding new compound. Keep going until all the marks from stage 3 are removed.
Wipe clean with a clean dry rag, and polish up with a microfibre (if you've got it) or kitchen roll if you don't.
You'll end up with this

Really satisfying for a straightforward hour.
Tips
1. Don't rush, aim for consistency, be very critical at the end of each stage.
2. There's loads of supplies in that kit, I reckon I could do about 5 cars with it.
3. The polishing stage is super important, it'll really bring it to life. Go slow with the drill to start with so that you don't launch compound everywhere. All the other stages are equally important though, examine the outcome of each one closely
4. Be careful not to sand your paintwork!
5. Use waterproof masking tape (note to self....)
6. No need to remove headlights (although it will mean that there is a small unobtrusive corner you can't easily get to)
7. Lift bonnet for better access.
8. Don't linger on one spot too long, the lens might get too hot
9. Overlap your passes to minimise swirl patterns
Comparison with other methods
There's nothing really magical about this, it's a progression of finer grit sanding followed by polishing.
Because I'm curious, I thought I would try the other side a different way. I did it with P600, then P1200 wet and dry. I then finished it off with progressively finer lapping paper down to submicron grit size.
This got me to about the end of stage 3 above, but I couldn't get the final lustre that I got from the compounding sponge mounted on my drill.
I tried the other witches brew like toothpaste, brasso, dremmel with wax compound....no great success.
I tried the 3M compound by hand. It certainly works, but it's just really slow. Similarly for G3 compound.
Don't get me wrong, this is not the only way to achieve this result, but the kit is great quality for reasonable value, is proven to work, and saves time compared to hand methods.
Some Kit
First, I bought this for about £13 (May 2013):
[ame="http://www.amazon.co.uk/3M-Headlight-Restoration-Discoloured-Headlights/dp/B0078IHJ1K/ref=sr_1_1?ie=UTF8&qid=1369173690&sr=8-1&keywords=3m+headlight+restoration+kit"]3M Headlight Restoration Kit to Restore Dull/ Faded/ Discoloured Headlights: Amazon.co.uk: Car & Motorbike@@AMEPARAM@@http://ecx.images-amazon.com/images/I/411pO-sRPlL.@@AMEPARAM@@411pO-sRPlL[/ame]
I'll come back to the reasoning at the end. By the way, I have no connection with 3M, I just like their products.
Result
Here's how they looked at the start. Note all the crazing and pitting on the outside, this doesn't clean off.

Here's how it looked after no more than 1/2 hour of work (per headlight):

I was hugely impressed. They are transformed, and I won't be buying new lights now.
If you look very carefully, you'll see that they are not absolutely perfect. You won't be able to get rid of anything inside the lens (such as water drying marks from condensation), nor absolutely everything on the outside, but I think you'll be very happy if you try this.
Method
The kit contains a few bits and bobs:
P500
P800
P3000 Trizact
Rubbing compound
Compounding sponge
Backing pad
Cordless drill
Plant mister with clean water
Stage 1: Masking
It's worth masking your bumper and wing edges to prevent a big mess, and to prevent paintwork from being sanded:

Stage 2: Coarse sanding
Mount the P500 on the backing pad, then into your drill

You have to keep a mist of water on the lens as you sand back and forth to build up a nice slurry.
The aim here is to sand out all the defects and leave a uniform frosted finish, a bit like this:

Once you're happy, clean the lens off with fresh water and wipe dry. You don't want to leave any coarse grit for the next stage. It's important to dry the lens off, a water film can hide any defects.
Stage 2: Medium sanding
Repeat of stage 1 with the P800 disks

Again, keep it a bit wet and build up a nice slurry as you go back and forth. The aim is a uniform finish, with the marks from stage 1 removed.
The end result should look a bit like this:

Rinse off all the slurry, make sure it's nice and clean, and dry for next stage. It's important to dry so that you can really see what's going on, a water film tends to hide defects.
Stage 3: Fine sanding
Stick the P3000 Trizact disk on your drill. This is a really nice abrasive, the sheet itself is a sponge, it works brilliantly.

Repeat above process, making sure all the marks from stage 2 are removed. Rinse clean, and dry.
You should end up with this:

It's getting good, but not good enough yet, still lightly frosted
Stage 4: polishing
This is the stage that really brings your headlight back to life.
Mount the compounding waffle sponge on the backing pad, then put a "dime" sized bit of rubbing compound on the sponge.

Give it some....go back and forth, keeping the sponge from going dry by periodically adding new compound. Keep going until all the marks from stage 3 are removed.
Wipe clean with a clean dry rag, and polish up with a microfibre (if you've got it) or kitchen roll if you don't.
You'll end up with this

Really satisfying for a straightforward hour.
Tips
1. Don't rush, aim for consistency, be very critical at the end of each stage.
2. There's loads of supplies in that kit, I reckon I could do about 5 cars with it.
3. The polishing stage is super important, it'll really bring it to life. Go slow with the drill to start with so that you don't launch compound everywhere. All the other stages are equally important though, examine the outcome of each one closely
4. Be careful not to sand your paintwork!
5. Use waterproof masking tape (note to self....)
6. No need to remove headlights
7. Lift bonnet for better access.
8. Don't linger on one spot too long, the lens might get too hot
9. Overlap your passes to minimise swirl patterns
Comparison with other methods
There's nothing really magical about this, it's a progression of finer grit sanding followed by polishing.
Because I'm curious, I thought I would try the other side a different way. I did it with P600, then P1200 wet and dry. I then finished it off with progressively finer lapping paper down to submicron grit size.
This got me to about the end of stage 3 above, but I couldn't get the final lustre that I got from the compounding sponge mounted on my drill.
I tried the other witches brew like toothpaste, brasso, dremmel with wax compound....no great success.
I tried the 3M compound by hand. It certainly works, but it's just really slow. Similarly for G3 compound.
Don't get me wrong, this is not the only way to achieve this result, but the kit is great quality for reasonable value, is proven to work, and saves time compared to hand methods.

