Tools and equipment:
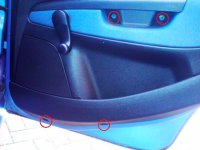
remove the two highlighted allen bolts from the handle and the two philps screws at the base of the door trim
Step 2
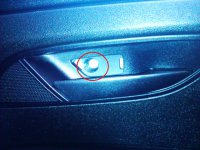
Using the small bladed screwdriver, remove the blank covering the third allen bolt behind the inner handle, and remove the bolt.
Step 3
Using the large flat bladed screw driver or trim popping tool, GENTLY prise the trim away from the door and "unpop" the securing fasteners. Work around the door gently unpopping each fastener in sequence. The very top edge of the trim sits into the door where the trim abuts the glass. It lifts out but may be tight.
Detach the window winder by removing its securing circlip using a spring hook or long nose pliers.
Be aware that locks operating cable will still be attached to the rear of the inner handle.

Step 4
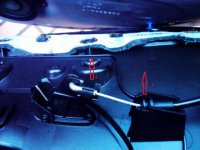
Detach the inner cable from the rear of the trim and the inner handle. Remove the outer cables gromit from the trim's rear, and then the inner cables end from the inner handle. The trim can now be put to one side
Step 5
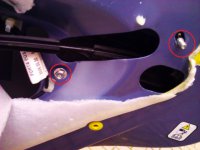
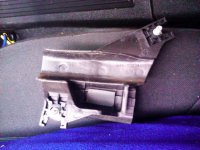
Gently remove the white protective covering from the door immediately behind the outer handle, taking care not to damage or tear it - although some damage is likely ! Expose the two 10mm nuts and remove these to loosen the guide behind it for removal.
Step 6
Extract the guide and store safely. There should now be a clear line of sight to the nuts which secure the outer handle.
Step 7
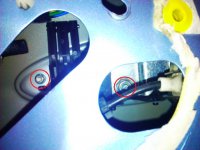
Loosen and remove the 8mm and 13mm nuts from the back of the handle, taking care not to drop the nuts down into the door.
Step 8
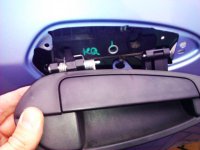
Remove the outer external handle from the door. It should lift out
Step 9
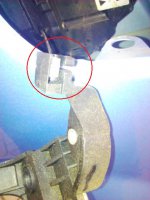
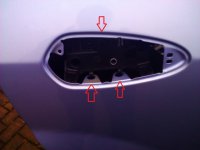
Disengage the inner cradle (three lugs as arrowed) and lift it out.

Step 10
Disconnect the cable end from the cradle
Step 11
Attach the cable to the new cradle and seat it into the door as previously
Step 12
Seat the new external handle into the inner cradle and secure it with its 8mm and 13mm nuts. At this point, I would check that the lock and new handle are operating correctly before reassembling anything futher.
Step 13
Final reassembly is step 6 to 1 in that order. Any damage to the white protective covering should be repaired before reattaching the trim. I used strong duct tape.
5mm Allen Key
8mm, 10mm, 13mm sockets, ratchet, and extension bar (ideally 200mm / 8" long)
Small flatblade screwdriver
Large flatblade screwdriver or trim popping tool
Philips / crosshead screwdriver
Small long-nosed pliers or spring hook
Roll of duct tape
Step 18mm, 10mm, 13mm sockets, ratchet, and extension bar (ideally 200mm / 8" long)
Small flatblade screwdriver
Large flatblade screwdriver or trim popping tool
Philips / crosshead screwdriver
Small long-nosed pliers or spring hook
Roll of duct tape
remove the two highlighted allen bolts from the handle and the two philps screws at the base of the door trim

Step 2
Using the small bladed screwdriver, remove the blank covering the third allen bolt behind the inner handle, and remove the bolt.

Step 3
Using the large flat bladed screw driver or trim popping tool, GENTLY prise the trim away from the door and "unpop" the securing fasteners. Work around the door gently unpopping each fastener in sequence. The very top edge of the trim sits into the door where the trim abuts the glass. It lifts out but may be tight.
Detach the window winder by removing its securing circlip using a spring hook or long nose pliers.
Be aware that locks operating cable will still be attached to the rear of the inner handle.

Step 4
Detach the inner cable from the rear of the trim and the inner handle. Remove the outer cables gromit from the trim's rear, and then the inner cables end from the inner handle. The trim can now be put to one side

Step 5
Gently remove the white protective covering from the door immediately behind the outer handle, taking care not to damage or tear it - although some damage is likely ! Expose the two 10mm nuts and remove these to loosen the guide behind it for removal.

Step 6
Extract the guide and store safely. There should now be a clear line of sight to the nuts which secure the outer handle.

Step 7
Loosen and remove the 8mm and 13mm nuts from the back of the handle, taking care not to drop the nuts down into the door.

Step 8
Remove the outer external handle from the door. It should lift out

Step 9
Disengage the inner cradle (three lugs as arrowed) and lift it out.

Step 10
Disconnect the cable end from the cradle

Step 11
Attach the cable to the new cradle and seat it into the door as previously

Step 12
Seat the new external handle into the inner cradle and secure it with its 8mm and 13mm nuts. At this point, I would check that the lock and new handle are operating correctly before reassembling anything futher.
Step 13
Final reassembly is step 6 to 1 in that order. Any damage to the white protective covering should be repaired before reattaching the trim. I used strong duct tape.

