This guide uses mostly written content from the original Electric Window Regulator guide written by jmac.
This guide describes how to replace the electric window regualtor. The window regulator fails due to the cables snapping which make the window go up and down.
Please note this guide is for a 3 door there are some subtle differences!
This guide describes how to replace the electric window regualtor. The window regulator fails due to the cables snapping which make the window go up and down.
Please note this guide is for a 3 door there are some subtle differences!
Removal of internal door trim panel
- Pry off screw cover behind internal door handle
- Pry off control panel on arm rest and disconnect plug

- Remove 4 (Allen) screws, 1 behind internal door handle, 2 below arm
rest and 1 on the door pocket
- Remove 4 Philips screws along bottom of trim
- Pry off tweeker speaker, clipped on, and disconnect plug

- Remove 1 (Allen) screw from where electric window control mechanism was

- Pull the door trim away from down, there are puch clips holding it down either side, the interior door trim will not come off at this point but just come away from the door

- Lift the trim panel up and away from door, be careful of alarm LED cable at top
of door (non-hinge side) and the puddle light if you have them
- Disconnect the alarm LED cable
- Disconnect the cable attached to internal door handle or remove screw holding internal door handle to internal door panel on the reverse side and remove door handle through door panel and place to one side
- Lift trim panel off
Now your door internals should look like this

Removal of door internal steel panel
- Disconnect and remove window winder motor, 3 screws.

- Unplug main cable between door and door frame

- Pull back 2 rubber caps (about 30mmm dia halfway down door)
- Slide window down until window support clips are in line with holes
- Push in white plastic buttons, thay support the window,until they are clear
of the glass
- Pull glass up and out of the door frame, it comes out easily.

- Undo 3 Torx screws holding the door lock in place

- Remove the door speaker by disconnecting it and undoing the 4 screw holding it in

- Remove the internal door computer

- Drill out the 4 pop rivets holding the winder assembly in place and make sure you remove the backs of this from inside the door

- Push out the 3 plastic plugs that locate the cable winder (centre of door)

- Undo the hex bolts around the steel panel

- Pull panel away from door - it wont move far as to remove it fully you need to rmeove the external door handle but it gives you about 2 inches of play which is enough to remove the old bits of the window regulator and install the new one (You'll need an assitant to hold it for you from now on so it doesn't break anything as it comes dangles away from the car door)

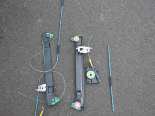
- Pull out the old broken winder assembly - this is how mine came out

This is how it should look

Installing the new window regulator
- Line new window regulator up with rivet holes, this can be a bit fiddly with not having the internal door steel panel completely off

- Now we need to punch the new rivets in when doing this ensure you hold the window regulator against the steel panel, I didn't on one and ended up having to drill the new rivet out again and put another new one in (If its not tightly riveted in place it will rattel against the steel panel when you are dirivng

- Reattach the motor ensuring you line the teeth up so you dont mash any of them

- Now before you put the glass in I recommend testing the new window regulator works, to do this you'll have to temporarily reattach the internal door computer and the electric window control buttons and the door wiring loom to the car
- When your happy the window mechanism goes up and down without fault make sure line the white lugs back up with holes so you can easily get the glass back in

From here reassemble all other parts as described in the dissassembly
New pop rivets are supplied with the kit
The kit cost me £49.01 inc vat so its not that expensive (Scrapyard wanted £45 for one off a scrappie)
Good Luck!!