You will need:
- 7mm thick Plywood (exterior quality is fine - do not use MDF as it gives inferior sound and is far to flimsy!) Enough area to fit each side of car where the plastic "arm rest" trims currently sit.
- A hacksaw
- Tea
- Sandpaper
- Wood file
- Drill
- Tea
- Varnish (optional)
- Acoustic carpet
- Staple gun
- Biscuits
- Spray mount glue
- Tea
- Rasp file
- Speakers
- Heavy duty self adhesive velcro (strip)
- Sharp scissors
- A print out of this highly useful and interseting guide!

First things First...
OK, now you have to carefully remove the plastic trim inserts in the rear of the car. This step is nice and easy...providing you do not rush the removal and apply even pressure as you work your way round. Just gently tug all the way round the trim until each of the plastic luggs holding them to the body pop out with a bang. Do'nt be alarmed...the bodywork does bend a bit as they disconnect!
Now have that first cup of tea.
Lets get going!
Now the fun starts.....take the plywood sheet and place the first of the two plastic trims face down on it. now without moving the trim, carefully draw around it (using a marker pen i forgot to list).remove and you will see something like this (please excuse the crudity of the drawing).
Next cut along the lines you have drawn, being careful not to cut into the shape. When one side is done, repeat the step with the other side.
Once both sides are cut out, use the rasp file and sand paper to give the edges of the wood a nice finish.
View attachment 64540
View attachment 64541
View attachment 64542
Preparing for the Speakers
Its time to prepare the boards for the speakers....
Next take the speaker/s you intend to fit and either using the template that comes with them, or the speaker itself draw the position you want them on the cut out. Bear in mind, that you need to leave an edge around the board to fit it back in the car, and that the speaker must clear the metalwork around the fuel filler on the drivers side of the car. Once you are happy with the position, you can then cut the speaker mounting hole. The easiest way is to drill ahole in the middle of the area and using a jigg saw cut out towards the diameter and then carefully cut the circle out. Or drill holes all around the diameter of the circle and then use a hacksaw to "join" the dots together untill the centre falls out. Next, using the rasp file and sand paper, prepare the hole for the speaker.
If you want to fit a tweeter also, use the same technique, or use a hole cutter, but to almost the same size as the tweeter, so it will be a tight push-fit.
Drink some more tea.
View attachment 64543
This is the point where if you wish, you can give the boards a good coat of varnish. I recommend it as it will stop the wood from swelling in damp conditions, or where the rear windows leak!
Have a biscuit.
Carpeting
Now the craft bit!
Roll and cut to length a piece of the acoustic carpet for each speaker board, remembering to leave enough to overlap the rear of the boards.
Spray a good coating of the adhesive onto the wood and work quickly but carefully to lie the board on the carpet. now pull the carpet tight around the back of the board and use another small amount of spray on the overlapping area. Next take the staple gun and apply staples evenly around the edges of the rear of the board to hold the carpet firmly in place.
Few.
Do the same with the other side, but make sure you keep the carpet taut as you staple it in place, or it will sag on the outside face.
View attachment 64547
Have a drink of tea and a biscuit.
View attachment 64548
View attachment 64546
It gets a lil trickier now...
Time to cut the holes for the speakers. I found it was easiest to cut small triangles out of the circle, with points towards the perimeter, leaving enough material to fold over the edge of the wood. (see pic).
Next staple the edges in place.
And admire from the front.
Repeat the step for the tweeters if being fitted.
Fitting the Speakers
For a neat look, rear mount the Cone or large speaker and push fit the tweeter from the front. y rear mounting the cone, it also means you can still fold the rear seats down.
Its should then look something like this:
Now its back to the car...
Take your superb speaker boards to the car, along with the staple gun, scissors and velcro tape. Cut the velcro tape into small strips, and staple the soft side to the speaker boards around the edge. (pic)
Next feed any wiring in the direction it needs to go...in this case behind the rear seat to the amp in the boot!
once all the velcro is in place, push the other side of the velcro pieces onto the stapled side and remove the sticky backing.
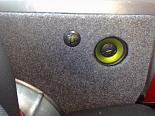
Now carefully push the board into place, be sure to align it carefully and press it firmly against the bodywork. (trust me on the velcro, ive had my boards in place for a year now, and they are still stuck solid!)
Also make sure the wiring is fed through in an inconspicuous place.


And thats about it!
Have another cuppa, wire it all up and pump out those tunes........Led Zep, Pet Shop Boys, Christmas songs or whatever takes ur fancy!
:slayer:
Enjoy!!!