Changing Front Brake Pads
This guide was really an afterthought, hence in the pictures you see shiny new bolts and pads because i only decided to do one after fitting both sides!
It's a very simple process, and should take even the most ham-fisted of home mechanics less than an hour (we clocked in at about 35mins)
Cheers to my mate Andy for helping out (he taught me everything i know)!
Tools you'll need:
- 12mm and 13mm ring spanners
- Trolley Jack and maybe Axle stands
- Normal wheel removing tools
- G-clamp
- Wire brush/toothbrush
- Rag
- Brake fluid (possibly)
- Gloves
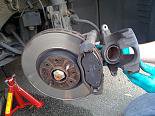
Remove wheel then caliper

Jack up the car and remove your wheel as normal then turn the steering so that the caliper is facing out, left for passenger side, or right for drivers side (in this case).

Remove the two 13mm bolts at the top and bottom with the ring spanner and carefully remove the caliper. My pad kit came with new bolts which were 12mm, so I disposed of the old ones.
Press back the piston

Remove the cap from the brake fluid resevoir, and surround it with the rag to catch any spills. Then using the G-clamp, push the piston back into the caliper body till it stops. The clamp should insert all the way into the piston, don't balance it on the edge.
Remove old pads and fit new ones

Now, hang the caliper on something so that it is not being held by the brake pipe - we balanced it on the top of the disc/hub.
The pads should have stayed retained in the clips next to the disc, just pull these out and give the clips and caliper mount/surrounding area a good brush to remove the brake dust. It's nasty stuff so be careful. Then fit the new pads by locating them in the clips and pressing. Mine had nice non-stick backing pads on so there was no need for copper grease.
Refit caliper and wheel

Finally, slide the caliper back over the pads and fit the new bolts. The mounts for the caliper are sprung so you'll need to hold these back as you push it into place.
The old bolts were "tight" but not overtight, so i did them up to the same degree - i couldn't find the torque rating anywhere.
Fit wheel and repeat on the other side.
On the passenger side the inside pad has the brake wear indicator attached. To remove this just unclip it and take it out of the cable tidy - it's very easy to figure out when you see it.
Check the brake fluid level, start the engine, pump the brakes, check it again and top up/remove as necessary. Go careful with the braking for the 1st 200miles as the pads bed in.
Taadaaaa