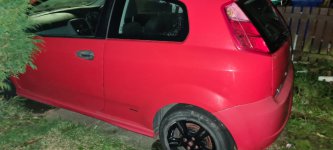
Technical New thread but not really.

Currently reading:
Technical New thread but not really.

Toisich

New member
Joined
Sep 1, 2021
Messages
15
Points
4
Location
Fife, Scotland
AN UPDATE

Good point of the day - Put fully charged battery in this morning. Still nothing from the starter, however dash lights are staying when I try to start her. It's not much, but it is a little step forward.

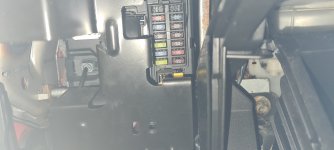
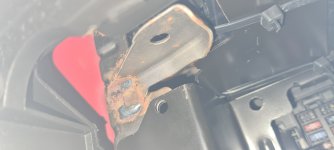
Bad point of the day - had, but didn't get too good alook at the internal fuse box. I'm seeing rust, which I presume can't be a good thing.

Chris
 

Attachments

  • 20201118_204606.jpg
    20201118_204606.jpg
    268.6 KB · Views: 80
  • 20201118_204635.jpg
    20201118_204635.jpg
    308.6 KB · Views: 73
Hello Toisich. I usually hang about on the Panda threads and, just of late because my younger boy is thinking of buying one, on the New Tipo threads I also look at the "threads you've posted to" However this morning I'm having a wee wander round the Forum at random and I've just come across your thread. - Sorry to hear of your problems.

As soon as I heard of your condensation problems I thought of my older boy's 2012 "new" Punto which developed condensation problems during the first winter after buying it. We found water in the spare wheel well and it took a while to track it down but in the end we found water was leaking past the rear lights, especially the N/S one, due to the foam seal having compressed. Before we really started to look for a remedy the LED side light on the N/S failed which meant the whole light unit had to be renewed and the new light, with it's new seal has pretty much sorted the problem. I think there's a very slight leak still on the O/S but it rarely causes any problem and the condensation problem has completely stopped. Unfortunately his electric hatchback release has now stopped working and I suspect it's probably a broken wire between the hatch and body where it goes through the rubber gator. He can still get in by triggering the lock from the inside though and, as the car is a second car which he just uses to go to work in, We may leave sorting it until next year when it gets warmer! Of course, now I'm thinking about it, it might be that the condensation problem has caused corrosion of terminals or the micro switch? Maybe I'll give that a check out soon.

I'm afraid I don't have much to suggest regarding your starting problem. I find electrical problems nearly always difficult to sort, but, as the earth lead to the body is a know weakness on our wee Fiats it could be worth clamping a jump lead to the engine block and a bare metal earthing on the body somewhere thus bypassing the possibly dodgy earth lead. If she then spins over you'll know it's either the earth lead itself or a dodgy connection at one end or the other.

Luckily for me I've not had to do a starter motor on any of the Pandas we've owned or my boy's Punto so I'm not intimately familiar with them but if you can easily find the solenoid connection on the starter - normally there are two wires connected to the type of starters used on modern cars. A really heavy wire which should be live all the time with battery voltage (don't short circuit this wire, it can pass very large current) and a much smaller wire which is the wire the ignition switch activates. If you can connect a wire to the positive terminal of the battery (doesn't need to be anything like as big as a battery wire - look at the wire already connected to the starter for size) and then touch the other end to this small terminal on the starter it should activate the solenoid and make the starter work. If this works you'll then know the starter itself is working - be careful because the engine will turn over of course! so make sure it's in neutral and count how many fingers you have when you've finished! If this "trick" results in the starter working then you can concentrate on the supply from the ignition switch, look for fuse and connection problems, broken wires, etc. If the starter doesn't turn when you try with the jumper wire then it's probably the starter motor itself.

Of course corrosion around the fuse box is not a good omen. Good luck. Nice to talk with someone else from near to home!

PS If you try to activate the starter with the wee jump wire as I've suggested above, be careful not to touch anything other than the small starter solenoid terminal - engine block, body or anyhthing metal, with the bare end of the wire or you'll get a big short circuit! - Actually, of course, I don't know your skill level here? Maybe all this is stuff you know already? In which case apologies.
 
Last edited:
Hello Toisich. I usually hang about on the Panda threads and, just of late because my younger boy is thinking of buying one, on the New Tipo threads I also look at the "threads you've posted to" However this morning I'm having a wee wander round the Forum at random and I've just come across your thread. - Sorry to hear of your problems.

As soon as I heard of your condensation problems I thought of my older boy's 2012 "new" Punto which developed condensation problems during the first winter after buying it. We found water in the spare wheel well and it took a while to track it down but in the end we found water was leaking past the rear lights, especially the N/S one, due to the foam seal having compressed. Before we really started to look for a remedy the LED side light on the N/S failed which meant the whole light unit had to be renewed and the new light, with it's new seal has pretty much sorted the problem. I think there's a very slight leak still on the O/S but it rarely causes any problem and the condensation problem has completely stopped. Unfortunately his electric hatchback release has now stopped working and I suspect it's probably a broken wire between the hatch and body where it goes through the rubber gator. He can still get in by triggering the lock from the inside though and, as the car is a second car which he just uses to go to work in, We may leave sorting it until next year when it gets warmer! Of course, now I'm thinking about it, it might be that the condensation problem has caused corrosion of terminals or the micro switch? Maybe I'll give that a check out soon.

I'm afraid I don't have much to suggest regarding your starting problem. I find electrical problems nearly always difficult to sort, but, as the earth lead to the body is a know weakness on our wee Fiats it could be worth clamping a jump lead to the engine block and a bare metal earthing on the body somewhere thus bypassing the possibly dodgy earth lead. If she then spins over you'll know it's either the earth lead itself or a dodgy connection at one end or the other.

Luckily for me I've not had to do a starter motor on any of the Pandas we've owned or my boy's Punto so I'm not intimately familiar with them but if you can easily find the solenoid connection on the starter - normally there are two wires connected to the type of starters used on modern cars. A really heavy wire which should be live all the time with battery voltage (don't short circuit this wire, it can pass very large current) and a much smaller wire which is the wire the ignition switch activates. If you can connect a wire to the positive terminal of the battery (doesn't need to be anything like as big as a battery wire - look at the wire already connected to the starter for size) and then touch the other end to this small terminal on the starter it should activate the solenoid and make the starter work. If this works you'll then know the starter itself is working - be careful because the engine will turn over of course! so make sure it's in neutral and count how many fingers you have when you've finished! If this "trick" results in the starter working then you can concentrate on the supply from the ignition switch, look for fuse and connection problems, broken wires, etc. If the starter doesn't turn when you try with the jumper wire then it's probably the starter motor itself.

Of course corrosion around the fuse box is not a good omen. Good luck. Nice to talk with someone else from near to home!

PS If you try to activate the starter with the wee jump wire as I've suggested above, be careful not to touch anything other than the small starter solenoid terminal - engine block, body or anyhthing metal, with the bare end of the wire or you'll get a big short circuit! - Actually, of course, I don't know your skill level here? Maybe all this is stuff you know already? In which case apologies.
Hi Jock,

Thanks for the warm welcome and reply. And yeah, no offence to anyone else, but good to talk to someone nearer to home.

RE: condensation issue. Does sound similar to your sons problem as the condensation is mostly in the boot/back seat area. Already thought of replacing boot seal, but didn't think to check seals around the lights. A job for the next decent day.

Earths: don't think I've checked them all yet but do have a couple decent cables to replace with.

Starter: is a pain in the a**e to get at, being logded behind close to the firewall. Has been swapped with another, which although being labled for a 1.4, didn't fit (think it was for a 1.2), the original got put back in again. I've see the trick with a wire to the solenoid on a youtube video, though haven't tried it myself as yet. My son put the starter back in the last time so will need to check he's done it right.

Now that I own a grinder, I'll be able to cut the inner fuse box (located in glove box and riveted in place) out. It's around here I'm seeing the rust, and what looks like previous repairs. Or bad factory welding.

As for my skill levels, haha, they're average. No offence taken. Advice is advice, you may have done something a different way to me but achieved the same outcome. And I thank you for it. Every day is school day.

Chris
 
Hi Chris

Can you give us a bit of a reminder timeline of what youve seen..found..done


Did it run well at one point.. what then failed..etc

Charlie

Hi Charlie,

The only time it ran well was the day I bought it, which was around September last year. On test drive, started no problem, drove around town for 10 mins, then back to sellers. Again started no problem when I left his. I made a couple of stops on the way home, and again started no problem, until i stopped to call home to say I was taking it up the local bypass as I'd only had it at 30-40mph at this point. Wouldn't turn over though could hear starter relay clicking. Managed to get a bump start and got it home. Wouldn't start with key but would with a bump.

Was left until July as I'd bought another car, 2005 pug 206. Original battery had died, as did dash lcd, Changed starter for what turned out to be wrong one, son put original back in though haven't checked he's got the wires right way around. Have checked earths but probably not thoroughly enough, so will do again. Got a couple spare from a visit to scrappies.

And that basically brings us up to date with the start of this thread.

Chris

P.S. Changed the oil pressure switch which was noted as an issue at time of sale.
 
Last edited:
A further update

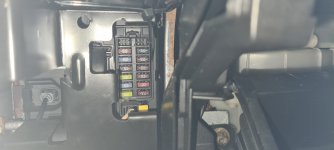
Just been out to car to take pics of internal fuse box. Turns out new to me battery is not as good as I thought. Despite being fully charged when I put it in car a few days back, there wasn't even enough power to unlock with remote fob.

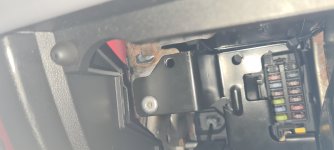
I know these aren't the best pics, but could any of this be causing issues? And looking at plate on the left of the fuse box, has it had issues before?
 

Attachments

  • 20211018_205008.jpg
    20211018_205008.jpg
    2 MB · Views: 28
  • 20211018_205018.jpg
    20211018_205018.jpg
    2.1 MB · Views: 55
  • 20211018_205023.jpg
    20211018_205023.jpg
    1.9 MB · Views: 26
  • 20211018_205027.jpg
    20211018_205027.jpg
    1.7 MB · Views: 48
Low battery..

Could be a symptom of the dodgy car electrics.. :(


Corrosion doesnt look too much worse than normal.. just a sign of some damp and poor airflow :)

Thanks for the reply Charlie,

A new battery it is then but it probably won't be until next year before I get one. In the meantime, may try the battery from my 206 as it's only 3 weeks old. Somebody did suggest I test the alternator. Have not long purchased a multimeter but still trying to get the hang of using it.

As for the corrosion, good to hear you don't might not it be an issue. Gonna put a couple humidiers in the car as there's still a bad (imo) condensation issue in the rear. And I'm gonna grind out the internal fuse box anyways, 1 for piece of mind, and 2 because it's the first me owning a grinder and want to play :slayer:

What about the welding shown in the last couple pics. Is that signs of previous work?

Chris
 
I agree with charlie that the corrosion doesn't look a big problem. It's actually the terminations behind the fuses where any problem would be, but looking at it from this side it all looks good enough.

Like you, I'm interested in the bracket at the top left corner of the two bottom pictures. The welds have been made with a MIG - manufacturers typically use spot welding and have done for many years. MIG welding is used in repair workshops so I'd guess some sort of repair has been done there. The corrosion here is because the welding will have burnt the paint back but noone has then repainted it to stop the rusting.
 
As to testing with the multimeter. Not knowing what your ability with one is, but you say you've only recently purchased one, let's start with some simple stuff. After installing and connecting the battery in the car select a suitable voltage setting on your meter. This will Depend on the type of meter you have. My older meter is a very common cheaper one where the voltage has to be selected manually whereas my newer, but still not ultra expensive one, is autoranging so senses what the battery voltage is and displays it appropriately.

Here's a picture of them both in the switched off position:
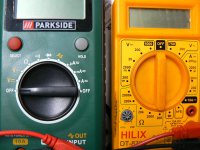
P1100073.JPG

The green one on the left is the autoranging one and the yellow one on the right is my "good old buddy". The next picture shows them with appropriate settings selected for connection to a car battery:
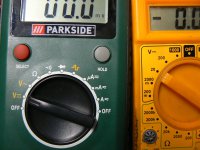
P1100072.JPG

The green one just needs it's selector turned to the DC Voltage position - Most meters indicate DC with the straight and broken line symbol you can see and AC Voltage with a wavy (sine wave) line symbol, which again you can see on the meter selector - The yellow one has had it's selector turned to the 20 volt position. You need to select a range greater than the voltage you are expecting to measure but not too much or you won't get much refinement in the reading. (if in doubt start with a very high scale and work down as the voltage is revealed).

Now put the probes on the battery terminals. Positive (red) to battery pos and negative (black) to battery neg. Digital meters are very forgiving - usually - so if you connect the "wrong" way round all that'll happen is you'll see a negative sign in front of the numbers on the screen. Put the probes directly on the actual battery posts for these first readings so you are obtaining direct readings from the battery itself without the possibility of poor battery terminal connections confusing the issue.

Now look at what the reading is. In theory each cell of a lead acid battery produces 2.2 volts when fully charged so a typical "12 volt" battery, with it's six cells, is more accurately a 13 volt battery in fact. In practice a 12 volt car battery is generally considered to be "fully charged" when showing around 12.6 or more volts. I've just dodged out to my garage and checked the big battery I keep for jump starting and it's showing 12.66 volts. I know it will show 12.9 volts when fully charged so I'll be sticking it on charge for a wee while tonight. Interestingly, once an open circuit battery (so a battery which is not connected to anything and passing no current) is considered "dead" when showing less than 12 volts. However people get very confused by this so a better way of checking your battery's performance is to keep the meter probes on the battery posts and operate the starter motor. This puts a heavy demand on the battery and you're looking for a minimum reading of around 10 volts (or slightly under).

It's perfectly possible to get a good voltage reading, say 12.5 volts or more, when the battery is not under load but a poor reading, say under 9 volts, when cranking due to internal problems in the battery. This is why i say to put the probes directly on the battery posts because if you have them on the clamps you'll get a poor reading if the battery is poor but also if the terminal clamps are not making good contact with their battery posts (and it only takes one) then you'll also get a poor voltage showing and you won't know that actually the battery may be Ok and all you need to do is clean up the posts/clamps to get a good contact!

So, if that all works out Ok. So good open circuit voltage (around 12.5 volts or more, of course it may be less just because the battery needs charging so don't condemn the battery until you've charged it and tried the test again) and more than 10 volts, or close too, under cranking, the next thing to check is what voltage is registered with the engine running.

So keeping the probes on the battery posts start the engine and see what the voltage is. It should jump up immediately to around 13.5 to 14.5 volts. This is because the alternator output is roughly a volt or so above the dormant battery voltage so that it can force electricity through the battery. With modern alternators you would expect to find this charging voltage to be there right from tickover up to max revs although you may find with some that there will be a slight increase in voltage as the revs lift away from tickover. If you're seeing the higher voltage and it's holding steady by the time you hit 1500 rpm there's probably not much wrong and the alternator is charging the battery.

The above is very much just simple checking and there's a lot more you can check for but it's a good starting point. Sticking to checking voltages is a pretty safe thing to do as the meter has very high internal resistance when taking voltage readings so shorting things out is quite difficult to do. Beware of selecting current (amperage) or resistance (ohms) scales where you can do lots of damage if you stick the probes in the wrong place.
 
Last edited:
Back
Top