Technical Replaced the original 2008 exhaust middle pipe + muffler on GP 1.2 8V

Currently reading:
Technical Replaced the original 2008 exhaust middle pipe + muffler on GP 1.2 8V

torniojaws

New member
Joined
May 4, 2019
Messages
137
Points
40
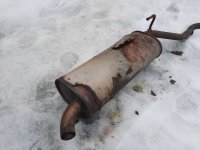
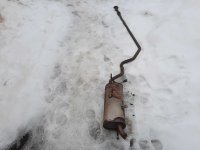
Man, what a chore that was to do, even though it's technically simple to do. Attached some pictures btw of the old parts.

Some tips if someone else is going to do it:

  • You only need to lift the front of the car on jackstands, as you can easily reach the rear parts without lifting the back separately
  • If it is the original exhaust, you need a cutting tool (angle grinder made short work of it) as it is a single assembly all the way from the manifold to the rear
  • Install the new muffler and pipe starting from the rear working towards the front
  • Removing the rubber mounts was really tough, but there's two tricks you can use:
  • If you want to save the old rubber mount, you can use scissor-style plumbing pliers to pinch the rubber off the "mushroom". The pliers need to be quite long though, as the steel hanger is quite long.
  • If you are going to put new rubbers, you can easily cut the old ones with regular scissors
  • Pour copious amounts of silicone paste on the rubber mounts before installing, otherwise you're going to have a fight of the week :D
Here's the steps I did after removing the old one:

  1. Attached the rubber mounts on the car hangers first. I put plenty of silicone paste on the rubber holes. I first tried putting the mounts on the muffler and then on the car, but that was really really difficult to do, as there is very little room to push on them with the muffler on the way.
  2. I pushed the muffler hanger against the middle-of-the-car side rubber mount first, which was quite easy. The muffler hanger slipped in place without much effort, just by pulling the muffler towards the car front.
  3. Then I lifted the muffler using a jack and aligned it with the rear bumper rubber mount. I pulled the muffler against the rubber in a backwards-forwards rocking motion until it popped into the rubber mount.
  4. Then I slipped the 45 mm exhaust clamp on the front side of the muffler pipe
  5. Then I applied a generous amount of exhaust mounting paste around the middle pipe outside, and inside the muffler pipe, and "screwed" the middle pipe into the muffler end until it was all the way in (make sure it is as far as it goes! Or you will have a really hard time in the next steps), and then tightened (as tight as possible) the exhaust clamp on the connection, and applied some extra mounting paste on the outside of the connection.
  6. Now, the tricky part. I ended up lifting the middle pipe up using a jack on the spot where it bends from center of the car to the side where the muffler connection is.
  7. Then in the front of the car, after removing the old gasket and sanding the manifold flange a bit, I added the new exhaust gasket on one side of the manifold flange and wiggled the middle pipe to align it, and pushed a new M8x20 stainless steel bolt through the manifold flange, gasket, and the middle pipe flange, and finger-tightened a stainless steel nut on the other side
  8. The tricky part was how to get the other side of the flange into position. In my case, the fit was ridiculously tight, impossible to do by hand. So I ended up lifting it into position using a bottle jack, and had to work carefully so that both the gasket and the middle pipe flange aligned at the same time with the manifold flange.
  9. Then finally got them to align and was able to put the second bolt through it, and tigthened both sides to really tight.
  10. And tightened the middle pipe ring clamp (13 mm bolt) to the car front lip for that.
  11. Then started the car and checked no leaks appeared. Then sprayed some soapy water on the connections, and made sure no bubbles formed.
I'm quite sure it is a helluva lot easier on a post lift, but it is doable with just jackstands :) But it's a lot of handwork and "fighting".
 

Attachments

  • 20210317_152402.jpg
    20210317_152402.jpg
    807.3 KB · Views: 77
  • 20210317_152357.jpg
    20210317_152357.jpg
    417 KB · Views: 51
Last edited:
I have this to do on my 1.3 diesel [just back box], I bought the box last year, at its mot the bloke said it will need doing, I cant believe how rusted it is yet it still isnt blowing, the steelwork is like flaky pastry! I actually had a prod at it here and there today and driving the car just after that it chucked a load of soot out haha

looks a right pig to get box of the hanger rubbers
 
Well, even that wasn't enough to pass the inspection :D The CO% was 0,36 and the maximum allowed in Finland is 0,2 under high rpm.

So now it seems the cat finally has to be replaced... not that it is difficult, but quite expensive compared to the value of the car :p
 
Ah that's painful. Have you plugged a copy of MES in to see if there's anything going on?


Are the plugs, oil and filters new/clean, are the lambda sensors all working OK?
 
Ah that's painful. Have you plugged a copy of MES in to see if there's anything going on?

No MES, but I do have AlfaODB. Nothing strange there. An ODB2 scan is part of the inspection here.


Are the plugs, oil and filters new/clean, are the lambda sensors all working OK?
I replaced the plugs+airfilter mid-2019, and oil+filter (all OEM), a couple of months ago. The lambda values are within range, but they are a bit old (143000 km originals), though the car hasn't been drive much in 2020 (surprise! :D), but I made a point to drive it a bit longer at least once a month.

I don't mind a non-OEM cat, but I think it's going to be quite a lot of work to install? I've never done any welding.

Btw, the exact emissions values from the inspection:

CO % @ 0,36
CO2 @ 14,20
HC ppm @ 43
O2 @ 0,54
Lambda @ 1,014

According to the inspector, all other values are nominal, but carbon monoxide (CO) is the offending one. It seems to indicate a rich mixture, so it could be related to the lambdas? However, the exhaust gas is not black or white. It looks fairly normal/almost invisible. The smell when idling isn't "bad", but it does lack that "freshness", which is why I suspect the catalytic converter.

Fuel mileage is also pretty much the same as it has always had, since it was new, which is odd if it was running rich.

I guess it could also be the MAF sensor? But there are no error codes, though. I presume it would give one?
 
Last edited:
Didn't the inspector tell you what might be at fault ? There's also an air leak somewhere, see O2 level.

Have u checked obd live sensor data for both 1st and 2nd O2 sensors? First one on hot engine will tell u whether it runs lean or rich, second tells the efficiency of the catalyst. Second value should stay fairly consistent and it'd already set a fault code for catalyst efficiency if it was to blame. .

You should only install OEM equivalent or original catalyst on this car, because the whole catalyst is integrated to exhaust manifold. No welding possible.

Could also be a dirty intake manifold. O2 sensors last a lot longer than some 140k km.
 
Additionally the engine condition could be worn that it's already burning some oil. Judging from the tailpipe photo, it appears to be black with soot and could indicate rich mixture or worn engine burning oil.

With O2 sensor you check the range of voltage, high and low value. The first one will fail first. You could also clean it and swap them because 2nd one could still be healthy and provide a quick fix. So just take them off and put 2nd sensor to the place of the 1st.

Clean intake manifold too.
 
I changed my back box today on my diesel GP, I had to cut the exhaust pipe as it was the original one piece system, I thought it was going to be a ball ache and I have been putting it off for about 9 months! blimey those mounting rubbers are a good design, properly firm

I dont know about the petrol ones, but the diesel just has the back box as the only silencer, with back box cut off I thought I would start the engine to have a listen, well I was amazed - its properly quiet even with no back box, unlike a petrol which would sound like a banger with it removed.

refitting went well, while under there I sanded down some surface corrosion behind the sills rear area and treated it which was a great time to do it as its bone dry underneath.
 
Back
Top