General Euro 6 Fuel Filter change - metal housing

Currently reading:
General Euro 6 Fuel Filter change - metal housing

Dezbo

New member
Joined
Oct 27, 2012
Messages
14
Points
6
Hi,

I'm changing my fuel filter. How are the fuel connectors and electrical connector safely removed. Once I get the fuel lines and electical componant disconnected, it seems straight forward.

My last van had the plastic fuel filter housing - annoyed as I purchased the removal tool for that one - but now they've moved on to metal housing with different connectors :(
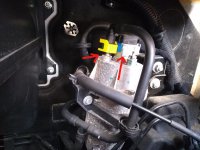
Inked239692372_10159594652749074_1291582391790537175_n_LI.jpg
 
It is pretty easy (I did mine last year).

There are a few videos on Youtube, but the ones I found were for other Fiat models (with the same filter).

This is for a Tipo, but the first few minutes cover the removal of the fuel pipes and electrical connections, which are similar/the same on the Ducato.

https://www.youtube.com/watch?v=SB9AlFHQE_4

Watched it thanks.
But its a 12 minure movie that could have been edited down to one minute.
Undo the top screws, lift the top off, prise away the old cartridge, push in the new, and replace the top. Better than the plastic job on the X2/50 because you don't need the special tool to hold the housing without cracking it whilst you unscrew the top. Looks easy on the Tipo. But the movie doesn't address the biggest problem of getting to it on the X2/90 - looks like you have got to take the housing out somehow like on the X2/50?
 
Last edited:
...I don't know if you have to, but I did. The mounting bolts are rather obvious.
Well yes - the movie would have been more useful if it had shown that instead of the guys feet walking back and forth to his shed
I suppose I sound like Victor Meldrew again don't i :eek:
 
Back
Top