Technical cam belt day

Currently reading:
Technical cam belt day

Joined
Aug 10, 2003
Messages
125,246
Points
24,395
Location
Essex/Suffolk border
there is a rad drain pipe here
a1.JPG

DSCF5588.JPG

DSCF5589.JPG

DSCF5590.JPG

DSCF5591.JPG

DSCF5592.JPG

DSCF5593.JPG

DSCF5594.JPG

DSCF5595.JPG

DSCF5596.JPG

DSCF5597.JPG


DSCF5599.JPG

DSCF5601.JPG

DSCF5602.JPG

DSCF5603.JPG

DSCF5604.JPG

DSCF5605.JPG

DSCF5606.JPG

DSCF5607.JPG

DSCF5608.JPG

DSCF5609.JPG

DSCF5610.JPG

DSCF5611.JPG

DSCF5613.JPG

DSCF5614.JPG

DSCF5615.JPG

DSCF5616.JPG
old bits
old bits.JPG
new bits
new bits.JPG
 
Last edited:
Nice post Dave

Some quick questions:

1) what was the state of the waterpump and it's mileage?
2) looks a little fiddly getting bottom belt cover off?
3) what was state of aux belt tensioner & pulleys? Mileage?
4) I see you used a Dayco cam belt kit. Were the aux belt tensioner and pulleys from Fiat or an aftermarket OEM kit?
5) How long did the job take?
 
Last edited:
1) what was the state of the waterpump and it's mileage?
it looked fine like new in side no play in it either

2) looks a little fiddly getting bottom belt cover off?
top 3 bolts come out from the top, jack engine up a little, bottom 2 bolts come out working under the car, lower engine a little

3) what was state of aux belt tensioner & pulleys? Mileage?
belt seems a little hard! rest seems ok :(
4) I see you used a Dayco cam belt kit. Were the aux belt tensioner and pulleys from Fiat or an aftermarket OEM kit?
aux belt is gates, the main tensioner is oem, i didnt know we had idliers too didnt see them on s4p so they are gates fron local factors

5) How long did the job take?

i spent all afternoon, but did others stuff in-between, if you take off drinking 2 ltrs off coffee, lunch, doing the washing, painting some wood for shed, coming on here to see if people had answered my question in general tech section, putting dinner on ready for when mrs dave gets home from work and trying to find tools. i reckon about 2 hours.

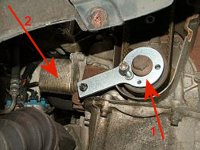
car is on 89,000 miles it came with service stamps in the book but no lists of what's been done. top belt cover has been off before as one bottom bolt hole was split, but they may have just looked at it. not sure if the photos show it but cam belt idler has a very rough surface to it, that cant have been doing the belt much good
 
Based (intially) on what you have found/said I think I will go for the basic cam belt, tesioner and pully/stretcher change at 50K miles and 5 years.

Already have new aux belt which when I fitted at 36K miles/3 years and tensioner and pulleys (and belt) were in perfectly good condition.

As always I check for play/wear/roughness/etc. in all components during a job.

Your feedback is most welcome as it sets a starting point/metric on which to guage matters. Garages get to do this stuff weekly/monthly whereas we do this sort of stuff once every 3 to 5 years and in many cases on a different car every time.
 
Thanks for the photos - they're blooming brilliant. Crikey - I didn't know you had to undo the engine mount, makes sense I suppose.

Having skinned my knuckles changing the alternator, I think I'll chuck mine into a garage for this job, having seen what's involved.
 
Dear Dave
Thanks for the very helpfull pictures. I have a few questions, that I would really appreciate if you can find time to answer them since I learned from the above mentioned work description that you are a very busy person.
I wonder if there are special marks on the gear wheels and motor block that have to set in line with each order or did you just slide on the new belt at the same time as the old came off.
Why did you use the special tool visible on the enclosed picture (arrow 1)
Just out of curiosity, what is under the aluminum coloured hood (arrow 2)
Looking forward to your reply
Regards
Vento
 

Attachments

  • Dscf5607.jpg
    Dscf5607.jpg
    179 KB · Views: 27
Yes you really do need the timing tools to ensure you get everything right.

There are NO timing marks available. It would be possible to change the belt without the tools but one would have to be extremely careful, mark everything up and pray that nothing moves. If anything does move then you will need the timing tools to put matters right.

Also there is no guarantee that the person/garage who last changed the cam belt used the tools and thus your current timing is accurate. It could already be out.
 
Thanks Dave and S130
I start understanding the procedure. For special tool I wil take a flat strip of iron. Dril holes in the ends and place it over the crank and cam shaft cock wheel. Tighten it to this wheels whit bolts when the old belt is stil on. After this the position of the wheels is secured to each other and the old belt can be exchanged with the new one.
Keep up the good work
Vento

you also need the cam locking tool

https://www.fiatforum.com/attachment.php?attachmentid=93129&d=1312059886

the tools are only £50 on ebay and you can re sell them after
 
No you don't have to remove the camshaft spocket. 'Offically' one is supposed to loosen the camshaft sprocket belt to allow the sprocket to self align as the belt tension is being set (this is when you are using the proper cam timing tools).

When I did mine with the proper timing tools I bent my camshaft sprocket counter torque tool whilst trying to loosen the sprocket bolt. In the end I skipped this step because I could perfectly aling and tension the "down/pull" path without loosening the sprocket.
 
What is inside the hole where the the cam lock tool is supposed to be, do I need to remove a screw from it?
Is this cam locking tool in principle a rod that shift's into a hole in the camshaft?

Thanks in advance

Vento
 

Attachments

  • Hole.JPG
    Hole.JPG
    17.6 KB · Views: 159
Back
Top