General Dash pics

Currently reading:
General Dash pics

Sei_rory

Established member
Joined
Nov 26, 2006
Messages
1,167
Points
313
Location
milton keynes
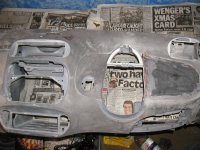
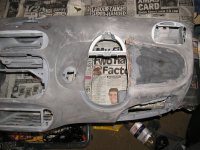
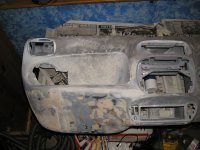
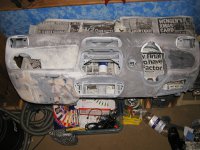
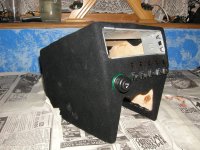
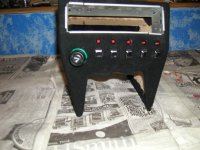
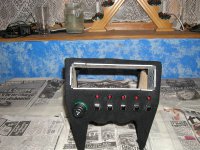
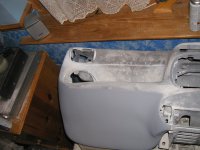
here we go guys ! here are the pics of my dash work in progress. in these pics you can see where the right hand clutter tray has been fibrglassed in and also the document tray filled and smoothed. tomorrow the large clutter tray on the left is being smoothed over and my two voltguages and PS2 will be going in. more pics to follow in a few hours when ive done more work ! opinions please ! oh yeah and thanks to my lil sis for lending me her new cam from santa !:D
 
Last edited:
Re: dash pics

sorry guys the picture uploder is crashing when im doin these so im guna av to do a couple at a time :(
 

Attachments

  • dash1.jpg
    dash1.jpg
    866.7 KB · Views: 148
  • dash2.jpg
    dash2.jpg
    822.9 KB · Views: 81
Re: dash pics

Certainly different, however it looks a right mess when WIP although im sure it will look decent when more further down the line. (y)
 
centre console & dash

heres the pic of the centre console which i made that i was chattin about weeks ago . comments please . if people like these i can make these as i now have the sizes etc.
 
Re: centre console & dash

yeah it actually looks like its completely f***ed lol by the end of 2morrow it be ready to be primed coz its all been smoothed now ready lol
 

Attachments

  • Picture 072.jpg
    Picture 072.jpg
    885.6 KB · Views: 81
Re: centre console & dash

The custom dash and relocation of the cig lighter is a good one. I am liking that! (y)
 
project pictures

i thought i would share with you the pictures and stages that i have gone through to completely customise my interior and make it completely one off! my dash project is taking quite a while to progress but im getting there. i would like peoples opinions and thoughts for changes and improvements please !
 
Re: project pictures

heres the picture of my dash when i had just fibreglassed the document tray over and put the filler on to rectify any valleys.
 

Attachments

  • dash3.jpg
    dash3.jpg
    834.9 KB · Views: 99
Re: project pictures

the next stage was to fibreglass in the little clutter piece on the right hand side of the steering wheel. this pic shows the tray fibreglassed over and smoothed ready for stopper paste to blend in better.
 
Re: project pictures

after a few hours hard work tonight ive managed to get the document tray piece completely rubbed down stopper pasted and smoothed again to cover imperfections. i then put a coat of primer onto this part of the dash to help me see if there was any imperfections to be rectified before the painting process.
 

Attachments

  • Picture 073.jpg
    Picture 073.jpg
    900.3 KB · Views: 84
  • Picture 075.jpg
    Picture 075.jpg
    850.3 KB · Views: 64
Re: project pictures

Looking good now actually its nice to see detailed work like this :thumbsup: only thing i would suggest on plastic is take time in between filler coats and primer it seems alot more succeptable to sinkage

wayne
 
Re: project pictures

heres the picture of my centre console which i made. i did this by making the shape out of mdf then fibreglassing over the top of the mould then smoothing the fibreglass and trimming it in cobra black material. this console fits nice and tight under the dash and also goes over the center tray on the floor, i have had to relocate my lighter and ive also put the switches for the ps2 neons split charge etc in. comments please guys! opinions and ideas welcome :D
 

Attachments

  • Picture 070.jpg
    Picture 070.jpg
    870.1 KB · Views: 61
Re: project pictures

I think it looks good actually,I was truthfully expecting to see big divot marks and cracks through the primer but looks good!

I like your console aswell,i assume its for your popup dvd or what have you?

im going to chop my console to make room for a dvd screen in the cinq
 
Back
Top