Technical Unusual problem - engine cut out??

Currently reading:
Technical Unusual problem - engine cut out??

Joined
Dec 27, 2014
Messages
1,134
Points
364
Location
Ripon
Greetings All, I have been enjoying my car of late - the rebuild went well and apart from a wiring gremlin to the starter all ok. (y)(y) So, I have chalked up 60km of steady running in and today thinks I will pop and get some fuel. Purring along and then a slight pop was heard and the engine stopped !!!
:eek::eek: 
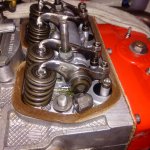
No clatter no banging no noise ( I know what that sounds like) To cut to the chase here I've isolated and proved the dizzy, plugs, HT leads, coil, capacitor and reset the timing the engine now runs and starts immediately, BUT only on one cylinder, the rear cylinder is not firing :confused::confused::confused:
I will say that the valve gear was getting noisy and noticed that the car had started to pink slightly ????? Having to wait for a cold engine will delay things, can the great and good on here confirm that it could be a valve or valves out of adjustment that's stopping the cylinder firing ???? I'm going to have a look inside the cylinder with my camera as well - just in case?????

Ian.
 
If it runs at all there must be fuel and you say that both plugs are sparking so ignition looks ok which only leaves valves, but they don’t normally change suddenly. They usually gradually go out of adjustment. Probably check and adjust the rockers. Maybe a locking nut is loose? Otherwise a compression test on both cylinders might help to see if you have lost compression.
 
Greetings, I finally got some time to look at the top end today (y)
If we look at the first pic you will understand the sense of horror I felt when the rocker box came off :eek::eek::eek: Clearly the number 8 head stud retaining nut has come off and the ensuing movement within the rocker box has somehow made the number 1 cylinder exhaust rocker adjustment screw jump out of the pushrod top :eek::eek::eek: The result - see pic2 - is that the pushrod is bent and scoured just below the top having come into contact with the pushrod tube and the M7 adjusting screw is also bent and has a gouge in it too. I cannot repeat what I said on here but suffice to say the air turned blue for a while !!!!!
So I have 4 new pushrods and adjustment screws on the way from VDL. I do believe that I have found the source of the 'pop' heard when the engine cut out and this is down to the number 4 head stud retaining nut stripping it's thread :eek::eek: I think that the number 8 nut coming loose has put pressure onto number 4 and it's 'popped off' if you'll pardon the pun. There is some wear on the thread top of the number 8 stud and add this to a worn head nut and there you have it(n)(n) Everything was torqued down nice and tight and yet it has taken only 60 odd km to fall apart :mad::mad::mad::mad::mad:

Ian.
 

Attachments

  • IMG_20180313_132419.jpg
    IMG_20180313_132419.jpg
    2.1 MB · Views: 64
  • IMG_20180313_134553.jpg
    IMG_20180313_134553.jpg
    1.5 MB · Views: 48
Blinking hell Ian....your title for this thread was very prescient!
I assume that the head studs must have had faulty threads or possibly may not have been secured tightly enough into the engine casing? It may be best to torque the studs too and use thread-lock on them?
 
Blinking hell Ian....your title for this thread was very prescient!
I assume that the head studs must have had faulty threads or possibly may not have been secured tightly enough into the engine casing? It may be best to torque the studs too and use thread-lock on them?

Hi Peter, yes, blinking hell indeed !!!!! Having had a good look it seems that the number 8 stud top thread is worn and I believe that the nut is too. The problem with number 4 is a combination of wear and a short thread on the stud as it has been cut at some time (n)(n) Overall I think I'm slowly replacing all the worn parts as they fail !!:mad::mad: In the long term I will be replacing all of the studs with new as soon as I can, In the meantime the head will come off and I will attempt to replace number 8 with a spare I have while the barrel is in place - fingers crossed!!! I have taken a look inside both cylinders with a borescope, but it will be better with the head off as I can check for any possible damage on the valve. More to follow :bang::bang::bang:

Ian.
 
i was always under the impression that the end with the longer amount of thread goes in the crankcase. This way, plenty of thread is in the crankcase where all the forces are trying to pull the stud OUT of the crankcase. If you put the shirt length of thread into the crankcase, you run the risk of stripping the stud thread in the crankcase if a stud pulled out. Looking in the 'works' parts catalogue, although the bottom of the head studs is not shown, the end holding head down IS shown, and it shows only a short length of thread.
thumb.gif
 
My head-stud faux-pas did get me thinking about whether or not when you start messing with non-standard, non-original, up-rated pistons and barrels, maybe the standard stud-lengths aren't appropriate. I know that in most instances the piston-stroke remains the same, but could it be possible to lose the benefit of a few mm of thread at the top or conversely, to find head-nuts bottoming-out with insufficient thread?

Anyway Ian, how's the strip-down going; you must be getting quite good at it. :bang:

Oh yes Peter, I know the process VERY well - I just didn't expect to have to do it so often :mad::mad::mad: I get what you are saying about stud length, but with the cylinder head I have (panda 30) is basically from a 650cc engine so the studs should be the same apart from the two (number 2 and 3) that have to be cut for the inlet passages. The stroke length (70mm) was checked to give a good squish band using a 0.5mm copper head gasket and a 1.0mm base support plate all this using VW barrels with an 80.5mm bore. All of the figures have been crunched to give a C/R of 9.8:1 which is not too wild given that most commercial kits run at above 10.0:1 I think between my engine man and me we are being conservative!!! (y)(y) In the end I believe the fundamental problem with my engine is that it has been initially tuned with a C/R of around 10.8 to 11.0:1 and that it has suffered increased wear and tear. everything I have done thus far involved the bottom end and cylinders/pistons - now all new, I am now finding wear on the head studs and nuts which I shall replace, there is not much else to change :bang::bang::bang:
Ian.
 
It is pretty plain to see in the picture that the studs have been shortened by the grinding marks on top and the short thread. I guess that would be for a skimmed head but I would be looking to check them all out and renew where needed as I think that you have had your fair share of problems
 
for some obscure reason, which neither I or my son (who is very good with IT), I am unable to expand most of the pictures put onto the Forum---my screen just goes dark when I try to enlarge the pictures. But from what 'Toshi' says he can see on the pictures, I would suggest that ALL the head bolts are renewed, and the nuts. If you wish Ian, I will send you 1 of my head studs for you to compare, mine with what you have.
thumb.gif
smile.gif
 
Thanks to all, but I think I've found the culprit in this muddy saga :mad::mad:
I've taken the head off to check - All ok in that department thank God!!! BUT,
The number 8 stud will not retain any torque :bang::bang::bang:
I managed to remove the offending stud without taking the barrel off and the proof of the pudding is that it has popped the thread in the crank case - Bugger!!
The other problems with the top end have come as a result of this. I'm going to have to have a very long and hard think about the situation now as I've thrown a lot of money at different parts of the engine and I still come up with problems. I consider the remaining studs as suspect now and don't know if it would be worthwhile helicoiling the number 8 or just getting another crankcase and starting from new - AGAIN :mad::mad::mad::mad: Comments please from the good and great on here !!!

Ian.
 
The problem with any sort of insert (helicoil or 'self-tapping') is that practically ALL 10mm threads are 1.5mm pitch---the Fiat head studs are, unusually, 10.00mm x 1.25mm. One way round the problem is to get your engineer to make up a 'stepped' stud---(possibly) 12mm into the crankcase, but 10mm for the 'shank' and top thread of the stud. This way a new sound thread can be cut into the crankcase. If you go for the 'new crankcase' route, a brand-new crankcase is about E300 (plus carriage), and you might as well go for a new crankcase---at least you know where you are starting from--and once the crankcase has been bored out for your larger barrels, everything can be transferred from the old engine over to the new crankcase. if there is anything that I can do to help--just contact me.
banghead.gif
banghead.gif
banghead.gif
cry.gif
 
Thank you for that piece of information Peter--it is amazing what the "collective brain" of the Forum can come up with! I would however, advise Ian to get his engineer to check the crankcase for how much damage has been done to the thread in the crankcase.
worship.gif
smile.gif
 
Thank you for that piece of information Peter--it is amazing what the "collective brain" of the Forum can come up with! I would however, advise Ian to get his engineer to check the crankcase for how much damage has been done to the thread in the crankcase.
worship.gif
smile.gif

Thanks Peter and Tom, I have indeed sent for a similar kit in 10 x 1.25 so I won't need a different Stud size. The damage to the crankcase is clear to see thanks to the position of the number 8 stud - the first cm (ish) of thread has pulled out, the remaining lower portion is intact so it should helicoil ok. (y)(y)
I have been thinking about something Toshi said regarding the stud length and skimmed heads. The existing head now on has less removed plus 1.5mm of gasket and base support plate than the original fitting so the studs will come up short for the nuts on top !!! :eek: The difference is small but maybe enough????
I'll measure an original stud to the one from number 8 and compare.

Ian.
 
Not sure why Fiat did it but those studs are a bit of a break from convention with the fine pitch thread at both ends. Most steel studs into the softer aluminium casting would have a standard coarser thread for more grip. Possibly done for the strain on the studs and the fine thread compensated for by the long thread depth. I think that you will get away with a helicoil but you will probably find that the inserts that come with the kit will be quite short so you may need to source some longer ones to make it work. I think that it would be a long shot to hope that a short helicoil would match up with the remaining unstripped thread but you might get lucky. I have got four spare crankcases here if you ever need one :)
 
When rebuilding my engine with the Athena 695 kit the original head studs where way too short.
After trying to buy some from 500 suppliers and having no sucess - ended up making my own.
 
Back
Top