General Franko the 1971 500L

Currently reading:
General Franko the 1971 500L

The order was correct, but a few items were out of stock and invoice showed they would be sent later foc.
Only fault was I asked for full gasket kit & they sent the wrong one without the jacket tube seals.
Needless to say I checked all the parts & sent an e-mail to Fred. Just waiting reply.
 
I decided to remove the camshaft from my latest 650 engine to use in the crankcase I got from Tony which he got with his latest buy. Annoying thing is its hard to remove one of these without stripping the whole engine. So now I have 2 650 engines in parts. Im glad I did as when I tried the camshaft in the crankcase I was going to use, I found it was a loose fit on the large journal. bit strange I thought. So I tried the camshaft from my non dizzy engine. This was exactly the same. Weird as there was no signs of any damage or work having been carried out to the crankcase hole, but it was too big. So I have had to use the crankcase from my latest 650. So now I have cleaned 3 crankcases.
frown.gif

Still waiting bearings & timing gear so no engine building yet.
mad.gif

This gave me the opportunity to rebuild the dizzy with new points, rotor arm, cap & condenser, oh and a good clean up.
smile.gif

Also stripped my 2 carbs, 28IMB & 28SIA. I had bought a kit for the SIA but sadly most of the parts in the kit are wrong. Just like Tony found, the SIA has a larger butterfly than the IMB. Lucky enough the SIA looked in good condition so I left it alone, if it ain't broke don't try fixing it!
Just took it all apart, cleaned it & changed gaskets. I did try the new float valve, but this is a different size and changed the float level from 7mm to about 2mm, clearly the wrong one. However the old one looked okay & was also the rubber tipped type. If I have a problem later at least I will know what it could be.
When I stripped the IMB one I found most of the kit would fit it, but the float pin holes in the body were broken and the float was inoperable, so this will need to be replaced to be used if it is to be used again.
Hopefully start my kingpins tomorrow as off to my parents for mothers day, so should be able to get in my dads workshop for a few hours.
smile.gif
 

Attachments

  • IMG_9432.JPG
    IMG_9432.JPG
    1.5 MB · Views: 49
  • IMG_9448.JPG
    IMG_9448.JPG
    1.2 MB · Views: 48
  • IMG_9452.JPG
    IMG_9452.JPG
    1.3 MB · Views: 45
  • IMG_9439.JPG
    IMG_9439.JPG
    1.2 MB · Views: 50
  • IMG_9447.JPG
    IMG_9447.JPG
    1.3 MB · Views: 43
  • IMG_9463.JPG
    IMG_9463.JPG
    1.1 MB · Views: 51
  • IMG_9462.JPG
    IMG_9462.JPG
    1.2 MB · Views: 43
  • IMG_9461.JPG
    IMG_9461.JPG
    1.1 MB · Views: 43
  • IMG_9459.JPG
    IMG_9459.JPG
    1.2 MB · Views: 44
Hi Sean,

I have had the same (apparent) drama with the camshaft on my 500D's. From memory the book has a clearance of 0.003", but mine have 0.004".

I have bought a few repair parts for the crankcase which are just bits of pipe that get pressed into the case once it has been machined to suit.

However after talking to my engine reconditioner I am going to leave them alone. Even though the camshaft feels very loose fit, in fact I first thought as if I could fit two shafts in the hole, the oil will easily accommodate the clearance.

I suppose I am saying, don't panic. The engine will probably go fine as it is, and the cases can be repaired if you are unhappy with the camshaft fit.

Chris
 
Hi Chris,
Thanks for that, lucky enough I have the option of using my other crankcase which appears to be the correct tolerance so no panic & no need to take any chances. I can always look into that option of having an insert fitted to that case later if required.
I have my 500d engine to pull apart at sometime in the future. It is currently seized so who knows what problems I will have with that one!
 
There is something odd about these Polish built carbs, I believe it is the later ones with the cutout solenoid that have these larger spindles. I mailed a place in Slovenia that is a 126 specialist and asked whether they had the larger spindle (about 8mm) and butterfly.

They replied saying that some carbs had been repaired and you could get over size spindles for carbs that had been slightly enlarged to fix issues with leakage. But the original spindle is 6mm and you could get 6.1, 6.2 and some other sizes that are increased by 10th of a mm steps but nothing as larger as 8mm. I have to say they were dirt cheap for spares though.
 
Nice find Sean
I bought a second hand set and am now awaiting the new ali casting before building my 5 speed......friend took internals for machining this afternoon
 
Back to the Kingpins:
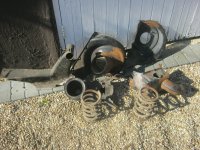
You may remember my earlier photos of my Kingpins?
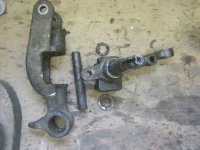
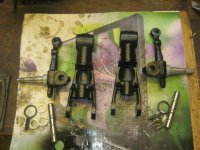
Well I have now got them back together.
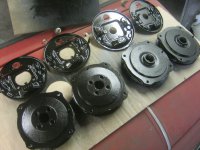
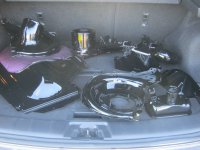
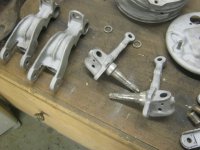
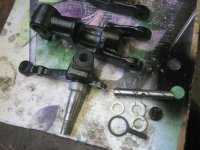
The new kit consisted of 2 hardened kingpins, 4 brass bushes, 6 washers, 2 large O rings & 2 metal caps.
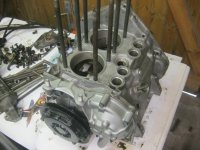
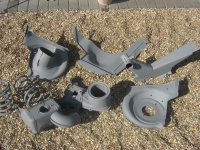
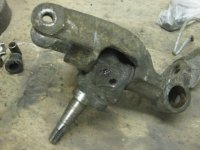
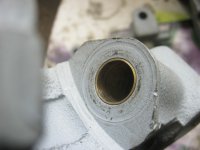
With the hubs all sandblasted, etch primed and old bushes removed, a few measurements were carried out and it was found that the outside diameter of the brass bushes were too much of an interference fit to go into the holes of the main upright. The bushes were actually a really nice fit on the actual king pins. So all 4 bushes were turned down in the lathe to a few thousands of inch interference fit. Then with a bolt and a specially made spacer the bushes were pulled into their position until slightly below the flat surface.
The pins were checked, and lucky enough with a fine polishing of the kingpin with some fine wet/dry paper, they were a really good fit in the bushes and therefore no need to use a reamer.
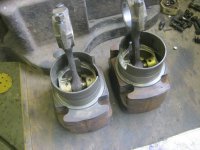
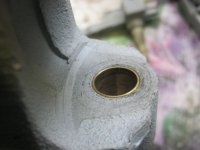
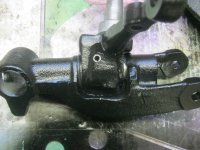
The next step was a dry assembly once it had been determined where the washers go. 2 large ones on top (these are load bearing) and these have the dust seal around them. Then the lower washer had to be ground and sanded flat to reduce the thickness to fit in the bottom. Too tight and you cant get it in, too loose and you have too much up & down play. Just right I think is with a slight movement to allow them to turn without binding & allow the grease to move. This proved rather difficult as it seamed quite tight on a dry fit, but with a little grease more play was felt.
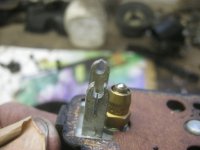
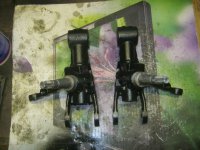
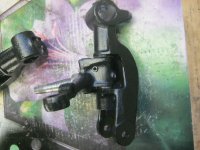
After everything had been checked, they were stripped apart and painted black. Then reassembled with loads of grease. The lower cap was then replaced. In my case it was a screw in one, so I reused the old caps. Usually you would use the ones in the kit where you place them in with the domed face up and then hit them with a large hammer & a drift to cause them to flatten out & therefore remain in place.
Next step was to replace the top bushes, fit the grease nipples & then apply more grease with the grease gun. This was when I realised I hadn't ordered them
banghead.gif

Lucky enough Fred is due to send some additional items to me so I have added them to the order.
 

Attachments

  • IMG_8922.JPG
    IMG_8922.JPG
    518.7 KB · Views: 62
  • IMG_9056.JPG
    IMG_9056.JPG
    518 KB · Views: 59
  • IMG_9227.JPG
    IMG_9227.JPG
    530 KB · Views: 55
  • IMG_9469.JPG
    IMG_9469.JPG
    1.1 MB · Views: 57
  • IMG_9470.JPG
    IMG_9470.JPG
    1.2 MB · Views: 50
  • IMG_9475.JPG
    IMG_9475.JPG
    1.4 MB · Views: 71
  • IMG_9474.JPG
    IMG_9474.JPG
    1.3 MB · Views: 55
  • IMG_9473.JPG
    IMG_9473.JPG
    1.4 MB · Views: 57
  • IMG_9472.JPG
    IMG_9472.JPG
    1.5 MB · Views: 57
  • IMG_9471.JPG
    IMG_9471.JPG
    1.4 MB · Views: 55
Looking good Sean. I can't get enough of my sand blasting cabinet. It's very satisfying to make a 48 year old part look like new (if not better). What paint are you using for the suspension parts? I'm using Wurth stone guard which works quite well but I may change to another product.
Damian
 
Yeah the sand blaster really does make light work of cleaning the old bits up. Personally I just give everything a coat of etch primer and then 3 coats of cellulose black paint or plastikote. I used to have parts powder coated but found it was too thick and couldn't find anyone who would blast the parts properly before coating. Therefore it wasn't long before it started peeling off.
I wil probably get the brake drum back plates either powder coated or painted in 2 pack as more resistant to brake fluid.
My 500 won't be used by me for all weathers so no worries.
 
Been busy again Sean, a good job as always. I assume the old grease nipples were not salvageable but then again thinking about it, it would seem a bit pointless going to the lengths you have and skimping on a couple of grease nipples.

Plastikote (y)(y)(y):D

I am using Automec Silcone brake fluid in my 500 that doesn't strip paint. There was some doubt about whether it would work ok on the 500 as it is thinner and the brake cylinders are not the most sophisticated when it comes to the machining of the components but it hasn't failed me yet. Fingers crossed.

Tony
 
Hi Tony,
It has been some years since I played around with brake fluid. I had a few nasty experiences years ago where break fluid eats the lovely fresh paint I applied. So its just a precaution to use a paint in those places that are likely to get contaminated at some stage.
But you are correct, there are some more advanced fluids available now that are less harm full. I think it should be ok to use the silicon one, they don't usually recommend mixing with the old stuff, but as all my components are new it shouldn't be a problem.
 
A few more bits done this weekend.
Brake drums & backing plates painted, engine parts had a final clean ready for assembly.
I also finished cleaning my 3rd crankcase & re tapped the holes.
Drilled & tapped one of the exhaust manifold bolts out of the head that snapped when removing it. Whilst I was at it I decided to gas flow the exhaust ports on the head to match the hole of the exhaust gasket. That's about it for modifications on this engine.
wink.gif

I had painted the drums and back plates on a piece of cardboard on the bonnet of my 500D. Running out of space in the garage!Ahhhh
When I finished I placed the cardboard on the screen so I could open the bonnet to put a few things in it. Hey I thought, someone is watching me
shakehead.gif
 

Attachments

  • IMG_9507.JPG
    IMG_9507.JPG
    1.5 MB · Views: 65
  • IMG_9504.JPG
    IMG_9504.JPG
    1.5 MB · Views: 60
  • IMG_9503.JPG
    IMG_9503.JPG
    1.7 MB · Views: 62
  • IMG_9508.JPG
    IMG_9508.JPG
    1.4 MB · Views: 53
I think buying all these engines might have sent you a bit loopy Sean. :D

Bits looking good as always.

Tony

What you on about Tony? ;)
"Gone?" The man bought a Fiat 500 didn't he? Even worse, then he bought another one. The engines are just the icing on the cake. Of course he's loopy. but not "gone" that way.

Like everyone round here (me excepted, of course;) ) he's mad as a Seicentocinquanta.:D
 
Main engine back together. Pistons in their bores waiting to be fitted.
Just need to get some inlet valve seals now. Found some on ebay for a golf that are 8mm diameter and look exactly the same as axel gerstl lists. Very cheap and should be here Tuesday.
Just need to lap my valves in.
 

Attachments

  • IMG_9543.JPG
    IMG_9543.JPG
    1.3 MB · Views: 40
  • IMG_9542.JPG
    IMG_9542.JPG
    1.3 MB · Views: 42
Nothing at the moment Tony.
Just getting everything ready.
Engine nearly built.
Engine tin work at paint shop.
Gearbox ready to build just waiting for new gear kit to arrive.
Front suspension all finished.
Rear trailing arms need painting.
Brakes all ready to put together.
Leaf spring needs painting.

Once everything is ready, I will get back to the shell and get it ready for painting.
 
I picked my tin work up from one of the bodyshops I go to yesterday.
Everything is now painted a lovely gloss black.
Main engine is together, I just need to buy 2 bolts today to fit in the crankcase for the exhaust brackets as the first part of the thread is a bit worn, but by following a method I think the Hobbler suggested, I am going to locktight 2 bolts in from the rear.
Then I can finish building the engine and maybe to a trial start up before bolting the tin work on.
thumb.gif
 

Attachments

  • IMG_9399.JPG
    IMG_9399.JPG
    1.9 MB · Views: 69
  • IMG_9414.JPG
    IMG_9414.JPG
    2.3 MB · Views: 57
  • IMG_9572.JPG
    IMG_9572.JPG
    1.3 MB · Views: 49
  • IMG_9573.JPG
    IMG_9573.JPG
    1.5 MB · Views: 48
  • IMG_9574.JPG
    IMG_9574.JPG
    1.3 MB · Views: 48
Back
Top