Getting to know our latest family member.

Currently reading:
Getting to know our latest family member.

Joined
Oct 1, 2017
Messages
7,366
Points
2,313
Location
Edinburgh Scotland
I made two posts yesterday, one about my older boy's Punto which had a flat battery and one about my younger boy's wife's "new" car. This is a 2014 Mazda2 which she bought in March of this year after her trusty old Jazz had been trashed by a druggie/drunk outside their house - declared " beyond economic repair". With a pretty modest budget, we'd been to see a few absolute sheds and this one was a bit of a stab in the dark as it was at a small sales room in Peebles - That's a wee bit of a drive from us up here in Edinburgh, however it looked good online so we decided to take a chance on it as she'd really like one we'd seen earlier - it was at the poor end of the shed description though.

The garage is a new build showroom on a pretty derelict site on the outskirts of the town. In fact the building was not yet finished with just a concrete floor and the chap's desk with a computer on it against the wall! Oh well, we're here so lets have a look at it. Well, the chap himself turned out to be very nice. He told us he'd been in "the trade" for some years and decided to have a go on his own and was just setting things up. I had quite a chat with him and he really seemed to know what he was about. Had a good crawl around the car, "assisted" by 4 year old grandson who even crawled under the car with me! It all looked pretty good, by far the best we'd seen so far and I told her I doubted if we would find anything better for the budget she had. After a test drive she decided to go for it.

After she got it home I had another quick kerbside go over it and confirmed that soon it would need new front brakes, the mid section of the exhaust looked a bit rough and 3 of the tyres, which had good tread depth, were a bit perished and had small cracks Not enough to be dangerous or fail MOT but not ideal either. The 4th was almost new.

A couple of months later I arranged for my "tame" mobile tyre fitter to change out the 3 dodgy tyres and she's been driving around in it very happily. With them being away on holiday at this time I thought this would be a good opportunity to give her (the Mazda) an in depth going over so I collected her yesterday and she's sitting in my drive.

This morning, after taking Mrs J her tea and biscuit in bed - become a bit of a tradition - and knowing the front brakes were in need of attention, I thought I'd start with the back brakes, which, these days, are unusual in that they are drums. The car has a full service history for about the first 7 years of it's life when it's original owner had it serviced at their local main Mazda dealer. After that the record is decidedly sparse/non existant. So I was expecting the worst and "looking forward" to fighting her to get the rear drums off! but no! The drums have no corrosion, they look almost new! The retaining screws did need to be "frightened" a bit with my impact screwdriver but after they were removed the drums almost fell off by themselves. There's not even any detectable lip on the inside of the drums! The linings aren't even half worn, the pistons are free moving and there's no hydraulic leaks, not even a sign of moisture under the dust rubbers! There's even signs of recent maintenance with not much by way of dust and white ceramic grease on the backplates and self adjusters:

P1100919.JPG

P1100922.JPG

P1100911.JPG

P1100910.JPG


So wow! Maybe she's been "loved" after all. Just a wee bit of dust removal and That was the back brakes pretty much done! While I was under there I took a good look around. Oh, that's nice, back box, not quite new but in very good order:

P1100933.JPG

Centre exhaust section not so good though:

P1100932.JPG

But it'll do for now. Rear spring pans? Just wish the ones on Becky look as good:

P1100913.JPG


Just look at the length of exposed thread on that lower shocker mounting though? Here's the other one:

P1100924.JPG

Gave it a wire brush and a wee coat of copa slip:

P1100928.JPG

Ok, yes I know Copa slip is contentious but it's all I had lying around without going raking around in my shed - and you need a fortnight if you're going to do that!

Then I thought it was all too good to be true when I noticed this metal brake pipe:

P1100914.JPG

Oh Gawd, is that rust? but no, my luck was holding, it was just dirt. Here it is after a brush with a stiff bristled brush:

P1100915.JPG

And a wee application of the good old Copa Slip on the more exposed bit. I'll be doing something more permanent about protecting these in the near future.

Ok, so now I know I don't need any parts for the rear brakes. By the way, ever seen a rear handbrake linkage like this:

P1100912.JPG

There's a short spur cable from the drum (on the left) with a nipple on the end and the cable from the brake lever on the right with a nipple on the end of it, both fitting into that joining piece in the middle - different eh?

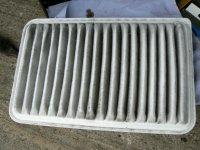
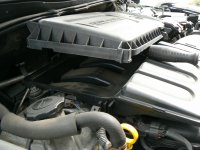
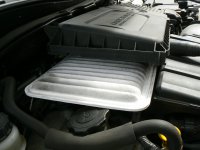
So what am I going to need? Well I already know I'm doing the front discs and pads, wonder what that air filter is like?

This thread is getting very long now and I don't know if the forum can accommodate so much. Going to try to post this now and continue in a new post in a minute
 

Attachments

  • P1100942.JPG
    P1100942.JPG
    782.4 KB · Views: 35
  • P1100943.JPG
    P1100943.JPG
    585.2 KB · Views: 38
  • P1100944.JPG
    P1100944.JPG
    527.6 KB · Views: 38
Ok, it seems to be happy with that, let's continue.

Being unsure when it last got a decent service I thought the air filter would be a good indicator but the air filter looks difficult because it's all in one unit with the engine ECU:

P1100907.JPG

Steven told me that you can release the thumbclips and tilt up the left hand side enough to get the job done and, thank Steven, you absolutely can!

P1100944.JPG

In fact, if you wedge a screwdriver handle under it you can then get Henry's "shnozzle" in to vacuum out the leaves and other foreigners:

P1100943.JPG

Well, it's a bit grotty looking, but I've seen much worse:

P1100942.JPG

Think I'll get it a new one though.

Big question is, shall I change the oil? The dealer told us the oil and filter would be changed before she took delivery of the car, but that it didn't need a big service. Well, the oil filter looks almost brand new so I guess that was done but how do I know about the oil? Well, oil accumulated particles of carbon and other dirt as it ages. If you run the engine for a while - so the oli in the sump gets a bit of a stirring up - and then pull the dip stick and wipe it on some absorbent toweling - light coloured - and leave it for a while for the oil to be absorbed into the toweling, you can get a pretty good indication of how good the oil is. After maybe 5 minutes when the liquid oil will be absorbed into the toweling (I use those big rolls of blue paper toweling) old oil will leave dark dirty deposits which are easily seen whereas new, or newish, oil will leave little visible deposits. Here's what mine looks like:

P1100949.JPG

She's done a couple of thousand miles since that oil change and this oil looks exactly as I'd expect it to look. So I know the filter is new and the oil looks great. No need to change the oil right now.

Ok, think I'll go with that. 2 new discs, a set of pads and an air filter, oh, and don't forget the Manista - the tub's nearly empty.

Bought 5 litres of windscreen washer concentrate too. Total bill including VAT:- £144.52 not too bad I suppose? Think the pads, disks and filter came to around £115 Filter was £13.24 (£22.72 retail!) Glad I decided to get the filter after comparing it with the old one:

P1100948.JPG

Let's get back into it then. Jacking up is, by the way, interesting. cutouts in the plastic sill cladding so you can gain access to the reinforced jacking points:

P1100920.JPG

and axle stands slid in on the box sections - both front wheels now up in the air. I slackened the wheel nuts while it was still on the ground and that was a bit strange. The 3 dome headed nuts -21mm socket - were so tight I needed my long power bar but the locking nits were all little more than finger tight! what was all that about?

Anyway, with the wheels now off the two caliper bolts were easily undone and I could see that the time for new pads was just right. Couldn't safely have got much longer out of those?

P1100938.JPG

For those not so familiar with this, here's one of the new pads alongside an old one:

P1100957.JPG

You can see the friction material is nearly all worn away and the "screech warning" tab is just about to contact the disc. If you let pads get much thinner than this they may fail catastrophically by breaking up.

Removing the caliper carriers allowed me to get a good look at the inside of the discs:

P1100946.JPG

and to measure how thick they are. They don't look too bad do they and the other sides - the outer facing sides, looked even better. I did wonder for a minute as to whether Id wasted my money? maybe I could have just popped a set of pads in with the old discs? but when I measured them they were nearly done with almost 2mm of thickness worn away, so my Mk1 eyeball judgement was right.

Stripped the other side down too and found both hibs needed quite a bit of "degunging" due to rust:

P1100947.JPG

You need to get the mating face really clean and smooth for the new disc to locate on otherwise it won't run true and you'll get problems like brake judder. Actually took me quite a while before I was completely happy with them.

Some of the guide pins were a bit rusty where the dust seals fit:

P1100952.JPG

So I cleaned them up a bit with emery cloth and wire brush:

P1100953.JPG

I'm not all that happy with the results so I'll buy new pins for next time I'm in here. While we're about it be aware most of these design of pin comes in two types:

P1100954.JPG

Notice one has a black ring whereas the other is plain. Make sure they go back in their correct holes won't you? Although I have to say I don't know what the black ring is all about?

Caliper carriers and anti rattle shims cleaned up - I like to reuse the existing anti rattle shims if they are in good order as I find generic spares often don't fit well and can be more bother than they're worth.

P1100958.JPG

These ones cleaned up well.

So now time to reassemble it all, which went well. By the way, although all the nuts holding the caliper to the guide pins and the larger ones which hold the caliper carrier to the hub, were very tight and needed my power bar to get "cracked off" the actual threads themselves were in immaculate condition without any trace of corrosion:

P1100950.JPG

Once all back together again it's really looking nice don't you think?

P1100959.JPG


Ok folks. time for bed now. I've got some more checking to do tomorrow and I'll round this off by reporting anything else I find.
 
I'd say whoever did the lockers up last has been burnt by someone windy gunning a locker on and and having to chop a wheel off a car.

Most locking nut keys are made of butter after a few years so applying full torque to them is generally a good way of making an easy job a harder one.

To be fair I'm debating replacing ours and fitting a 4th standard bolt given the wheels are not desirable but getting them off without power tools is.

I used to find the Mazda reasonably well thought through in terms of service items, anything that needed doing often was not a pain in the arse. The only doozy was when the bearing in the heater box failed and it was dash out...which would have been annoying if I'd not paid someone else to do it 😂.
 
Last edited:
I'd say whoever did the lockers up last has been burnt by someone windy gunning a locker on and and having to chop a wheel off a car.

Most locking nut keys are made of butter after a few years so applying full torque to them is generally a good way of making an easy job a harder one.
That sounds like a very likely scenario to me Steven. I've had a very careful look at the lockers and their key and all looking good at this time - thanks for the suggestion though.

Been some time since I've come across a car with studs and wheel nuts. I think those dome heads actually look rather smart?

P1100918.JPG

Not quite so keen on those low profile tyres though, I'd have rather had something more compliant.
 
I used to like them as well.

Made me wonder why other manufacturers will spend time and effort on god awful plastic head covers that require a little tool to remove etc to look like a nice bolt or at least hide the inevitable rusty mild steel bolt when the could just use what appeared to be a stainless nut.

Mine had a bit more sidewall being a 3 rather than a 2.

20140828_144252.jpg
 
I'd decided, when I got up this morning, that I was going to get the Mazda finished today. Her front end was still up on the stands from last night so I did a quick check on yesterday's work and tightened up the wheel nuts. Then gave both front wheels the "quarter to three" and "half past six" wiggle and tug check, looking for ball joints, bushes, wheel bearings etc. All good although there's a slight dampness around the N/S bottom ball joint - likely to be the dust boot beginning to fail, maybe needing done for MOT at the turn of the year? Just before letting her down back onto her wheels I had a bit of a general "recce" and look see. First very obvious thing is that there's a complete absence of oil leaks from anywhere:

P1100962.JPG
Crankshaft pulley seal? No.


P1100963.JPG
O/S driveshaft? No.

P1100961.JPG
N/S driveshaft? No.

In fact no oil leaks visible anywhere, not even cam cover or anywhere! What is it with Japanese cars? I find this is pretty much the norm with them. Her old Jazz - 2008 plate - was as tight as a drum right up till the end. As a guy who grew up renewing gearbox selector shaft seals on Mini, 1100, etc, etc, I am always exstatically delighted when I see a power unit as oil tight as this!

Sliding under a bit further and I can see the "dog bone" is going to need doing at some time:

P1100964.JPG

But it's by no means bad at this time so it's just something to keep in mind for the next time.

Oh, that's nice. The brake fluid looks really nice, light coloured and clean.

P1100966.JPG

Gets a clean bill of health from the fluid tester too so must have been changed not too long ago, Battery terminals show signs of maintenance too:

P1100968.JPG

Lots of little signs that although there's no written proof of a service history for the last few years, it look like someone has been giving her some care and attention. While we're on that subject Cheest made a very true observation recently in the "grumpy today" thread. He said that "Some of the most expensive and regrettable words used by the home mechanic are,”While I’m in there…” It's so tempting isn't it? and so often goes wrong and leaves you thinking "wish I'd left well alone". Well I fell foul of that way of thinking while doing the calipers - fallen foul of it many times in the past too - One of the things I always like to do with a "new to the fleet" vehicle is to try cracking off the bleed nipples. My thinking being that the longer I leave them alone the more they'll corrode so might as well do it now!. I did it with the two front caliper bleed nipples and they were very tight but did surrender. so I was able to take them out, give the threads a wee wire brush and coat of copa slip (yes I know, there he goes with his copa slip again) and reinstall them. By the way, if you're quick about it you'll loose next to no brake fluid, it drips out very slowly under gravity and because gravity forces a slow flow of fluid you'll find no air gets back up into the caliper so no bleeding is needed. If you're doing this at the same time as changing pads, as I was, you probably need to loose a bit of fluid anyway to allow the pistons to be pushed back.

So, all going well? I suppose I really need to pull the, 2 piece? cabin filter out and see what it's like. Getting at the cover is not actually too hard. It's in the footwell by the clutch pedal. It's held on with 4 Philips - yes Philips, not Posi! - self tappers which I got to quite easily with my wee electric screwdriver and an extension bit. The bottom half of the element pulls out sideways first and you have to push the clutch pedal down to allow this. It came out easily and the top half dropped down under gravity so it can then be pulled out in the same way. I've never seen a cabin filter in two parts like this before and was rather dreading it, but it came out easily once that pedal was depressed. Oh deary me, just as I've so often found in the past, along with the filters came a small cascade of leaves, insects (dead), dust etc. Here's the filters:

P1100971.JPG

and a close up of the elements shows how dirty they were:

P1100970.JPG

I think they are the carbon impreganated type so they would have looked slightly black even when new, but you can see the leaf debris etc quite clearly. Getting the new ones back in nearly defeated me. The top one seemed to go in Ok and I could lift it up by it's bottom edge inside the casing. However then you need to slot the bottom filter into the groove in the bottom of the casing whilst also locating it into the groove on the bottom of the top filter whilst at the same time trying to stop the top filter dropping back down and/or getting out of line with the groove on the bottom filter. Add to that that I wear bifocals and am as blind as a bat without them and I was in trouble! I eventually thought I'd got them in correctly but found I couldn't put the cover on because the bottom filter was sticking out by about a couple of mm. I called a halt and made a cup of tea. Whilst sitting on the planter at my front door with my tea and looking at the car I suddenly thought "wonder if I could lay on my side across the passenger and get my head into the drivers side footwell so I can now look at what I'm doing through the bifocal part of my glasses. Well, it was all a bit of a contortionist's wet dream but I managed it and yes, now I can see what I'm doing. Got the top filter back in and was starting to fiddle with the bottom one when I suddenly realized the car was slowly moving backwards towards the road! I'd managed to release the hand brake as I lay over it! Luckily I caught it early so no drama and I then put blocks behind the back wheels - could have been nasty though. The "breakthrough" came when I understood fully where i was going wrong. The filters have to locate in a vertical groove on the side at the bottom of the hole! In fact there's a groove the whole way round which the filter engages with to effect an airtight seal. So, you have to slide the first filter in with it's bottom edge engaged with the groove in the bottom until it is all the way in with it's side seal engaging with the groove at the far end. Now, being very careful not to let the element disengage from the groove anywhere, you slide it up into the top part of the casing and hold it there while you slide the bottom element into place under it. It's quite a faff until you realize what you're trying to do. Still not the easiest but very doable once you understand.

All this trouble because I'm a bit obsessed with cabin filters, not because I like that they trap dust, pollen, etc but because a blocked one will often considerably reduce the flow of air to any fan speed resistor pack which can cause early failure. Better avoided as many are quite a hassle to change.

Ok, now time for a road test and to give those brakes a bit of gentle bedding in. I went up the ferry road and down to Granton Harbour then along past Newhaven Harbour and finished up by driving through to Kenny's garage to get his opinion on the clutch. Clutch they all cried, he's not said anything about a clutch! Well yes, It's a little on the heavy side when compared to our Ibiza or either of the FIATs. Also it's bite point is quite low. I'd looked carefully at the slave and master cylinders but they looked dry ad a bone. Maybe that's just the way they are? but I decided I'f feel happier with Kenny's input. He was very busy pushing to get all the jobs finished by the end of the day - I remember that feeling so well - but made time to come out and drive the car to the end of the wee estate where his garage is located and back. Well yes, he said, maybe a little "heavy" and the bite's a bit low but it's not dragging or slipping. I'd give it a bleed and see how it does he said, It's too good to change it as it is. Live with it for a while and come back immediately if it drags or slips.

So there we are. The wee Mazda - must think of a name for her (suggestions anyone?) has been well "fettled" and is now ready to go back out into the country to await the return of her owner. I didn't change the plugs in the end but probably will at the next service - there's no indication they are a problem at this time and the mileage is only 47,000 (although they are well over timewise they are nowhere near mileage wise (around 70,000 is recommended) A risk I know, but i think it's worth taking while I talk to people about the best way to tackle them. Thinking also about what I've found I think most of the stuff I've been dealing with is Original, for new. The filters all had Mazda and their emblem on them. The brake pads were stamped FOMOCO - which would be right for one of this age I think? At best I suspect the brakes and cabin filter were original from new and the air filter probably not changed since she left the Mazda dealership system probably around 3, maybe 4, years ago. I hope someone was changing the oil and filter? On the upside the engine is very quiet, not a trace of timing chain noise. In fact the noisiest thing you can hear is the injectors clicking as they trigger. Air con still working very well, icy cold and all fans etc running as they should. Hopefully we've got her before any neglect has had an effect.

Oh, and I didn't mention that she - daughter in law - asked me to "fix" the non working rear powered windows. Apparently they haven't worked since she bought the car. Well that will be because the isolator switch on the driver's door, next to the window switches, is in the "off" position. Depress the switch and the windows are working again - Why can't all "fixes" be that simple? Could be embarrassing when I tell her though?

So here she is occupying the space where Twink, the ibiza, usually resides.

P1100972.JPG


Twinkle is in Becky's place and poor Becky, our Panda, is having to sit at the kerbside - you can just catch a glimpse of her "B" pillar through the back windows of these two. Looking at this picture I rather like the dark grey wheel colour, goes well with the white, which we didn't realize until recently, is pearlescent. Hope it never needs a local repair!
 
Hi All,

Haven't had chance to enjoy all of this thread yet (-:

But

Loving the giant holes in the drums and hub so you can get to shoe self adjusters- lovely girling derived self adjusters?

Caliper slide pin black rubber bit ....to stop caliper/ pad rattle?

Best wishes
Jack
 
Hi All,

Haven't had chance to enjoy all of this thread yet (-:

But

Loving the giant holes in the drums and hub so you can get to shoe self adjusters- lovely girling derived self adjusters?

Caliper slide pin black rubber bit ....to stop caliper/ pad rattle?

Best wishes
Jack
Thanks Jack, glad you're enjoying it. It's the sort of thing I like to read about too.

Regarding the black (plastic I think?) bit's on the slide pins. You may well be right, but why only on one of the two pins. It was the top pin on each side that had this black thingy.
 
I'd let her off on the back windows.

Just because they don't work like any modern car. You lock the windows in our current all 4 switches on driver's door still work and a red light on the switch illuminates to tell you they are locked.

As far as I could tell all the "lock" did on the Mazda was cut the power for all switches to back windows.

As we've discussed before, electrically they are a little primitive in places but this is not necessarily a bad thing.

Despite being a similar age to twink you could swap batteries at the side of the road without the car losing it's **** for example.
 
Last edited:
Thanks Jack, glad you're enjoying it. It's the sort of thing I like to read about too.

Regarding the black (plastic I think?) bit's on the slide pins. You may well be right, but why only on one of the two pins. It was the top pin on each side that had this black thingy.

One thingy is cheaper than two
Plus two could cause binding ?
 
I'd let her off on the back windows.

Just because they don't work like any modern car. You lock the windows in our current all 4 switches on driver's door still work and a red light on the switch illuminates to tell you they are locked.

As far as I could tell all the "lock" did on the Mazda was cut the power for all switches to back windows.

As we've discussed before, electrically they are a little primitive in places but this is not necessarily a bad thing.

Despite being a similar age to twink you could swap batteries at the side of the road without the car losing it's **** for example.
Yes Steven, I'll be diplomatic about it, she's a nice lass and I'd not want to cause her embarrassment.

As you say, I'm sure all the switch does is cut the power. Also as you say primitive perhaps but I'm all for simplicity.
 
Random thought for the evening..do they still put tamper proof stickers on every external panel so you can see if it's had a bump? Front and rear bumpers included...

Missing sticker or wrong vin = replaced panel. Although given she owns it now probably not the time to look 😂
 
Random thought for the evening..do they still put tamper proof stickers on every external panel so you can see if it's had a bump? Front and rear bumpers included...

Missing sticker or wrong vin = replaced panel. Although given she owns it now probably not the time to look 😂
Didn't know that. As you will have gathered I know nowt about Mazdas and what I do know I've mostly learned over the last few days!

So what do these stickers look like. I'm saying nothing to them about stickers, but I'd like to have a look for my own interest.
 
Didn't know that. As you will have gathered I know nowt about Mazdas and what I do know I've mostly learned over the last few days!

So what do these stickers look like. I'm saying nothing to them about stickers, but I'd like to have a look for my own interest.
Best photo I've got of them I'm afraid. If you look at the inner edge of the rear quarters in the door shut above where the lights cut in and drivers side below you can see 3 white stickers against the white...one on each quarter and one on the edge of the back bumper.

20210705_163342~2.jpg
 
Best photo I've got of them I'm afraid. If you look at the inner edge of the rear quarters in the door shut above where the lights cut in and drivers side below you can see 3 white stickers against the white...one on each quarter and one on the edge of the back bumper.

View attachment 426462
I see them Steven. Thanks, didn't realize they would be so easily seen. Now I know what I'm looking for I'll make a point of having a look tomorrow - Although, as you say, not much point now she's had the car for quite a while. It interests me though.
 
Mine had them on every panel, if you opened the bonnet there was one on the slam panel/top of the bumper, one above your head on the bonnet itself, both wings, inside all 4 doors.

If anything this thread is making me miss having a nicely put together car. 😂
 
Mine had them on every panel, if you opened the bonnet there was one on the slam panel/top of the bumper, one above your head on the bonnet itself, both wings, inside all 4 doors.

If anything this thread is making me miss having a nicely put together car. 😂
Just nipped out and had a quick look for those stickers and I've found them everywhere except on the back hatch itself. Maybe it's been changed or resprayed at some time? Although there's absolutely no trace of overspray anywhere. Looked very carefully at the shut lines on the hatch and they are even and nice and "tight" all round so, if something has been done due to accident damage then it's been repaired very well indeed. Don't feel any anxiety.

I've never had anything to do with Mazda before but I agree with you about the quality, seems like a very well put together motor. Mind you, I could make the same comment regarding her old Mk1 Jazz.
 
These were a cheaper car back in the day.

I nearly bought a 12 plate at 12 months old but ended up hanging on and getting the 3 a few years later.

For what you paid they were a very nicely engineered item, rust proofing and paint quality was slightly questionable but they were about 2k less than an equivalent Fiesta or Polo if not a bit more and given the drive train and suspension aren't made of cardboard and they've got all the toys there would be compromise somewhere.
 
Dealer say they did the oil. Do I change it? Well stand back one pace and add up the sum of your question and then ask yourself, is this something I need to consider...... I expect they changed the air filter at the same time. I think I would bite the bullet and do it then you know it has proper grade and quality. IF they changed it you can think of it as a flush!
 
Last edited:
Look like a good 'un Jock:) As you say, it's a pleasant surprise to find a car that's been looked after. Always liked the Mazda2, was seriously considering one before we went for the Panda.

We ran Mazdas in our family fleet for about 10 years - Xedos, Mazda6 & MX5 - and I like them a lot. Generally well built, not much ever goes wrong, handle well.

Only issues, which we had on all our Mazdas, were:
Rust in rear sills & rear wheel arches. Keep the arches clean and well protected; if you can find access to protect the sills then well worth doing. Some of the rain-water drains were a bit odd, dumping gunk into the inner wings, so check drains are clear.
Seizing rear calipers - Replaced a lot of rusty slider pins over the years, so probably best that this 2 has rear drums.

Parts were always a bit expensive, especially on the occasions when the only sensible option was genuine Mazda spares from Japan. Lucky then that not much needed replacing, and sounds like you have a good local source.

And funnily enough, my old man used to press the window switches in the wrong order and get himself in a pickle, some locked, some opening fully instead of part-way. I used to have to reset them for him every now and again, something about holding all switches down that I can't remember now...
 
Last edited:
Back
Top