General Winter greyB

Currently reading:
General Winter greyB

Clutch whirring is very worrying... So while I have to wait 2,5 weeks for the "seat belt explosives" I thought to have the clutch done ... However, after taking a deep dive in the service manual, and not having a garage nor sober friends, I haggled the price of the clutch job at the Fiat centre to a manageable level, so will have a new clutch as well.

Would sooooo much rather do these me self, but being financially challenged there's no garage in the near future... The wife insists the life in the city, whereas for the same money we'd be having a 2-car garaged house a few hundred miles to the East, or any direction for that matter.

Miss the times we lived in Portsmouth, and had one garage. And decent lager.

Here's a few picts from under the car I took.
The sump has taken a hit at some point, and is leaking like a Jag, i.e. ever so slighty marking its territory. Sump(1).jpg

01092010673.jpg

01092010684.jpg
 
Last edited:
Clutch whirring is very worrying... So while I have to wait 2,5 weeks for the "seat belt explosives" I thought to have the clutch done ... However, after taking a deep dive in the service manual, and not having a garage nor sober friends, I haggled the price of the clutch job at the Fiat centre to a manageable level, so will have a new clutch as well.

Would sooooo much rather do these me self, but being financially challenged there's no garage in the near future... The wife insists the life in the city, whereas for the same money we'd be having a 2-car garaged house a few hundred miles to the East, or any direction for that matter.

Miss the times we lived in Portsmouth, and had one garage. And decent lager.

Here's a few picts from under the car I took.
The sump has taken a hit at some point, and is leaking like a Jag, i.e. ever so slighty marking its territory. View attachment 82627

View attachment 82628

View attachment 82629

By the looks of things you're lucky there's oil in there to leak out!

At least the wife lets you have toys mate, don't push it...:D
 
Kind of you to point that out => So now that the tranny&diff is coming out this would be the opportune moment. Already asked for quote for sump & recondition the starter motor while that is out too.

Good advice, luv the the wife!

By the way, yours is the most cacthy phrase, someone say that to you one day perhaps?
 
He he, it's just a cliche of what people think of Italian cars.

I live for Italian cars, so get all sorts of jip every day!

:D
 
The sump must wait as Fiat wants both me arms&legs for it.

Albeit I found no rust in the bodywork, wheelarches/boot, there is "slight surface rust" under the floor cover judging from this pict into the VIN flap in the passanger side floor.

So to remedy and create a "new look floor I will:

  1. Derust the floor with Deox-Gel.
    (http://www.bilthamber.com/deoxgelquickguide.html)
  2. Coat the floor with Electrox .
    (http://www.bilthamber.com/electrox.html)
  3. Fix the floorcover:

  • Firstly remove the underfelting as it will be soaked and smell worse than football socks
  • fill the 3 cracks with silicon
  • Attach resomat (http://www.tru-fitcarpets.com.au/resomat.htm) onto the plastic floor thingy itself - not the floor, as I want to be able to lift the floorcover away and see the metal floor every year to dry & clean the floor itself, as water will find its way in there.
  • Overlay some nice carpet onto the floorcover (http://www.classic-car-carpets.co.uk/home.php?cat=273)
  • Screw a heelpad on the carpet

After all this is done I need to get to the seals. As some here have said the original Fiat seals are questionable / expensive-> anyone have experience with the likes of these sealmakers: http://www.sealsdirect.co.uk/bbCMS/shopping.asp?intDepartmentId=68

Does someone have the measurements of the seals...well... I will next week, so there' s just the minor detail of securing a warm garage to work in. I wish it was summer since our summer house would be perfic, but its snowing outside this week so I don't think thats an option.

By comparing the design of the roof edges by the window with e.g. a 330ci BMW I noticed that in Italia function follows form, whereas in ze Germany form follows function. Meaning that in a Bimmer the roof extends 3 cm over the window & seals, just like in a house. But the B roof looks better. So there you have it. Hope B of 2014 will have this remedied, but I doubt it(y).
 

Attachments

  • 09102010760.jpg
    09102010760.jpg
    1.1 MB · Views: 66
  • 09102010799.jpg
    09102010799.jpg
    529.7 KB · Views: 55
  • 09102010753.jpg
    09102010753.jpg
    642.6 KB · Views: 53
  • 09102010813.jpg
    09102010813.jpg
    480.9 KB · Views: 59
  • 09102010790.jpg
    09102010790.jpg
    896.2 KB · Views: 49
  • 09102010766.jpg
    09102010766.jpg
    605.1 KB · Views: 52
Finally a few weeks back the driver's side pretension of the Airbag system arrived and was installed along with new clutch, and off to MoT I went ... to fail on "VIN on car body not readable" (the VIN under the small flap by the passgr seat). So got the VIN restanzaed at no cost at the local Fiat Centre as they failed to notice that on MoT pre-check they did. Great service, that.

MoT and Finnish reg is now a reality, :D and next MoT is on April 2012 as they did and approved a "Health check" on the car. A new feature of a government controlled MoT service here. And did I mention 230 euros it was, thank you very ouch.

Have had the car covered with a standard (read cheap) and a bit oversized outdoor car cover and the B is shining and healthy. That the cover is loose is good, so air circulates a bit and since I have a ski/luggage rack on the trunk lid and keep the wipers up, the cover touches the B only on the edges. Even when there's the usual 5 cm of snow on top every morning.

Bought winter tyres just before snow, Goodyear Ultragrip Ice + 195/55/15", made specially for Scandinavian winters. They are quieter than my Fulda summer tyres (which were recycled), and the grip is very good. Not as grippy as studded tyres on ice, of course, but hey, if you know how to drive, no probs there. And the ride comfort is superior.

Been driving around about 500 kms on snow fun now.
The next immediate fix is to replace thermostat, as the mpg is horrible with the OEM stuck so that the engine doesn't heat above 1/4 on the road. Cabin warmth is excellent, so I hope just replacing the thermostat will correct the engine temp, and return the 10 liters/100 km in town it should.

Oh, and the oil leak from the sump is minor, no need to add any oil in 3 months. BUT the radiator is leaking like government intelligent agencies, so that is due for renewal next summer. Fun, but a bit on the expensive side. But then, every hobby has its costs.

Happy winter motoring everyone!

Keep your locks and hinges well oiled, so yer nervs don't get boiled (y)

ps. the pics I had to make a dash "artsy" as I shot them with my nobile phone's camera, which is quite poor for taking picts in the dark...
 

Attachments

  • 04122010910.jpg
    04122010910.jpg
    4.3 MB · Views: 54
  • 04122010911.jpg
    04122010911.jpg
    4.7 MB · Views: 53
  • 04122010917.jpg
    04122010917.jpg
    737.3 KB · Views: 54
  • 04122010915.jpg
    04122010915.jpg
    2.3 MB · Views: 50
  • 04122010912.jpg
    04122010912.jpg
    1.8 MB · Views: 63
Thermostat changed today at the 127k mark. Judging by the hose clamps, the original thermo was still on. Took 4,5 hours to do though, as mine has the original air intake hoses, and I live the slow life.... I think is worth it: Car heats up faster, nearly to the halfway mark within a 15 minute drive in -10 C weather.


If someone has problems with the "Italian engine temps", I encourage that one to change the thermostat. Mine cost 40 euros at a local auto parts store. And this particular thermostat fits to many other Fiat/A-Romeos. It should look like this: http://cgi.ebay.de/Thermostat-Thermostatgehause-FIAT-Barchetta-NEU-/220328111538?pt=Autoteile_Zubeh%C3%B6r&hash=item334c942db2

Below are some instructions, I cannot be held liable for any mistakes or damages ensued from following these...(y)

First remove the battery.
Second drain the coolant by loosening the lowest coolant hose. Let the coolant run out, and tighten the hose back on with a garden hose clip.

The thermostat is a dash tight to get to, but once you get the battery and the intake hoses out of the way (if you have the originals, as mine does) the toughest part is removing the old clamps and nudging off the hoses.

Remember to unclip the blue wire attached to the green plug on the thermostat. Save and reuse the green plug on the new thermostat. To have more space easily I also removed one 10mm nut above the thermostat that has two hoses coming to it, and this is attached to somekind of oil tube (no clue what this bi is) in the engine block, pulled the "tube" out of the block and pushed the 2-hose "tube" gently out of the way.

The hoses go back on like a charm. And you need to have 3 sizes of garden hose clamps to tighten the hoses back on.

A new thermostat you buy should have a new rubber gasket with it. Using the old one may not be possible, as the sealant will most likely have it stuck to the old thermostat. Put gasket sealant on the rubber gasket. Put grease or copper grease on the bolts, and tighten up. Put the other bits back on. Mix a coctail of 50/50 water/coolant. Add coolant 1 liter at a time so you know how much you have put in... It should take in about 2 litres with ease. Then start the car and let it idle for about 10 minutes with the coolant reservor cap off and in-car heater in red-hot and blower set in 4. Idle until the the reservoir start to bubble (I could not find the "nipple" to bleed the coolant system, but hope this does the trick). Then fill up with coolant to the max-mark. Presto.
 
This post contains eBay links which may earn a commission at no additional cost to you.

Attachments

  • 14122010986.jpg
    14122010986.jpg
    663.3 KB · Views: 51
  • 14122010985.jpg
    14122010985.jpg
    803.4 KB · Views: 45
  • 14122010983.jpg
    14122010983.jpg
    607.9 KB · Views: 53
  • 14122010981.jpg
    14122010981.jpg
    666.7 KB · Views: 55
  • 14122010980.jpg
    14122010980.jpg
    729.2 KB · Views: 49
Last edited:
Make shure you bleed the air out at the radiator. You can find it at the top of the radiator right. You will have to remove the resonator first to access it.

Big rep+ for the tutorial:slayer:
 
Been some time since my last post, but here's what I've done for B this summer.

Floor fixed, again:
Took the seats and floor mats out again, as last summer's welding seams started to look rusty again. The welding was on the front side seams where the floor meets the firewall (I take this is typican Italian car problem, that floors rust here.), and the welder apparently hadn't put etch primer on the weld so rust again appeared. So I resealed the whole floor another time: this time with 3 coats of Hammerite (1 primer, 2 top coats). I say, it looks great, and the car is so quiet.

As you can see from the piccy, I have cut the floor in half in the middle, so I can take out the floor without removing the whole middle console.

Talvi 2012 1763.jpg

New discs and pads:
Never done this job before, but it was both fun and pain. Parts cost about 120€ from local shop. Job took about 3 days, 1ltr coffee, 3 packs of smokes, and 3 lagers (in sauna after the day was done). Made all the difference in stopping, specially in the rain.

The fronts were easier as the piston is large and easy to push back in, but the rears were tight, as there was serious rust, and no grease. Anyone doing the discs should have at least 2cm deep 12mm socket, or you won't be able to open the long & slim disc bolts. I also painted the calipers in silver, so they look quite new now.

Talvi 2012 1748.jpg
Talvi 2012 1742.jpg

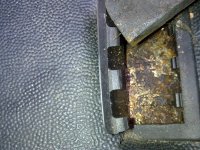
Rear arches derusted and coated:
Awaited to see serious rust, but after poking with a screw driver found only a small hole in the rear upper part on both sides. Serious rust forming on the front seams though. Should be fixed no for years to come, and protected from the winter elements ...road salt that is... what them b****rs keep on spreading here nowadays.

I first grinded out the rust,
- then applied a base coat of Hammerite Special Primer,
- then a coat of "Hammerite direct to rust Metal Paint",
- and 1 layer of 100% zinc,
- and finished off with 2 layers of Dinitrol 4941 stone protection (black rubbery stuff).

This has also aided in reducing road noise, so once I have the window seals fixed I should have Lexus quietness in B.

Talvi 2012 1768.jpg
Talvi 2012 1766.jpg
Talvi 2012 1770.jpg
Talvi 2012 1773.jpg


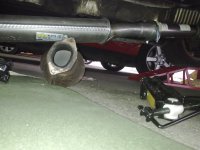
New driveshaft inner & outer covers, and exhaust rubbers
Done by local Fiat dealer, as I wan't these parts origianls and under a real warranty.

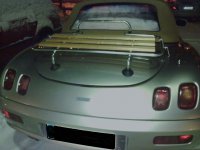
Ordered today a new black mohair/sollenland hood from Germany (300e), and a complete set of soft top seals from Henk (300€-10% Fiat Forum discount) used, but I hope good, as my current ones are all torn at the edges). I will change the hood my self, so nice weather is on my wating list (no garage, just summer house out doors)

Still need to source some type of seals for the lower parts where the bottom edges of the hood frame meets the B-pillar, as most Bs have them perished, or lost in hood renewing. I suppose they are about 10c, in lenght, and need to be both flexible, and provide a tight seal.

09102010819.jpg
 
WOW.. congrats... well here in Dubai we dont have to worry about cool or cold weather.

Just a lot of sand and heat.. its has it own set of problems... all manageable

The Winter is when we open the top... October thru February the best convertible driving weather... that's when you really enjoy the B... sunny and 20 every day.

Hi, I was in Dubai in 2008/9 and spotted a silver B , is this you?
 
Put on new exhaust downpipe, flexi, kat, middle end. All original spec as I like steel. Oh and the exhaust rubbers need to be renewed yearly with the original 25kg exhaust. Nice! Never a boring moment.


A hint is to use nothing but original catalysator....I bought a copy-cat one new: fits and works but emissions too high. So when you replace your cat, do as I: order used one from Henk.
 

Attachments

  • 2012 2392.jpg
    2012 2392.jpg
    513.5 KB · Views: 46
  • 2012 2399.jpg
    2012 2399.jpg
    364.8 KB · Views: 42
  • 2012 2397.jpg
    2012 2397.jpg
    582.8 KB · Views: 44
Back
Top