CamperVanBeethoven
Member
I've watched a youtube video where I think the mechanic used drill bits, yes.
I got the proper kit for about £17 from ebay.
I got the proper kit for about £17 from ebay.


I've watched a youtube video where I think the mechanic used drill bits, yes.
I got the proper kit for about £17 from ebay.
This is something we all used to do in the past with no problems, however with modern engines using crank and cam sensors along with ECUs and closer tolerances for emissions etc. the argument is that if the cam wheels are slackened along with using locking /setting pins etc. then timing should be more precise once retightened in the exact position.this guy is not locking the cam's - except the cam wheel..
I'm thinking it's aboutThis is something we all used to do in the past with no problems, however with modern engines using crank and cam sensors along with ECUs and closer tolerances for emissions etc. the argument is that if the cam wheels are slackened along with using locking /setting pins etc. then timing should be more precise once retightened in the exact position.
Most of us would argue that if engine turns over without contact with valves etc. starts and runs fine, then few of us would notice the difference compared with one done to exact manufacturers spec.
I know on some Toyota chain driven engines as they wore they would go into limp mode and throw up errors re the difference between the Cam and crank sensors of the stretched chain, though one could argue that belts may not stretch to the same extent.I think the slackening of the cams pulley is to cater for very slight differences in belt lenght even though the teeth count is (must be) exactly the same. However if one assumes that the belt stretches a little during its life, the initially fitted new belt will not be exactly the same lenght at the end of its life (potentially 190k km) so the timing would have also changed slightly and I believe that would not affect very much the functioning of the engine.
As I mentioned before I have not done mine yet, but when I do it, I will just be locking in place the crankshaft and the camshaft pulley without slackening it. Only if that does not seem to work properly I will bother to lock the cam shafts as well and then slacken the camshaft pulley.
Again, I believe that the initial assembly line installation is as close to perfection as you can get and it is hard to replicate in a workshop replacement on the vehicle. So I will be keeping a watchful eye on it and wait another year or so, but certainly within the recommended 190k km.
.
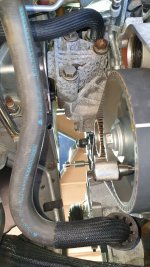
Hi, removing the headlight is 2 minutes' work and gives you so much more visibility and easier access so definitely do that. For the engine mounting I took the load on a trolley jack and then slackened eacb bolt off about 8mm and then lowered the jack and removed it. As you're working underneath it's just a little easier to move around when the jack isn't there. Once the belt was done I lifted the engine using the trolley jack and then tightened the bolts back up again. Another advantage of lowering just those few mm was that I could then get a socket and 1/2" ratchet onto the crank bolt - prior to that I'd been using a ring spanner. I refitted the original auxiliary belts but what I did notice is that they retained their shape after removal so will need changing soon as the rubber is hardening up a bit. For the stretch belt I do have a tool for removal and refitting but it fouled the chassis leg so I just put a bit off side loading on the belt and rotated the engine to get it off. Getting it back on was really easy - fitted fully to the aircon pulley and to the bottom of the crank pulley and just rotated the engine - it went straight on.Hi RS Pilot. Thanks for the tips and all the photos.
That 2017 belt in the photos looks like new to me! Mine is also a 2017 and I am thinking that the Fiat 5 years recommended replacement is way too early. After looking at your removed belt, would you still do the job?
Mind you mine has 120000km so I may do it next year.
A few questions if you don't mind.
1)Most of the job is done from underneath, so is it really worth removing the OS headlight?
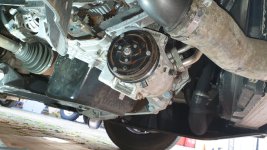
2)Loosen the engine mounting, do you need to support the engine from below with a jack? I have heard people just leverage the engine a bit with a pry bar just to remove the crank pulley.
3)Did you replace accessory belt & tensioner and A/C belt as well?
4)Did you use the special tool for the A/C stretch belt or just put it on the pulley before retightening the A/C compressor?
Thank you!
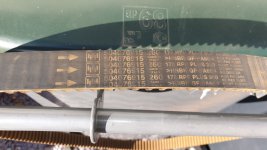
Good point , although strangely enough I have never used the marks on belts, just followed my AutoData Timing Belt book details on all vehicles.Resurrecting this old thread as I did my timing belt.
Warning for people doing it, the timing white lines on some belts are wrong, as CamperVanBeethoven mentioned above.
Even the old original Fiat belt has the wrong white line marking on it.
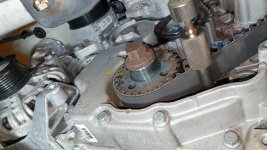
Teeth count between my marking done with the old belt in place and locks on crankshaft and camshaft in, is 59 teeth between crankshaft mark and camshaft mark.
Teeth count on the white lines still visible on the original Fiat belt just removed is 62 teeth.
Yes , what ever you have to do it must be securely supported.From what I have read everyone agrees that you can't get the crank pulley off without moving the engine, but some say you don't need to lower the engine on later models, because you can just prize it sideways with a crowbar.
I would be a bit concerned about leaving the engine supported on my hydraulic trolley jack as its very old so the jack could be sinking due to fluid getting past the seals. I would prefer a mechanical scissor jack.
I just changed my timing belt today. Reluctantly, as I thought it was still good. But I had a ticking noise from that area, so I decided to do it. I had already bought the kit a year or so ago.From what I have read everyone agrees that you can't get the crank pulley off without moving the engine, but some say you don't need to lower the engine on later models, because you can just prize it sideways with a crowbar.
I would be a bit concerned about leaving the engine supported on my hydraulic trolley jack as its very old so the jack could be sinking due to fluid getting past the seals. I would prefer a mechanical scissor jack.
Yes, but this timing belt kit is sold specifically for the Ducato 2.3 engine. Why put timing marks on the belt if they are not right or if the same belt is used on different engines with different timing marks.Good point , although strangely enough I have never used the marks on belts, just followed my AutoData Timing Belt book details on all vehicles.
I do check length and teeth, plus same tooth mesh in gears.
Apart from on some vehicles I have come across modified pulley diameters resulting in the need for longer or shorter belts.
Well said. It causes a lot of worry and wasted time trying to figure out why the damn marks won't line up too!Yes, but this timing belt kit is sold specifically for the Ducato 2.3 engine. Why put timing marks on the belt if they are not right or if the same belt is used on different engines with different timing marks.
It just confuses people. May as well not have any timing lines at all so everyone knows they have to mark the old belt themselves before removing it and transfer the marks to the new one.
Glad you've confirmed the problem is real!Resurrecting this old thread as I did my timing belt.
Warning for people doing it, the timing white lines on some belts are wrong, as CamperVanBeethoven mentioned above.
Even the old original Fiat belt has the wrong white line marking on it.
Teeth count between my marking done with the old belt in place and locks on crankshaft and camshaft in, is 59 teeth between crankshaft mark and camshaft mark.
Teeth count on the white lines still visible on the original Fiat belt just removed is 62 teeth.

It concerned me too. Then luckily the old original belt on the engine also had timing lines and they were wrong, just like the new belt.Glad you've confirmed the problem is real!