

FIAT 500X 1.4L REPLACING REAR PADS and ROTORS
View attachment FIAT 500X REPLACE REAR PADS and ROTORS.pdfPDF HAS PHOTOS
First wheel will take 2 hours and second 1 hour.
Wear rubber gloves and make sure there’s space and good light (headlight).
These are my steps. Yours my vary and I take no responsibility for anything whatsoever that may happen to you, third parties, property, other people, your car, other cars, your community and environment, your tow, country universe.
1. chock front wheels so car can’t roll forward or back
2. turn car on, disengage electric park brake, turn car off
3. disconnect negative terminal on battery (10mm socket)
4. remove wheel cap with flat screwdriver
5. loosen wheel nuts (17mm)
6. lift car
7. remove wheel
8. place jack stand under frame for support and paper to catch brake dust
9. wash the wheel, let it dry, put under car as a back up should car fall
10. pull connector upwards after pressing the tab inwards, I used a small screwdriver
11. undo the 2 bolts holding the actuator (Torx T-30); photo was taken from under the wheel arch
12. pull the actuator out
13. with 17mm spanner, undo the two bolts holing brake caliper; a ratchet spanner would be great because there isn’t much space between the bolts and brake line
14. I undid top bolt first & lower bolt second (don’t undo the guide pin bolts which have dust cover)
15. pull brake caliper off and either tie to suspension spring with rope, or rest it on a box
16. undo 5mm hex screw holding the rotor and spray WD40 where rotor meets hub
17. with rubber mallet, strike rotor from behind & turn the wheel, eventually the rotor will come off
18. to achieve extra working room, pull out spring (1) and brake line (2) and place caliper on a box
19. pull out inner brake pad first, lift up the little tab (arrow)
20. loosen cap on brake fluid reservoir
21. gently turn bolt CLOCKWISE with TORX T-40 to wind back motor but don’t make it tight
22. using your fingers push piston in, this doesn’t take much force
23. remove the four rusty clips, picture shows what the assembled pad will look like in the caliper; remember the little tabs overhang the pad
24. insert new clips into caliper and then insert inner brake pad (this one has a spike); to get the small tab in front of the pad, I found it easier to insert the far end of the pad on an oblique angle and then fiddle the front part; hard to explain and photograph. Do the inner clips and then pad. Once done, slide the caliper out (dust seals will slip off) and then insert outer clips and pad. Push caliper in, and dust seals will slip back on. Install rotor.
25. Tighten cap on brake fluid reservoir
26. Use threadlocker and tighten up two bolts; apply copper grease before reinstalling rotor
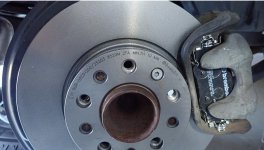
27. Finished product
28. Remove everything from under the car. Apply thin coat copper grease before you put wheel back on. Lower car. Torque to 89 Ft/Lbs and replace the cap.
29. Do same on other side. Reconnect battery, check that cap is tight on brake fluid reservoir. Turn car on. Apply brake gently.
30. Brembo state you need to bed-in the brakes. This has 2 steps:
a) drive very slowly and gently press brake, this removes the outer protective coat; check that the contact between pads and rotor is perfect before proceeding to (b)
b) drive 40km/h and gently apply brake for 3 seconds without stopping; release; accelerate to 40km/h; do this 30 times
c) takes 300-500km for brakes to settle in
View attachment FIAT 500X REPLACE REAR PADS and ROTORS.pdfPDF HAS PHOTOS
First wheel will take 2 hours and second 1 hour.
Wear rubber gloves and make sure there’s space and good light (headlight).
These are my steps. Yours my vary and I take no responsibility for anything whatsoever that may happen to you, third parties, property, other people, your car, other cars, your community and environment, your tow, country universe.
1. chock front wheels so car can’t roll forward or back
2. turn car on, disengage electric park brake, turn car off
3. disconnect negative terminal on battery (10mm socket)
4. remove wheel cap with flat screwdriver
5. loosen wheel nuts (17mm)
6. lift car
7. remove wheel
8. place jack stand under frame for support and paper to catch brake dust
9. wash the wheel, let it dry, put under car as a back up should car fall
10. pull connector upwards after pressing the tab inwards, I used a small screwdriver
11. undo the 2 bolts holding the actuator (Torx T-30); photo was taken from under the wheel arch
12. pull the actuator out
13. with 17mm spanner, undo the two bolts holing brake caliper; a ratchet spanner would be great because there isn’t much space between the bolts and brake line
14. I undid top bolt first & lower bolt second (don’t undo the guide pin bolts which have dust cover)
15. pull brake caliper off and either tie to suspension spring with rope, or rest it on a box
16. undo 5mm hex screw holding the rotor and spray WD40 where rotor meets hub
17. with rubber mallet, strike rotor from behind & turn the wheel, eventually the rotor will come off
18. to achieve extra working room, pull out spring (1) and brake line (2) and place caliper on a box
19. pull out inner brake pad first, lift up the little tab (arrow)
20. loosen cap on brake fluid reservoir
21. gently turn bolt CLOCKWISE with TORX T-40 to wind back motor but don’t make it tight
22. using your fingers push piston in, this doesn’t take much force
23. remove the four rusty clips, picture shows what the assembled pad will look like in the caliper; remember the little tabs overhang the pad
24. insert new clips into caliper and then insert inner brake pad (this one has a spike); to get the small tab in front of the pad, I found it easier to insert the far end of the pad on an oblique angle and then fiddle the front part; hard to explain and photograph. Do the inner clips and then pad. Once done, slide the caliper out (dust seals will slip off) and then insert outer clips and pad. Push caliper in, and dust seals will slip back on. Install rotor.
25. Tighten cap on brake fluid reservoir
26. Use threadlocker and tighten up two bolts; apply copper grease before reinstalling rotor
27. Finished product
28. Remove everything from under the car. Apply thin coat copper grease before you put wheel back on. Lower car. Torque to 89 Ft/Lbs and replace the cap.
29. Do same on other side. Reconnect battery, check that cap is tight on brake fluid reservoir. Turn car on. Apply brake gently.
30. Brembo state you need to bed-in the brakes. This has 2 steps:
a) drive very slowly and gently press brake, this removes the outer protective coat; check that the contact between pads and rotor is perfect before proceeding to (b)
b) drive 40km/h and gently apply brake for 3 seconds without stopping; release; accelerate to 40km/h; do this 30 times
c) takes 300-500km for brakes to settle in

