

cmm.sedici
New member
In what appears to be an escalating obsession with 'modding' my car, i've again spent a few hours taking my sedici interior apart.....
In my box of things I had a spare marine-grade 12v socket and a belkin micro usb car charger so decided that the rear seats needed some access to power for mobile phones and whatnot.
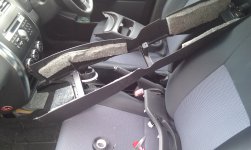
I decided that the best place for this would be on the back of the centre console where the handbrake, switches and cupholder are. The only problem with this getting access to that part of the trim so figured that the whole thing needed to come out! Here's what i did...
1. take off the two triangular pieces of trim in the front footwells. If you just give them a pull they will unclip.
2. take off the trim where the 4x4 switch is mounted. This again just pulls off vertically. I started near the back where the cupholder is. Once it's unclipped, disconnect the 4x4 switch (and other options that you might have, like ESP or heated seat switches).
3. unpop the gear stick leather cover. I pulled the leather up and the silver circle of trim popped out. You don't have to take the whole thing off, just unclip it.
4. take out the trim with the two cupholders. This is another pull and unpop job. Push the circluar gearstick trim through the whole so that you can remove the trim.
5. Next, there are 5 screws to remove to get the main console out. Two where the triangular pieces were removed, one just in front of the handbrake, and two by the rear cupholder. The trim should then just come out.
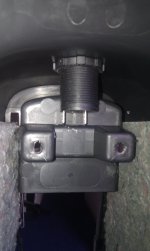
6. I then marked up where I wanted the socket to go. You don't have much choice here because the two screws at the back attach to a metal plate which only leaves a bit of room. I marked it up so that the socket was as high as possible.
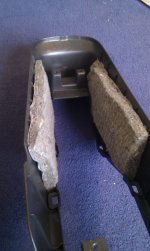
7. I drilled a pilot hole then used a large drill bit to core a 25mm diameter hole. The socket was 26mm diameter so I then used a knife to fine-tune the fit.
8. I then soldered on two pieces of wire that were the length (and a bit longer) of the centre console.
9. Refit the centre console and all the other bits in reverse order.
10. I then paralleled the wire to the back of the cigarette lighter. I already had this at hand because of my previous addition for putting a micro USB cable in for my phone. So I added the new wires to the circuit.
11. Checked it all with a multimeter and gave it a go. Fortunately it all worked!
Remember to safely insulate all your new connections. I used thick red and black insulation tape for shielding, taping the wiring up for routing it, and also for reference if I need to revisit the wiring.
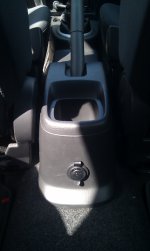
So now i've got the cigarette lighter socket that i use for my fm transmitter, a 12v socket that has the belkin USB socket in the middle of the car, and an identical marine 12v socket in the boot!
This organised destruction was also a good opportunity to give the sides of the centre console and the cupholders a bloody good clean!
Again, hope this is useful for someone. At least you guys know if can be done if you're thinking of a similar thing. I've attached a few photos.
In my box of things I had a spare marine-grade 12v socket and a belkin micro usb car charger so decided that the rear seats needed some access to power for mobile phones and whatnot.
I decided that the best place for this would be on the back of the centre console where the handbrake, switches and cupholder are. The only problem with this getting access to that part of the trim so figured that the whole thing needed to come out! Here's what i did...
1. take off the two triangular pieces of trim in the front footwells. If you just give them a pull they will unclip.
2. take off the trim where the 4x4 switch is mounted. This again just pulls off vertically. I started near the back where the cupholder is. Once it's unclipped, disconnect the 4x4 switch (and other options that you might have, like ESP or heated seat switches).
3. unpop the gear stick leather cover. I pulled the leather up and the silver circle of trim popped out. You don't have to take the whole thing off, just unclip it.
4. take out the trim with the two cupholders. This is another pull and unpop job. Push the circluar gearstick trim through the whole so that you can remove the trim.
5. Next, there are 5 screws to remove to get the main console out. Two where the triangular pieces were removed, one just in front of the handbrake, and two by the rear cupholder. The trim should then just come out.
6. I then marked up where I wanted the socket to go. You don't have much choice here because the two screws at the back attach to a metal plate which only leaves a bit of room. I marked it up so that the socket was as high as possible.
7. I drilled a pilot hole then used a large drill bit to core a 25mm diameter hole. The socket was 26mm diameter so I then used a knife to fine-tune the fit.
8. I then soldered on two pieces of wire that were the length (and a bit longer) of the centre console.
9. Refit the centre console and all the other bits in reverse order.
10. I then paralleled the wire to the back of the cigarette lighter. I already had this at hand because of my previous addition for putting a micro USB cable in for my phone. So I added the new wires to the circuit.
11. Checked it all with a multimeter and gave it a go. Fortunately it all worked!
Remember to safely insulate all your new connections. I used thick red and black insulation tape for shielding, taping the wiring up for routing it, and also for reference if I need to revisit the wiring.
So now i've got the cigarette lighter socket that i use for my fm transmitter, a 12v socket that has the belkin USB socket in the middle of the car, and an identical marine 12v socket in the boot!
This organised destruction was also a good opportunity to give the sides of the centre console and the cupholders a bloody good clean!
Again, hope this is useful for someone. At least you guys know if can be done if you're thinking of a similar thing. I've attached a few photos.
")