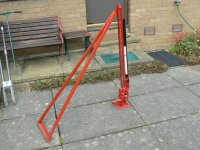
Farm Jack? some will be wondering what I'm talking about? Well, it's one of these:

Obviously Mrs J was not home when I took that picture and, on reflection, thank goodness it didn't fall over!
So how did I get involved with such a strange jack and what on earth do I do with it?
I first saw one many years ago when I worked at the wee garage out in Dalkeith because one of our farmer customers always had one in the back of his Land Rover. When I asked him what it was he demonstrated it to me by jacking the vehicle up by it's bumper and I thought it was a most impressive tool but couldn't really see a use for it in what I was doing - stayed in my memory though.
Then, when I had the gardening squad for 15 years - largely, although not exclusively, looking after the mature grounds around churches and church properties - I found us replacing rotted off fence posts on a quite regular basis. It's a real pain digging out old, concreted in, fence post stumps and it can take a long time for each post. Then I saw a video where the chap was using a farm jack to pull the stump from the ground. I managed to convince the boss we should buy one and it was amazing.
Many domestic fences are constructed using panels these days so if you're replacing a rotted off post you've got to get the existing bit of post and it's concrete infill out of the ground before you can install the new post, you can't simply put another one in the ground next to it. Likely you'll find, if a post has rotted off, there's nothing to easily get hold off you end up digging all round it and levering it out with a big bar or something else. This can take a lot of time and is very tiring if you've got a few to do. Also you end up with a big hole which takes a lot of filling in and a lot more concrete to stabilize the post. Using the Farm Jack it's much more like pulling a cork out of a bottle. Start off by digging a narrow trench around the top of the concrete until you get down far enough to loop a lifting rope, length of steel hawser, length of chain, or whatever around it, doesn't need to be very deep. Position the jack over the stump, loop the hawser/rope over the jack saddle and jack it out of the ground. - Positioning the jack can be a problem and I'll mention more on that in a minute. Also it sometimes helps to use a big "podgering bar" thrust into the ground beside the concrete and wiggled about to loosen the hold of the ground on the concrete. This video gives you the general idea:
Of course these guys have got it easy because they don't have a rotted post. With a rotted off post you'll have to dig down enough to get the rope/hawser/chain/whatever around the top of the concrete slug, but that's much easier than trying to dig the whole slug out of the ground.
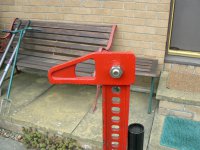
You'll notice the two bits of 2x4 (I love those imperial measurements) they use to stabilize the jack. The problem is without them you'll find the jack just tumbles over and the forces involved are far to great to resist by hand. I made a simple metal "A" frame which bolts to the top of the jack, didn't occur to me to use wood. actually i think the metal frame looks neater anyway:
Very simply fitted by just using the bolt that otherwise would be holding the top jaw in place:
The jack we bought for the squad was the cheapest I could find (budgetary restriction) and I did have some problems with it because of the cost cutting. The lifting mechanism wasn't very easy to engage and sometimes jumped out and the metal it was made from seemed to be a bit soft and wore quite quickly. For this reason, when it came to buying one for myself, I went for the "Rolls Royce" brand, Hi-Lift. and I don't regret it as it's still working as it did the first time I used it. Bought it from these people: https://www.paddockspares.com/off-road/jacking/hi-lift-jacks.html I went for the standard 4ft jack because they had it on a very good offer at that time. I did wonder if the longer version would have been better but the 4 ft one is fine for what I use it for, also pulls tree stumps too.
The other great advantage of buying that brand is they sell all the parts which means you can repair it if you break something. I also like that they have designed it with a sacrificial bolt in the lifting mechanism, it's the slightly smaller one bottom fight:
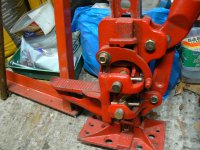
If you try to lift something well outside the jack's range the bolt snaps but the jack just stays where it is so doesn't collapse and maybe endanger you or wreck the jack. I've sometimes literally "swung" from the handle and haven't broken that bolt yet. Haven't had to try an extension bar on it yet, maybe that would do it?
I bought mine because I had a fence to replace at my older boy's house just after I retired - so couldn't get my hands on the works one and we did the whole job, at quite a leisurely pace, in a couple of days.
Here's where we'd got to at the end of the first day. All the old posts pulled and half the new fence built:

And the final result on the afternoon of the second day:

Some of these photos may be familiar to some of you as I think I posted some of them a few years ago when I built that fence. and that's made me think that you DIY guys might be interested in how I approach digging virgin holes for posts? If not, just bug out now!
In fact doing that fence meant pulling the old posts from the house down to the wall but beyond that it was all new fencing so new holes had to be dug. You can spend a lot of time and expend a lot of energy digging a fence post in virgin soil. For a six foot high fence you need at least a two foot deep hole. If all you've got is a spade it starts out quite easy and gets harder and harder the deeper you go. The ground can be very hard, there's stones and boulders to deal with and as the hole gets deeper you can't angle the spade so the earth stays on it and a lot of it just tumbles back into the hole each time you lift the spade! You end up making the hole wider than it needs to be simply to get the earth out! After thinking about this, quite a lot, I realized it boils down to two main problems. 1) loosening the earth and keeping the hole "neat" 2) getting the earth out of the hole without expending too much effort and without making the hole excessively large in diameter.
While I had the gardening squad my boss (not a gardener) suddenly turned up one day with six "revolutionary" he said, hand cultivators which were supposed to make weeding and cultivating borders easier for us. This is one of them:
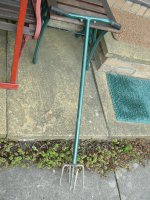
and it's "business" end looks like this:

We didn't really get on with them, a normal hoe worked better, so they got parked in the back of the tool shed. However I discovered that they dig a very accurate hole if simply thrust into the ground and rotated a few revolutions. What this does is loosens the earth nicely but doesn't disturb the earth around the hole. Then you need to get this loosened earth out of the hole and a proper post hole digger is hard to beat for this. We had a wooden handled one which eventually we broke the handles off. When I bought my own I got one with glass fibre handles which, although they seem to bend slightly, are actually much stronger:
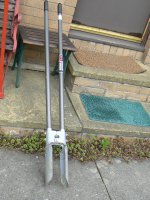
When you move the handles apart it closes up the spade blades and all you do is lift the loosened earth straight out of the hole:
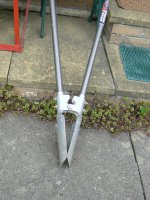
So the procedure is to first loosen the earth with the "twisty" cultivator and then lift the loosened earth out. Then back in with the twisty tool to loosen another 5 or 6 inches of soil and lift that out with the post hole digger. You just keep on doing that until the hole is as deep as you want it. Compared to any other method I've tried this is much quicker - 2 ft deep hole in "normal soil with no excessively big stones in about 5 minutes flat without really breaking sweat. Of course you can use just the post hole digger on it's own but because the earth isn't loosened, especially as you get deeper, it's difficult to close the spade ends and, in fact, we broke the handle of the one with the wooden handles that we initially had - and I've seen a number of post hole diggers with broken handles. The glass fibre handles go a long way to alleviating this problem but loosening the soil with the "twisty" cultivator first almost does away with the problem altogether and, more importantly if you're doing a number of them, it makes it much quicker when the soil is loose.
Here's a two foot deep virgin hole dug in this way in just a few minutes - look at how neat it is:

and here it is, with it's new post, braced, waiting for the concrete:
I like to use batch mixed "real" concrete rather than the quick setting stuff. Better and cheaper in my opinion - unless I'm maybe doing just one post in which case the quick setting stuff is very convenient, but you do need to brace the post overnight if using batch mix.
I also have a couple of stout "helpers" for when I hit something that's too big or hard for the "twirly" tool to cope with:
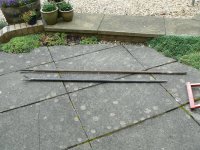
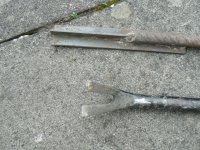
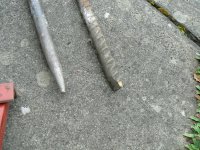
One is inch rebar with a chisel shape on one end and a digging shape on the other. The other bar is made of some very hard metal, and is very heavy, with a pointy end and a "Y" shape on the other. I've had a good length of scaffold pole on that one and been swinging off it without it bending:
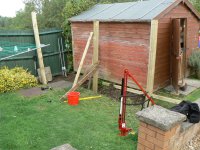
Once you get sorted out with being able to pull the old stumps quickly and with little effort and being able to dig the hole quickly and without breaking too much sweat, fencing starts to become a real fun thing to do. I used to dread tackling rotted off posts but now I say "bring it on"! Here's "the gang" hanging out in my back garden:

The two "podgering" poles are on the ground behind me, I forgot to put them in the photo.

Obviously Mrs J was not home when I took that picture and, on reflection, thank goodness it didn't fall over!
So how did I get involved with such a strange jack and what on earth do I do with it?
I first saw one many years ago when I worked at the wee garage out in Dalkeith because one of our farmer customers always had one in the back of his Land Rover. When I asked him what it was he demonstrated it to me by jacking the vehicle up by it's bumper and I thought it was a most impressive tool but couldn't really see a use for it in what I was doing - stayed in my memory though.
Then, when I had the gardening squad for 15 years - largely, although not exclusively, looking after the mature grounds around churches and church properties - I found us replacing rotted off fence posts on a quite regular basis. It's a real pain digging out old, concreted in, fence post stumps and it can take a long time for each post. Then I saw a video where the chap was using a farm jack to pull the stump from the ground. I managed to convince the boss we should buy one and it was amazing.
Many domestic fences are constructed using panels these days so if you're replacing a rotted off post you've got to get the existing bit of post and it's concrete infill out of the ground before you can install the new post, you can't simply put another one in the ground next to it. Likely you'll find, if a post has rotted off, there's nothing to easily get hold off you end up digging all round it and levering it out with a big bar or something else. This can take a lot of time and is very tiring if you've got a few to do. Also you end up with a big hole which takes a lot of filling in and a lot more concrete to stabilize the post. Using the Farm Jack it's much more like pulling a cork out of a bottle. Start off by digging a narrow trench around the top of the concrete until you get down far enough to loop a lifting rope, length of steel hawser, length of chain, or whatever around it, doesn't need to be very deep. Position the jack over the stump, loop the hawser/rope over the jack saddle and jack it out of the ground. - Positioning the jack can be a problem and I'll mention more on that in a minute. Also it sometimes helps to use a big "podgering bar" thrust into the ground beside the concrete and wiggled about to loosen the hold of the ground on the concrete. This video gives you the general idea:
Of course these guys have got it easy because they don't have a rotted post. With a rotted off post you'll have to dig down enough to get the rope/hawser/chain/whatever around the top of the concrete slug, but that's much easier than trying to dig the whole slug out of the ground.
You'll notice the two bits of 2x4 (I love those imperial measurements) they use to stabilize the jack. The problem is without them you'll find the jack just tumbles over and the forces involved are far to great to resist by hand. I made a simple metal "A" frame which bolts to the top of the jack, didn't occur to me to use wood. actually i think the metal frame looks neater anyway:

Very simply fitted by just using the bolt that otherwise would be holding the top jaw in place:

The jack we bought for the squad was the cheapest I could find (budgetary restriction) and I did have some problems with it because of the cost cutting. The lifting mechanism wasn't very easy to engage and sometimes jumped out and the metal it was made from seemed to be a bit soft and wore quite quickly. For this reason, when it came to buying one for myself, I went for the "Rolls Royce" brand, Hi-Lift. and I don't regret it as it's still working as it did the first time I used it. Bought it from these people: https://www.paddockspares.com/off-road/jacking/hi-lift-jacks.html I went for the standard 4ft jack because they had it on a very good offer at that time. I did wonder if the longer version would have been better but the 4 ft one is fine for what I use it for, also pulls tree stumps too.
The other great advantage of buying that brand is they sell all the parts which means you can repair it if you break something. I also like that they have designed it with a sacrificial bolt in the lifting mechanism, it's the slightly smaller one bottom fight:

If you try to lift something well outside the jack's range the bolt snaps but the jack just stays where it is so doesn't collapse and maybe endanger you or wreck the jack. I've sometimes literally "swung" from the handle and haven't broken that bolt yet. Haven't had to try an extension bar on it yet, maybe that would do it?
I bought mine because I had a fence to replace at my older boy's house just after I retired - so couldn't get my hands on the works one and we did the whole job, at quite a leisurely pace, in a couple of days.
Here's where we'd got to at the end of the first day. All the old posts pulled and half the new fence built:

And the final result on the afternoon of the second day:
Some of these photos may be familiar to some of you as I think I posted some of them a few years ago when I built that fence. and that's made me think that you DIY guys might be interested in how I approach digging virgin holes for posts? If not, just bug out now!
In fact doing that fence meant pulling the old posts from the house down to the wall but beyond that it was all new fencing so new holes had to be dug. You can spend a lot of time and expend a lot of energy digging a fence post in virgin soil. For a six foot high fence you need at least a two foot deep hole. If all you've got is a spade it starts out quite easy and gets harder and harder the deeper you go. The ground can be very hard, there's stones and boulders to deal with and as the hole gets deeper you can't angle the spade so the earth stays on it and a lot of it just tumbles back into the hole each time you lift the spade! You end up making the hole wider than it needs to be simply to get the earth out! After thinking about this, quite a lot, I realized it boils down to two main problems. 1) loosening the earth and keeping the hole "neat" 2) getting the earth out of the hole without expending too much effort and without making the hole excessively large in diameter.
While I had the gardening squad my boss (not a gardener) suddenly turned up one day with six "revolutionary" he said, hand cultivators which were supposed to make weeding and cultivating borders easier for us. This is one of them:

and it's "business" end looks like this:

We didn't really get on with them, a normal hoe worked better, so they got parked in the back of the tool shed. However I discovered that they dig a very accurate hole if simply thrust into the ground and rotated a few revolutions. What this does is loosens the earth nicely but doesn't disturb the earth around the hole. Then you need to get this loosened earth out of the hole and a proper post hole digger is hard to beat for this. We had a wooden handled one which eventually we broke the handles off. When I bought my own I got one with glass fibre handles which, although they seem to bend slightly, are actually much stronger:

When you move the handles apart it closes up the spade blades and all you do is lift the loosened earth straight out of the hole:

So the procedure is to first loosen the earth with the "twisty" cultivator and then lift the loosened earth out. Then back in with the twisty tool to loosen another 5 or 6 inches of soil and lift that out with the post hole digger. You just keep on doing that until the hole is as deep as you want it. Compared to any other method I've tried this is much quicker - 2 ft deep hole in "normal soil with no excessively big stones in about 5 minutes flat without really breaking sweat. Of course you can use just the post hole digger on it's own but because the earth isn't loosened, especially as you get deeper, it's difficult to close the spade ends and, in fact, we broke the handle of the one with the wooden handles that we initially had - and I've seen a number of post hole diggers with broken handles. The glass fibre handles go a long way to alleviating this problem but loosening the soil with the "twisty" cultivator first almost does away with the problem altogether and, more importantly if you're doing a number of them, it makes it much quicker when the soil is loose.
Here's a two foot deep virgin hole dug in this way in just a few minutes - look at how neat it is:
and here it is, with it's new post, braced, waiting for the concrete:

I like to use batch mixed "real" concrete rather than the quick setting stuff. Better and cheaper in my opinion - unless I'm maybe doing just one post in which case the quick setting stuff is very convenient, but you do need to brace the post overnight if using batch mix.
I also have a couple of stout "helpers" for when I hit something that's too big or hard for the "twirly" tool to cope with:

One is inch rebar with a chisel shape on one end and a digging shape on the other. The other bar is made of some very hard metal, and is very heavy, with a pointy end and a "Y" shape on the other. I've had a good length of scaffold pole on that one and been swinging off it without it bending:


Once you get sorted out with being able to pull the old stumps quickly and with little effort and being able to dig the hole quickly and without breaking too much sweat, fencing starts to become a real fun thing to do. I used to dread tackling rotted off posts but now I say "bring it on"! Here's "the gang" hanging out in my back garden:
The two "podgering" poles are on the ground behind me, I forgot to put them in the photo.


