Technical Multipla 1.9 JTD 2001 rear brake bleeding problem

Currently reading:
Technical Multipla 1.9 JTD 2001 rear brake bleeding problem

MarkX

Member
Joined
Mar 21, 2013
Messages
314
Points
62
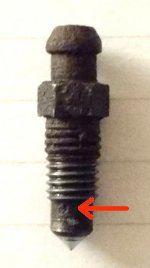
After replacing the front brake flexi hoses on my Multipla 1.9 JTD 2001 reg recently, I bled the front brake calipers no problem. As my MOT's coming up, I thought I'd bleed the back brakes too as after attaching my Sealey bleed device to the brake fluid reservoir, the only extra work to do the back brakes was just attaching a bleed tube to the bleed nipple and opening it. So I thought. On the front brakes I only had to open the bleed nipple about 1/4 turn to get the brake fluid to flow. On the back brakes, after unscrewing the bleed nipple several full turns no fluid came out of the nipple end into the bleed pipe, but from the base of the bleed nipple only.

I have read somewhere that with ABS brakes, to bleed the brakes a device has to be attached to OBD? connector and an instruction given to open valves to allow bleeding. Does anyone know if this is the case with a 1.9 JTD 2001 Multi?

If so, I will probably get the Fiat dealer to do the brake bleeding.

Otherwise, I'm thinking of replacing the rear brake cylinders, which I believe are not expensive, and would eliminate them and/or bleed valves as the cause of the problem.

FYI: The local garage replaced both rear brake cylinders in the last 2 years (or did he just say he did?), so I can't believe that the bleed hole/valve has become blocked in such a short time. And how?

Can anyone shed any light on my problem?
 
Last edited:
You don't need to get involved with the abs unit to bleed the brakes in your case.
It's most likely that your nipples are blocked.
Do you have drum or disc rear brakes?

I suggest trying new nipples they shouldn't be expensive.
Blow through the new ones to make sure they work before fitting.
 
Previously I have had new bleed nipples where the drilled holes didn't line up , that caused a lot of confusion till discovered.

Often lower pressure in pressurised brake bleeders works better than higher pressure.
 
Thanks Jackwhoo. That's a relief about the ABS. I'll check the nipples for blockage.

They are drum brakes on the back.

One pain - I bought and installed new nipples for the front calipers when I did the flexi hoses, they fit perfectly and were cheap - 2 for £1. So I got another 2 for the back brakes and the b*ggers don't fit. The nipples on the back are smaller diameter.
 
If you have the correct equipment you could remove the nipples , one at a time, and carefully use a drill bit to clear it out. Then blow through to check it.
Cars with abs don't usually have a rear brake load proportioning valve.
Does your car have one of these valves?
They are bolted to body , have a lever on them , lever is connected to rear axle or rear swing arm usually a spring connection.
 
Ok thx. I've ordered a brake cylinder, they're only cheap £7, to pick up later today, hoping that the bleed nipple is the same size as the existing one. If so, I can either buy another single nipple for pennies, or clean out the old one as you suggest to use on the other brake cylinder.

My car has ABS. I know because a few times I've slammed the anchors on (probably driving too close to the car in front) and the car kept moving - with the ABS judder - towards the other car's back bumper - what the f*ck!!! I would prefer *no* ABS.

Also rear wheel bearing I ordered a while back had the magnetic ring on it for the ABS.

>>>You don't need to get involved with the abs unit to bleed the brakes in your case.
So this still applies, right? The front calipers bled no problem, but is bleeding the rear brakes with ABS different?
 
Last edited:
It's most likely that your nipples are blocked.

FYI: Neither back brake bleed nipple had an end cap on it, and everything in the back wheel arches is covered in muck, so could well be blocked.

The front calipers on the other hand, both nipples still have their end caps.
 
Don't worry about the abs unit , it only really needs to be activated while bleeding when first assembled at factory, or if the brake fluid was allowed to go nearly empty and then abs was activated.

Plan to try new nipple from new cylinder first is good because it would be a pain to fit new wheel cylinder and find you couldn't bleed it and so not be able to drive car.
 
Cheers. And yes, I would like to avoid having to fit new brake cylinder(s).

Will let you know how the plan goes.
 
It's most likely that your nipples are blocked.

I suggest trying new nipples they shouldn't be expensive.
Blow through the new ones to make sure they work before fitting.

Spot on diagnosis.

I picked up the rear brake cylinder this afternoon, unscrewed the bleed nipple and then got a second identical nipple (for the second brake cylinder) off the motor factor.

Went to my usual place to do my repairs, unscrewed the old nipple and hey presto the bleed hole was completely blocked, so blocked I had to look closely to find out where it was (see photo). I then screwed in one of the new nipples (see photo) which fit perfectly *and* once it was screwed in far enough, brake fluid started to come out of the hole in the end of the nipple not the base, as was the case with the old nipple.

I then successfully bled the brake with my Sealey kit. Sorted. Just for good measure I then bled the diagonally opposite front brake, but only clear fluid came out - no air bubbles (I bled this brake when I replaced the front brake hoses recently).

Then had some good luck for once - I loosened the second rear brake cylinder nipple and fluid came out of the end immediately, meaning it was OK and not blocked. Brilliant. Left the old nipple in place - if it ain't broke... Bled this brake too and it's front partner diagonally opposite. Again with the latter only clear fluid came out. This perhaps confirms what someone has said elsewhere - that you can bleed each brake independently.

Thx jackwhoo, you're saved me about a half day's work not having to replace the rear brake cylinders.

PS. My garage said he replaced both rear brake cylinders a year ago. Does this bleed nipple look only 1 year old to you?

Also, blocked bleed hole - a good advert for nipple end caps? I'll have to knock some up. Motor factor doesn't have 'em.

One last thing FYI: The rear brake bleed nipple is smaller in diameter than the front brake nipples - so they are *not* interchangeable.

Photos:
- Old (blocked) bleed nipple
- New bleed nipple
 

Attachments

  • Old nipple.JPG
    Old nipple.JPG
    34.8 KB · Views: 46
  • New nipple.JPG
    New nipple.JPG
    36.4 KB · Views: 45
Last edited:
And after a hard (half) day's successful mechanic-ing, time for some refreshment...

I knew I'd find a use for that 7mm spanner one day...
 

Attachments

  • Bottle.JPG
    Bottle.JPG
    113.8 KB · Views: 47
That's all the work done for the MOT identified at the pre-MOT test. Time to get the MOT booked...
 
To cap the nipples you can use a piece of plastic tube with one end blocked with glue or silicone or anything else you think will do the job.
If you are really keen use a small brush and apply grease around nipple thread and cylinder (do this with nipple screwed into cylinder so as not to contaminate brake fluid with grease)
 
I can use a bit of clean bleed tube with perhaps the end stop of a Bic pen stuck in the end. I'll find something... I think greasing up the threads etc. is a good idea.

Going to do an oil change, even though the engine passed the emissions tests at pre-MOT. Oil change is due. Going to stick some Wynn's Engine Flush in first. Have used it before. Got some good Castrol oil.
 
Last edited:
Hey presto...

DIY brake bleed valve end cap/dust cap

Background: The bleed valves on my rear brake cylinders have no end caps/dust caps, and the new bleed valves I bought have none either, so if you are in the same boat, here's how to make your own:

Tools and materials required:

- Scissors
- Knife or saw
- Superglue or other glue
- Piece of clean bleed tube
- An old pen

Procedure:

1. Cut off a piece of clean bleed tube with the scissors.
2. Take the pen to pieces, remove the on/off button.
3. Put some glue in one end of the piece of bleed tube.
4. Push the *closed* end of the pen button into the glued end of the bleed tube and leave to set.
5. With the knife or saw, cut off the button so that it's flush with the end of the bleed tube.
6. Cut off the other end of the bleed tube to make the end cap the correct length - my end caps are 15mm long.

Takes about 5 minutes to do. (It took longer to write this than to make them!)

Photos:
- Brake bleed valve
- Tools and materials required
- DIY end cap/dust cap
 

Attachments

  • Bleed valve.JPG
    Bleed valve.JPG
    36.4 KB · Views: 33
  • Tools and materials.JPG
    Tools and materials.JPG
    31.9 KB · Views: 88
  • End cap.jpg
    End cap.jpg
    158.5 KB · Views: 48
Last edited:
Hello chaps and chapesses and those inbetween,

After all the work over the last few weeks, my Multi passed it's MOT first time today. Not bad for a 17 year old car! Just a few advisories. The garage reckons the rear subframe will survive till at least the next MOT. Slight play in a track rod end (TRE) ball joint, so as I'm getting the tracking done anyway, I'm going to replace both TRE's, as if one TRE is on the way out, the other might follow shortly. They're only cheap from the local motor factor at £12 each inc. Haven't done a TRE for a few years but if I remember, the trick is to completely undo the nyloc nut from the ball joint pin/bolt *before* splitting the ball joint from the steering arm with my pickle fork... Seem to remember doing it the other way round once and then realising my mistake... :doh:

I can't do tyres and exhausts myself which were identified on the pre-MOT, but I did everything else listed on the pre-MOT, and some more, so reckon I have saved at least £300 in labour. And what price would you put on the mechanic-ing learning you gain in the process? The car also had it's annual spring clean in prep for the MOT so the inside has gone from looking like a fly-tipping site to the inside of the Tardis - there's so much space! :D

TQ to the forum-ers who assisted with my efforts.

Tip: MOT pre-testing: It is the *first time* ! in several decades of owning cars and taking them for MOT's that I have had my car pre-tested, and in this case long before (6 weeks before) the MOT. Previously I have always waited until right before the MOT certificate expires to book and take the MOT - without a pre-test. Pre-testing weeks in advance takes all the stress out of the situation, especially with an old car - you have weeks to do any identified work, by yourself or through a garage, and/or if the damage/repairs are too costly, you have weeks to look for another car. It's a no-brainer. Why I didn't think of it before now...

FYI: For the MOT, I took my car back to the same garage where the pre-test was done, made sure it was the same tester as before doing the MOT, and handed him his pre-test notes to remind him what work he'd identified needed doing and that I'd completed.

Mark
 
Last edited:
Back
Top