Technical how to change a track rod end

Currently reading:
Technical how to change a track rod end

minimad99

Driver Extraordinaire
Joined
Sep 14, 2004
Messages
1,145
Points
229
Hi all,

I've had some knocking and slight vague steering for a while but have just put up with it.
Well i've got some holiday coming so thought i'd enjoy myself and do some work on the stilo.
I've already got the droplinks ready to be changed but thought i'd also change the track rod ends at the same time if they are a DIY job.
I believe they are all the original parts, if not then they have definately covered 70,000 miles since i've had it so should be ready be changing, LOL

Can anyone write a step by step guide for me and include any specific tools required, i know i need to buy a balljoint splitter but anything else?

Should i use OE spec ones, such as
http://www.shop4parts.co.uk/index.cfm?action=catalogue.list
at £22 plus VAT
or have a chat with my local motor factor

Ta
 
Last edited:
Hello mate,

.....again from memory as no stilo on the drive to check measurement but....

1, Jack car up
2, Remove wheel
3, Measure the distance between the end of the threads and the end of the old track rod end (also check that the new track rod ends are the same length as the old ones, if not...make allowance for this)
4, Loosen the nut at the end of the track rod end (steering rack side) (not to much as you can use it as a reference point to do the new track rod end up to...
5, Undo the nut attaching track rod end to the steering knuckle
6, Use ball joint separator to remove ball joint from knuckle.
7, Unscrew track rod end from steering rack.... throw in bin etc
8, Screw new track rod end on to steering rack shaft. Stop by the nut you left and when the measurements are correct,
9, Tighten nut at steering rack side of track rod end.
10, Put ball joint back in steering knuckle
11, Do up bolt securing track rod end to steering knuckle.

12 (I would advise) Get tracking checked.

Hope that helps,
Alan
 
No real need to stick with Fiat's own brand if you can find alternatives
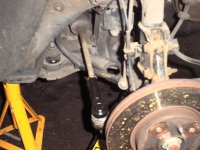
stilo steering 1.JPG
As your tracking may well be altered then you're either looking at a steering alignment being required after the job or, if you check out your steering the way I describe in the Stilo Guides, then you can put your steering accurately right back to where it was at the end but you need to check it out BEFORE you start the job

It's a very quick job to do but loosen the rod end lock nut just a fraction first before you do anything else as it's usually very tight. Leave the locking nut there as it will help guide you to put the new track rod end in close to the right place on refitting. There's some flat sides on the track rod end for the right sized spanner to provide a counter force


If the ball joint breaker won't make the joint break, give the ball joint splitter a sharp blow with a hammer directly on the joint

As you'll need to rotate the track rod arm to align the tracking, loosen the steering rack gaiter's grip on the track rod end as it usually sticks to the rod with time and will fold up and tear if it's not free to rotate

Always a smart idea to use axle stand anyway but you could do with your hyd jack free in case you need to jam the new track rod end taper in tight so you can tighten the securing nut
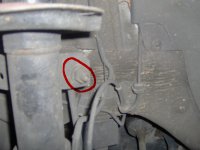
links 4.jpg
For the antiroll bars joints you can easily hold their ball joints on the weatherproof gaiter with a mole wrench to stop them from spinning as the gaiter is very tough and that makes the whole job possible in minutes
 
Last edited:
Well i completed this today on both sides, along with replacing both wishbones and both droplinks.

Was relatively straight forward apart from a couple of stubborn bolts.

QUESTION;
The only thing that i can't find an answer for is, how do you fully tighten the track rod end nut?
It came with a nylock nut so won't come undone but i can't find the torque setting on elearn, also when you tighten it so far it would start to spin surely?

I have fully tightening it with a standard ratchet but when using a torque wrench set around 70Nm it still turns, hence this post.
Could one of you confirm for me if this is the correct?
ta


the track rod end nuts are there purely for tracking, the nylock is to stop the nuts as they dont fully tigthen up, adjusting the nuts will cause the wheels to pos or neg Tow

have a looky here
http://www.etyres.co.uk/glossary-tyre-terms?term=alignment-tracking
 
Are you both talking about the same thing?
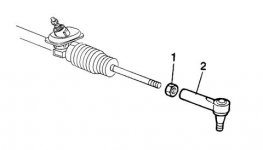
Track rod end has a locking nut item 1 next to it, you turn the track rod (also called tie rod) to adjust the tracking and the lock nut locks it up. This isn't a nylock nut though

track rod end.JPG
The nylock nut holds the tapered track rod end ball joint in the hub track arm and i think this i what minimad refers to. If this is spinning then put a hyd jack underneath to force the taper joint to hold whilst you tighten the nut
 
Are you both talking about the same thing?
Track rod end has a locking nut item 1 next to it, you turn the track rod (also called tie rod) to adjust the tracking and the lock nut locks it up. This isn't a nylock nut though

The nylock nut holds the tapered track rod end ball joint in the hub track arm and i think this i what minimad refers to. If this is spinning then put a hyd jack underneath to force the taper joint to hold whilst you tighten the nut

Yep exactly that Decks, so you would just do it as tight a poss, no specific torque setting? I suppose as long as it's fully wound in it's fine.
 
Back
Top