Technical How do I remove the window winder / door card?

Currently reading:
Technical How do I remove the window winder / door card?

smart51

Established member
Joined
Oct 1, 2015
Messages
401
Points
167
Location
Birmingham
I have some new door mirrors that I should be able to see through the windows but I'm defeated bu the window winders. Can you give me a clue how to get them off?
 
I have some new door mirrors that I should be able to see through the windows but I'm defeated bu the window winders. Can you give me a clue how to get them off?
It's a long time since I removed one, but from memory you push the door card back slightly to gain access to the horse shoe clip that holds the handle on to the splined spindle, you can then push the clip off. When you want to replace it you refit the clip to thje handle and then when in correct position a gentle bump on the handle will pushthe handle over the spline allowing the clip to snap back into place.
 
There's nothing here that looks like a clip. Maybe mine is different because it is a 500R. Here are a couple of pics.

20230621_144805.jpg
20230621_144932.jpg
 
There's nothing here that looks like a clip. Maybe mine is different because it is a 500R. Here are a couple of pics.

View attachment 425756View attachment 425757
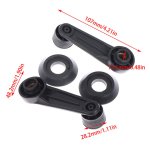
On the last picture you show, place a flat screwdriver between the handle and the movable part of the plastic boss to create a space, then if you look between the two the horse shoe clip can then be pushed out using either another screwdriver or a flat blade whilst holding the gap aprt with the first screwdriver. There is a proprietary tool for the job that looks like a steel rule with a wide groove cut out of the end, but I have always managed with a couple of screwdrivers.
You may find the clip needs to be pulled back along the line of the handle towards the winder end.
 
....well I haven't! But well done Smart51.

Tonight I tried the various "push back and look and pry", "see-saw a thin rag between the handle and the door card", "cut a slot in a credit card and push", "use trim removal tools" methods.....and....nothing!

With apologies to the OP but does anyone have any photos of the naked handle, the famous ring, where to go fishing for it (assume the shaft of the handle to be 12 O'clock) and what the proper tool looks like, preferably with dimensions so I can make something, please?

Also how many of the clips to each door are there?

All help, diagrams, clear instructions etc etc gratefully received!

Thanks

RDS
 
Assuming yours look like the last photo above and that you are trying to remove the window winder handle, then operation is exactly as I described and have done on literally 100s of vehicles since I first started working on cars in 1969, I agree it may be a little bid of a fiddle but has never taken more than 5 minutes to release the horse shoe clip that holds the handle on to the window regulator/winding mechanism, I have attached a photo of mechanism from an eBay advert, not ideal but if you look at where the handle goes on to the splined end you can see that at the inner end of the spline is a groove or recess that the horse shoe clip engages in .
The horse shoe clip is a spring metal wire with the two ears bent outwards slightly to assist in pushing onto the handle and then bends in either side to engage in the grove in winder spindle and at opposite end is slightly bowed which if you are having difficulty you may be able to make a slight hook on a piece of wire to drag the clip off, usually towards the revolving end of the winder. If tight once hooked on you may try pushing handle in towards door to release any slight tension. I suggest this as an alternative method but normally I just ease a gap between handle and door panel using a large flat blade screwdriver to be sure the clip has been previously fitted correctly, then use a thin straight screwdriver to push the clip off the handle usually in the direction of the winder swivel end.
The clips in the middle photo are not Fiat but to give you an idea of what you are trying to remove.
The last picture you may see where the clip locates in the winder groove.
Incidentally on refitting I usually set the the glass in the fully wound up position , but with the winder handle hanging vertically as this helps the window to not try to open slightly in use. Possibly a little grease may help ease handle on to spline with clip in place on finishing the job.
I don't know if this is the exact same type of handle you have, but it may help you see how the clip engages with it.
As I mentioned before there is a flat slotted blade tool to do the job on eBay, but I have never needed it.

1689834423450.png

1689834820632.png

1689835160807.png
 
Last edited:
If you look at the picture of the handle, there is a splined centre hole. On the outside of this, there is a boss cast on each end, one by the handle and one opposite. Between the bosses, there are two small slots, one on each side wall of the hole. The omega clip goes around one of the bosses and each end goes in one of the slots. In use, the ends poke through the slots and into a groove on the winder spigot. This stops the handle coming off.

To remove, you need to open up a gap between the handle and the trim ring. Find the end (or perhaps both ends) of the omega clip and push with a thin tool. I used plastic trim remover tool but a spudger or a very thin screwdriver would work. Cutting a slot in a credit card sounds like an excellent idea. Push the omega clip back so the ends aren't in the grove on the spigot, and the handle will come right off. I found it very difficult on the first door, but a lot easier on the second once I'd understood what to do.

To refit the handle, place the omega clip in the right position and push the handle back on the spigot. Again, I found doing the first one was frustrating but the second one went straight on.
 
Thanks both for taking the time to write; it is appreciated.

However, I have already tried these ideas without success. The issue is that I have to work in less than ideal circumstances in a very tight dark "garage" (there is not space to open the car doors fully) and I cannot get the car outside at this stage. Hence I phrased the questions in the way that I need to address the issue given the limitations. I do not want to run the risk of digging into the door card vynil or cracking the handle etc etc

My handle appear similar to smart51's handle in his photo above.

As a result is anyone able to tell me please:

1 the width of the notch that I will cut out on a (second!) credit card to act as the push tool for the Omega shaped spring clip? Perhaps the notch is best with splayed rather than parallel sides so as to push the horseshoe right off rather than just get it started.
My 10-piece, 20-different-end trim clip removal set is not appropriate for the clearance here.
1a if any one has a pic of the special tool?
2 whether the "direction of push" is along the length of the handle arm or 90 degrees, 180 degrees or 270 degrees to the handle arm?
3 whether the gap into which the card tool is to be introduced is a) between the door card and the bottom (static) part of the handle or b) between the bottom (static) part of the handle and the rotating part of the handle?
4 whether on reassembly (assuming I do not expire from frustration beforehand) with the window closed, where the arm should be placed, using the clock face as a reference. I hear what Bugsymike says; I ask because I have found numerous restored classic cars have the handle exactly where a knee needs to be when the window is up or down, which is not comfortable. The factory must have worked out the appropriate position and not place it haphazardly.

Thanks again!

RDS
 
Last edited:
Just found this, It is generic but the dimensions might be similar; however I'd be appreciative if someone might measure the diameter on their spare handle....

click the pic to see the dimensions not blurred.
 

Attachments

  • example window winderjpg.jpg
    example window winderjpg.jpg
    68.5 KB · Views: 30
Last edited:
Sorry can't help with dimensions, but basically you push the clip off between the chrome part of the moving handle and the static boss on most vehicles and whatever tool you are using will be roughly parallel to the door card, pushing from the spindle end of the handle towards the revolving "ball" end of the handle on that plane. It may help if you put the handle in a down position so you can get your eye line from above looking down towards the back of handle maybe even with window right down and a good torch shining at the handle.
Sometimes a small mirror can help in difficult places, I have an old round dentists mirror on a handle, it's only about an inch around but magnifies slightly as well, I bought it from an autojumble some years ago along with a couple of those stainless steel locking plier type things they use to grip teeth etc. with, given what they were designed for they are very strong and useful .
I sympathise re working conditions, we haven't all got large heated and well lit workshops to work in:(.
 
  • Like
Reactions: RDS
The direction of push will be along the handle arm or 180° to it, depending on which way the clip was last fitted. Your pushing tool should be parallel with the door. You won't push the clip all the way off as it will be caught in the round bit of the handle, or the boss.

You can probably do it with the door closed, though if you try, removing the seat might help. Pull the handle end of the winder away from the door and shine a torch into the gap. Even better, hold the gap open with a flat tool. See if you have the end or the middle of the clip showing. You have to push the end(s) until the clip moves back maybe 10mm, then the handle comes off in your hand.
 
  • Like
Reactions: RDS
Mike and Smart many thanks for these ideas. I will give it a go next time I am there. I am grateful that the car is not out in the open so will not complain about the working conditions.

Remove the seat? .....funnily enough I got fed up with the winder job and installed the new seat!! What a faff that was too - stuck on runners even fully greased; it is not coming out again.
 
If i
Mike and Smart many thanks for these ideas. I will give it a go next time I am there. I am grateful that the car is not out in the open so will not complain about the working conditions.

Remove the seat? .....funnily enough I got fed up with the winder job and installed the new seat!! What a faff that was too - stuck on runners even fully greased; it is not coming out again.
t's ever had a replacement floor the runners will be to blame. I've gradually ground the width of the flanges until the seat almost moves without using a lump hammer. ;)
 
If i

t's ever had a replacement floor the runners will be to blame. I've gradually ground the width of the flanges until the seat almost moves without using a lump hammer. ;)
yes, this may have indeed happened because the ways on the runners were not level and possibly not parallel throughout the run. Also, the side notched flanges (to allow the seat position to be fixed) were warped in places and catching on the release lever as the seat was slid back. I am hoping things will free in use....but I won't hold my breath. Getting in was a struggle and I ended up with cramp in some very odd muscles.
 
I found some time this afternoon and attacked this job.

A slot cut into a credit card 10mm wide x 15mm (or just slightly larger) pushed between the two halves of the handle assembly along the direction from the winder knob to the centre disengages the OMEGA clip just enough for you to get a 90deg pick into the resulting gap between the two halves of the handle and fish the clip out from the round side of the handle.

There is debate on which "hour of the clock" the handle should be re-installed. I hope there is a position with the window fully up and fully down where the handle does not foul my knee.

I used a new credit card, so any creditors expecting payment....tough, you've a wait ahead.
Glad you succeeded :).
Re handle position try fitting without the clip until you find best position for your seating style.
As I mentioned earlier if hanging vertically it discourages the window dropping open especially on older cars where the channel is looser, which in the past enabled thieves to bang against the glass in a downwards direction, causing the window to drop so they could gain access.
 
Many thanks for your encouragement; I look forward to the reassembly.....actually I am not because of the possible damage to the lovely new door cards. The retaining strip's gap looks a little narrow to slide the card under it without damage.

The circular finisher/escutcheon around the interior door release was damaged and is chromed plastic. Does anyone sell metal ones?

Noted with thanks the tips re handle position, some grease on clip/groove.

Whilst I have the door card off, beyond greasing the mechanism, is there anything worth adjusting in there?
 
Any rust treatment required inside panel? Though don't let it clog water drain holes or jam window and lock mechanism.
good thought: the paint is not the best inside and I only spied one drain hole 2/3 the way back from the hinge, which i though tio tbe a bit mean. Are there usually more per side?
 
Back
Top