Well finally, I bit the bullet and replaced the matrix, a few days of better weather helped the situation.
It is a horrible job, it took me around 1 1/2 days. If anyone needs help to do this in the future I've detailed a few points below. My car is mark 1 Punto 75 ELX, with the centre console.
1. Remove centre console + handbrake plastic surround casing. Remove radio, remove oddments tray.
2. Remove all the centre vents & controls. (Remember to first to remove the singular hidden screw behind the fan speed knob!).
3. Disconnect battery negative. Disconnect fan motor & resistor pack connector and remove both. Separate the circular fan housing from fresh air inlet (5 or 6 small screws).
4. Remove drivers seat (I removed passengers as well). Remove steering wheel cowling. Undo the four nuts that hold the steering wheel assembly to bulkhead. Lay steering wheel in the driver side foot well. (This way there is no need to loosen or adjust any steering components). Adhere to safety precautions if an air bag is fitted. (Mine does not have this feature).
Once the steering wheel has been dropped down, remove the two screws, the ends of which you can now see, they really are quite difficult to access and you will need a suitable length screwdriver for this.
5. Remove and unplug speedo.
6. Remove three screws along the top of the dash (on my car have to remove the speaker covers first, to get to this). There are a further two similar screws at the bottom left and right ends of the dash, and a further two at the centre bottom. Making a total of seven of these types of screws used.
7. Open the glove box and remove one of the two big bolts (which is located in a hole through the back of the compartment). The other big bolt on the other side, is accessed by removing the main fuse box cover (the hinges for this can be slide back and it can be removed completely), the bolt is on the top right. Remove the other bolt and spacer at the bottom of the fuse box.
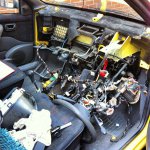
8. Open bonnet, locate and remove two M6 nuts, one holds the circular fan housing to the bulkhead, the other is the all important single fixing to the bulkhead of the ventilation system. This is to the top left of the matrix pipes, viewed from the front of the car. Disconnect the two water pipes in this area to the matrix, if you haven't done this already. Picture showing the 'front' of the ventilation system, for reference of nut location.
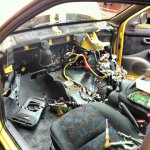
9. You should now be able to ease the dash out, hinging from the drivers side/ fuse box area, as you don't want to disturb too much here if it can be helped. I didn't remove the dash from the car, but moved the passenger side back about 12-18" inches for access to the vent. system.
My car has the secondary fuse box for the sunroof, electric mirrors etc in the glove box, I cut some of the cable ties, removed the two screws at either end, and pushed the fuse box back through the dash, but didn't altogether remove, to allow for better access.
10. Undo the fan housing to vent. system ducting by undoing the screws on the fan mount end. Leave the ducting attached to the vent. system.
11. Remove the two M6 nuts at either side of the top of the vent. system. (Its worth noting that the two halves of the vent system cannot be separated when fixed in the car, because of the two studs on the bulkhead). Disconnect the two connectors at the top left here.
11. For cars with a centre console, remove the screw that holds the lower ducting to the floor of the car. Unclip the duct from the vent. system.
12. At this point I had unbelievable trouble, as you can imagine with the car in this many pieces, and with this last piece to remove, the vent. system, is the only thing left, but it would not budge, I looked for for further screws but they where none. What had happened with may car is that that the vent system had become bonded to the heat/sound proof material on the inside of the bulk head. This material had become sticky. Only thing to do was to lever it with a large flat screw driver around the edges (minding the windscreen), although a crow bar may help if you go gently - I didn't have one. Finally, I freed it from the bulkhead. Hooray!
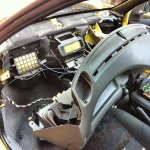
13. Undo the fresh air/re-circ control cable (mark the outer where the clip is positioned) and the two electrical connectors from the vent. controls. See how the vent control panel can stay connected via a piece of spring metal to the vent. system. (See pic below showing this).
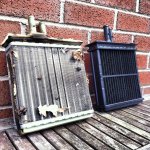
14. It is now free from the rest of the car. The picture above shows it being recovered to the house. Once at this point it is simple enough to remove the heater matrix, just two small screws hold it to the vent system. This picture shows why its best to keep the ducting on the left hand side of the vent. system, although here I have already removed it, there are some difficult screws to access at the top of the dash area.
15. I chiselled some of the heat/sound deadening material off around the matrix area with a craft knife, so it would sit reasonably flush.
16. In true Haynes Manual instructions style; refitting is the reversal of removing. When the vent. system was back in the car I checked the vent. controls for correct operation at all the settings, and when the dash was back in, but the speedo was yet to be fitted, I found I could adjust the white control wire for the knob that directs the air, from the aperture left for the speedo by unclipping and re-positioning the fixing of the outer cable.
17. Luckily everything went back reasonably easily, I refitted the pipes, on the first test drive I found the injection light to be on, and the car running lumpily - I had forgotten to replace the three wire connector on the throttle body - when this was replaced all was okay and with the pipes refitted I now have hot air as well as a dry interior.
All I can say is never want to do this again!


")