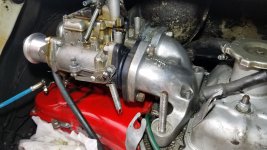
My '72 500L has a Dellorto DHLA 40, and it appears that the only way to remove it is by pulling the whole engine out of the engine bay. The yellow circles are studs which are too long- the carb hits the engine bay before it's free of them. The blue circles are nuts to join it to the manifold, with x's being on the other side... several of the blue marks are seemingly impossible to remove without the whole assembly being off of the engine or at least out of the engine bay. Does anyone know how in the world I might be able to remove the carb without pulling the engine?? I can't even access the spark plugs either because the manifold is in the way.


You are using an out of date browser. It may not display this or other websites correctly.
You should upgrade or use an alternative browser.
You should upgrade or use an alternative browser.
Technical DHLA 40 Removal???
- Thread starter Hutbed
- Start date
Currently reading:
Technical DHLA 40 Removal???

I should note- the purpose of this is to check my plugs, clean out the carb, and replace the rubber bits between the carb and manifold since one is torn due to absurdly violent bouncing during normal operation (it broke the rubber mount, then broke metal when I hard mounted it).
the hobbler
Distinguished member
- Joined
- Jul 25, 2012
- Messages
- 4,400
- Points
- 1,106
Hi Dax---have you thought of removing the very long studs by the "double-nut" method first? If they were removed (and subsequantly shortened to a "only as required" length), it looks at if the carb/manifold unit could be removed "in-situ". Why are those studs so long?
Tom,
I tried exactly that, double-nut unscrewed them and they are about 5" (yes, FIVE INCHES, no typo) too long to remove due to hitting the engine compartment. I could cut them about 2" shorter, but with about 3" to go it wouldnt make a difference. It seems like a ridiculously poor design right now.
-Andrew
You are replacing the rubber bits so cut though them to remove carb.I should note- the purpose of this is to check my plugs, clean out the carb, and replace the rubber bits between the carb and manifold since one is torn due to absurdly violent bouncing during normal operation (it broke the rubber mount, then broke metal when I hard mounted it).
When carb out remove inlet manifold.
Manifold off , remove studs, cut slots in top of studs so they can be easily screwed in with flat blade screw driver.
Reassemble as suits you.
I was writing that while you posted studs are 5 inches long so potentially I have not helped.
Last edited:
With the stud nuts loose is it possible to lift the carb and manifold up enough to get a spanner on the one hidden nut that holds the split rubber stub on to manifold.
You may only get 1/16th of a turn at a time but could work?
You may only get 1/16th of a turn at a time but could work?
My '72 500L has a Dellorto DHLA 40, and it appears that the only way to remove it is by pulling the whole engine out of the engine bay. The yellow circles are studs which are too long- the carb hits the engine bay before it's free of them. The blue circles are nuts to join it to the manifold, with x's being on the other side... several of the blue marks are seemingly impossible to remove without the whole assembly being off of the engine or at least out of the engine bay. Does anyone know how in the world I might be able to remove the carb without pulling the engine?? I can't even access the spark plugs either because the manifold is in the way.
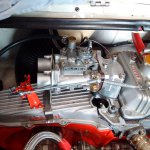
Hi Dax, do you have a Panda 30 head there?? If so you may find that the long studs go all the way into the crankcase and clamp the head down too. I would pull the engine, if only to see how you can shorten the stud length, you could cut the flexible mount, but that would still leave you with the stud/manifold problem. When you replace everything use a good strong brace (see pic) to stop the carb moving otherwise the flexible mount will split. Using these large carbs was one reason I adopted the smaller Solex 35phh on the Panda head.
Ian.
Attachments
Last edited:
the hobbler
Distinguished member
- Joined
- Jul 25, 2012
- Messages
- 4,400
- Points
- 1,106
Comparing Ian's picture of his cylinder head with yours (both Panda30) it would seem that for some obscure reason they have fitted 2 head studs that are excessively long. Jackwoo's suggestion of cutting the old rubbers and taking the carb off might be, strangly, the best way to go. With the carb out of the way it might be possible to wangle the manifold off. With the manifold off, it might then be possible to trim the long studs down to a sensible length, not forgetting to work out how long thestuds require to be before you remove the manifold. If you do decide to cut the studs 'in-situ', don't forget to leave a nut on the stud (below the cut line) prior to cutting the stud--it will help to clean up the thread at the cut.
As Ian mentioned, a support bracket is a 'must' to prevent rapid break-up of the carb rubbers.
As Ian mentioned, a support bracket is a 'must' to prevent rapid break-up of the carb rubbers.
With the stud nuts loose is it possible to lift the carb and manifold up enough to get a spanner on the one hidden nut that holds the split rubber stub on to manifold.
You may only get 1/16th of a turn at a time but could work?
No, there is simply no space to fit the tools, definitely not to turn them, on the rear side.
Comparing Ian's picture of his cylinder head with yours (both Panda30) it would seem that for some obscure reason they have fitted 2 head studs that are excessively long. Jackwoo's suggestion of cutting the old rubbers and taking the carb off might be, strangly, the best way to go. With the carb out of the way it might be possible to wangle the manifold off. With the manifold off, it might then be possible to trim the long studs down to a sensible length, not forgetting to work out how long thestuds require to be before you remove the manifold. If you do decide to cut the studs 'in-situ', don't forget to leave a nut on the stud (below the cut line) prior to cutting the stud--it will help to clean up the thread at the cut.
As Ian mentioned, a support bracket is a 'must' to prevent rapid break-up of the carb rubbers.
My big concern with doing that is the ability to reinstall- if I cannot disassemble, I cannot reasonably expect to rebuild it. I really just can't believe how bad of a design this is.
the hobbler
Distinguished member
- Joined
- Jul 25, 2012
- Messages
- 4,400
- Points
- 1,106
Looking at your pictures, It looks as if you are able to get the 2 very long studs cut down to a sensible length (the depth of the nut + deep washer + a couple of threads) you would be able to slide the manifold (complete with carb attached) over the studs to both remove and refit it.
ilgrilleto
New member
- Joined
- Aug 26, 2019
- Messages
- 31
- Points
- 8
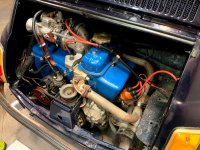
Hutbed, I feel your pain! Getting that DHLA 40 out is a bit tricky given how massive it is, made no better by those studs of yours! When I had to remove mine, I didn't want to take the whole intake manifold off just to clean up my carburetor and tried to get those nuts off that you circled in blue to no avail. I created unholy ratchet extension after extension with no luck, though maybe if i had a flexible extension it might have been possible. I eventually gave up and pulled the manifold, though that might be easier said than done in your case. I think Jackwhoo and The Hobbler's point of just cutting through the rubber is probably your best bet. You can order a set of Anti-vibration supports from mrfiat.com here that would make future maintenance much easier, or just have a local shop make the metal plates for you using the original rubber as a template for likely much much cheaper.
Attachments
That is great news and very funny because I was just typing a question if it was possible to remove the rear engine mount rubber and tilt engine.Solved!! Thanks for the inputs, but but what I was able to do is support the engine, remove the rear bumper/engine mount assembly, then lower it several inches. Got the carb and manifold off together easily. [emoji106]
Not knowing how easy it is to remove rear bumper/cross member thing ha ha
Well done
Last edited:
the hobbler
Distinguished member
- Joined
- Jul 25, 2012
- Messages
- 4,400
- Points
- 1,106
Dax;
It looks like the 2 very long studs are also head studs, so before you mark them in order to trim them to a sensible length, check that they are fully tight (with the 'double-nut' method). It would be somewhat embarrasing to trim them and then find that they are not fully home in the crankcase threads.
It looks like the 2 very long studs are also head studs, so before you mark them in order to trim them to a sensible length, check that they are fully tight (with the 'double-nut' method). It would be somewhat embarrasing to trim them and then find that they are not fully home in the crankcase threads.
Solved!! Thanks for the inputs, but but what I was able to do is support the engine, remove the rear bumper/engine mount assembly, then lower it several inches. Got the carb and manifold off together easily. ?
Well done Dax, Logical thinking and you saved any possible damage too
")
Ian.
the hobbler
Distinguished member
- Joined
- Jul 25, 2012
- Messages
- 4,400
- Points
- 1,106
Apologies---got you mixed up with another of my American 'electronic' colleagues with an almost identical engine set-up. How is military life in Corsica during these difficult times? Keep safe.
Similar threads
- Replies
- 1
- Views
- 254
- Replies
- 1
- Views
- 214