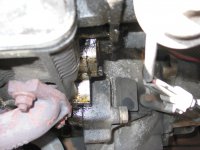
How To: Curing distributor oil leak on a FIRE engine Uno.
A guide for replacing the distributor O-ring on 999 and 1108 FIRE engine. (part number 9938590).
OK I think its better to remove the distributor completely and take the opportunity to check vacuum advance. Steps E and F ore optional, but good practice.
First of all, allow a good afternoon for the job – You don’t want to rush to finish as things easily go wrong. Start early if your working outdoors - you don’t want to run out of light. – then again – I took loads of pictures
This is exactly how I would do It,
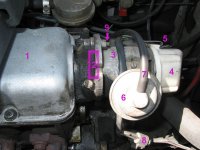
Key
1 – cam Cover
2 – Cylinder head to distributor join
3 – Distributor
4 – distributor cap
5 – distributor cap retention clip (lower one not in view)
6 – vacuum advance diaphragm
7 – vacuum advance pipe
8 – distributor electrical connector block
9 – Distributor mountain nut and washer – (lower one not in view)
A. with ignition off at all times!!! And engine cold Spray nut and washer 9 with WD40 or other penetrating fluid. Do the lower one too. Put a rag below 2 as there should be a small oil leak when you remove 3.
B. Scribe a couple of scratches across area 2. – This will help you refit the distributor with the correct angle essential for the timing.
C. Unclip 5. and rest 4. out of the way, with all wires connected.
D. Note which way the rotor arm is pointing, but leave in place. It won’t nessesarrily be pointing the same way as mine pictured BTW.
E. Unplug 8.
F. Follow pipe 7. to the back of the engine and disconnect. Note the pipe is fixed at a right angle and simply pulls off.
Clean the end of the pipe, and try blowing down it gently – less effort then blowing up a balloon. You should be able to blow a tiny amount, then no more. If this is the case the vacuum advance pipe and diaphragm are good.
If you can blow continuously, inspect the pipe for holes. Try removing the other end, blocking it and blowing again. If you can still blow, the pipe needs replacing. Try sucking too, if the pipe collapses it will also need replacing.
If the pipe is good, clean the outside as any oil on it will eat at the pipe and shorten its life.
Hmm it the pipe is good, but no resistance when connected to 6, 6 will need replacing. There is a chance both 6 and 7 could be bad, but your not that unlucky are you?
G. Have the rag ready, loosen nut 9, and the lower one about a turn, twit the distributor to break the seal, then remove the lower nut, put the nut and washer safe, hold the distributor 3 and remove the upper nut (put safe too). Twist 3 and should come away in your hand. pit it somewhere safe and claen, and turn your attention to the leaking oil.
Key2
1-0 – Coolant pipe on thermostat
2-0 - Cylinder head to distributor join
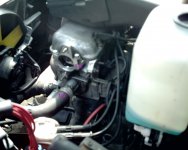
H. Don’t let oil drip onto the coolant pipe below – if it does – clean it off. I moved the rags for this picture BTW.
If there is no oil leek – this could mean the cam is running dry, perhaps due to a blocked oil pipe, which will need further investigation. It’s a separate job, which doesn’t need distributor off, and will need a cam cover gasket at least.
H. Cleans the old o-ring gasket off face 1-2. I used WD40, sprayed onto a rag to avoid getting any inside the cam. – If there are any stubborn bits I’d say don’t scrape off with anything metal as scratching this face will affect the future seal. If any bits fall inside the cam hole, fish them out, as they won’t do any good in there.
I. Blue Peter time – make 2-1 look like 2-2, using same method as in H.
J. Check inside the distributor for oil. – If you see any – check here https://www.fiatforum.com/showthread.php?t=24730- as the distributor inner seal needs replacing. My local FIAT dealer couldn’t supply the part so I haven’t done it yet. Mine were both OK, but I was going to do them both on the spare distributor. I’m not sure if the distributor will need dismantling like this. if it dose, make sure all the components go back in the same order.
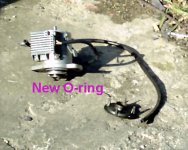
K. Fit the new O-ring to the clean distributor – yes it will go on it sits in the grove. Make sure it isn’t twisted as it will probably compromise the seal. I fitted the gasket dry in that I didn’t lubricate it.
L. Now your ready to refit the distributor. Twist the rotor arm back to the original position. It can go back 180 degrees the wrong way, or the right way.
M. Marry the distributor to face, may need the distributor body and / or rotor arm twisting, but it will be firmer than when you removed it due to the new O-ring gasket.
N. Now align the scribed marks from B., replace the washers and nuts 9 – don’t over tighten them (hard to explain how tight TBH ).
).
O. Replace both ends of 7, plug in 8, refit 4, remove your rags, clean where old oil leak ran down bell house, check for spare parts that should have been refitted and start her up.
Take a short drive and check for leaks. – check after a day or too and you should be OK and not see like below:
A guide for replacing the distributor O-ring on 999 and 1108 FIRE engine. (part number 9938590).
OK I think its better to remove the distributor completely and take the opportunity to check vacuum advance. Steps E and F ore optional, but good practice.
First of all, allow a good afternoon for the job – You don’t want to rush to finish as things easily go wrong. Start early if your working outdoors - you don’t want to run out of light. – then again – I took loads of pictures
This is exactly how I would do It,
Key
1 – cam Cover
2 – Cylinder head to distributor join
3 – Distributor
4 – distributor cap
5 – distributor cap retention clip (lower one not in view)
6 – vacuum advance diaphragm
7 – vacuum advance pipe
8 – distributor electrical connector block
9 – Distributor mountain nut and washer – (lower one not in view)
A. with ignition off at all times!!! And engine cold Spray nut and washer 9 with WD40 or other penetrating fluid. Do the lower one too. Put a rag below 2 as there should be a small oil leak when you remove 3.
B. Scribe a couple of scratches across area 2. – This will help you refit the distributor with the correct angle essential for the timing.
C. Unclip 5. and rest 4. out of the way, with all wires connected.
D. Note which way the rotor arm is pointing, but leave in place. It won’t nessesarrily be pointing the same way as mine pictured BTW.
E. Unplug 8.
F. Follow pipe 7. to the back of the engine and disconnect. Note the pipe is fixed at a right angle and simply pulls off.
Clean the end of the pipe, and try blowing down it gently – less effort then blowing up a balloon. You should be able to blow a tiny amount, then no more. If this is the case the vacuum advance pipe and diaphragm are good.
If you can blow continuously, inspect the pipe for holes. Try removing the other end, blocking it and blowing again. If you can still blow, the pipe needs replacing. Try sucking too, if the pipe collapses it will also need replacing.
If the pipe is good, clean the outside as any oil on it will eat at the pipe and shorten its life.
Hmm it the pipe is good, but no resistance when connected to 6, 6 will need replacing. There is a chance both 6 and 7 could be bad, but your not that unlucky are you?
G. Have the rag ready, loosen nut 9, and the lower one about a turn, twit the distributor to break the seal, then remove the lower nut, put the nut and washer safe, hold the distributor 3 and remove the upper nut (put safe too). Twist 3 and should come away in your hand. pit it somewhere safe and claen, and turn your attention to the leaking oil.
Key2
1-0 – Coolant pipe on thermostat
2-0 - Cylinder head to distributor join
H. Don’t let oil drip onto the coolant pipe below – if it does – clean it off. I moved the rags for this picture BTW.
If there is no oil leek – this could mean the cam is running dry, perhaps due to a blocked oil pipe, which will need further investigation. It’s a separate job, which doesn’t need distributor off, and will need a cam cover gasket at least.
H. Cleans the old o-ring gasket off face 1-2. I used WD40, sprayed onto a rag to avoid getting any inside the cam. – If there are any stubborn bits I’d say don’t scrape off with anything metal as scratching this face will affect the future seal. If any bits fall inside the cam hole, fish them out, as they won’t do any good in there.
I. Blue Peter time – make 2-1 look like 2-2, using same method as in H.
J. Check inside the distributor for oil. – If you see any – check here https://www.fiatforum.com/showthread.php?t=24730- as the distributor inner seal needs replacing. My local FIAT dealer couldn’t supply the part so I haven’t done it yet. Mine were both OK, but I was going to do them both on the spare distributor. I’m not sure if the distributor will need dismantling like this. if it dose, make sure all the components go back in the same order.
K. Fit the new O-ring to the clean distributor – yes it will go on
L. Now your ready to refit the distributor. Twist the rotor arm back to the original position. It can go back 180 degrees the wrong way, or the right way.
M. Marry the distributor to face, may need the distributor body and / or rotor arm twisting, but it will be firmer than when you removed it due to the new O-ring gasket.
N. Now align the scribed marks from B., replace the washers and nuts 9 – don’t over tighten them (hard to explain how tight TBH
O. Replace both ends of 7, plug in 8, refit 4, remove your rags, clean where old oil leak ran down bell house, check for spare parts that should have been refitted
Take a short drive and check for leaks. – check after a day or too and you should be OK and not see like below:
Simple 


