Technical Bravo fog light replacement

Currently reading:
Technical Bravo fog light replacement

paulessex

New member
Joined
Nov 27, 2010
Messages
2
Points
1
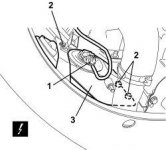
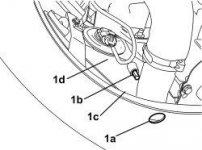
I've a 2007 Bravo 120 TJet. The front passenger side fog lamp got smashed, apparently by a stone. I have bought the Fiat replacement unit (£100 !)but despite the dealer who sold it to me saying it was a straightforward job,I can't get the old broken one off. The two metal clips securing it are like none I've seen before,they almost look like rivets.I've tried pulling them in all directions with pliers to no avail. I don't want to break them because the new unit has no fittings with it. Any ideas?
 
eLearn says the foglamp is retained by three bolts, indicated 2 in the picture.

Hope this helps,
Neil
 

Attachments

  • 198000785.jpg
    198000785.jpg
    11.5 KB · Views: 2,569
Thanks to all. I'll put a photo on later,I got the black plastic surround off easy enough right at the start and can't see any bolts,just the two silver tin clips.Presumably if I get the lower grille off I can reach around the back of the lamp. The front spoiler curves under quite a way so I can't see that getting under the car,even with it up on a ramp would provide a view of the rear of the lamp,much less access to the fixings.Frozen fingers here I come!
 
Having looked at eLearn again, you are right to have removed the trim. eLearn says you next have to remove the wheel arch liner. However, I would try and do the job by feel. I'm sure you can change the fog lamp bulb without removing anything, you "just need to get underneath".

Nice day for it:devil:
 
Are the fog lights adjustable for height, as the headlights are?
Mine seem to be aiming too low

Yep, have fun:D

Position the vehicle complete with spare wheel, tools, fluids, fuel reserve.
- Check that the tyre inflation pressure is correct.
- Position the vehicle on a flat surface, perpendicular to a screen or opaque surface 10 metres away on which a line corresponding to the height from the ground (A) of the centre of the fog lights has been traced.
1. Switch on the fog lights and, via the opening (1a) regulate the adjustment screw (1b) so that the demarcation line between the dark area and the area lit up by the light beam is at height B = (2/3 A - 10) cm.
For vehicles with an intercooler system (1c), adjust the bolt (1b) directly via the opening (1d).
 

Attachments

  • 198001676.jpg
    198001676.jpg
    11.1 KB · Views: 2,176
Hi neilship!

My 2007 Bravo has a little condensation by the passanger side. have you ever hear about the problem? Or dou you have solution? The seals are too old?
 
I just had the pleasure of laying on a cold floor for 90 mins while I attempt to remove a smashed drivers side fog light. What a ball-ache!
I couldn't get to the top screw because of the radiator. Eventually I got my hacksaw blade out and removed the whole unit in under 2 mins.

However now it appears the socket which the bulb plugs into, on the wiring harness has also fractured, as half of it is missing!
Looking at the other fog light socket, its the interlocking part and the seal are missing, or snapped off.
Any idea what part needs replacing? I don't fancy replacing the wiring loom :bang:

vitaqo, did you find a solution to the fog light, I was looking at mine today. Its not a sealed unit, so my guess would be to wait until summer, take the bulb out and air it for a few hours.
 
However now it appears the socket which the bulb plugs into, on the wiring harness has also fractured, as half of it is missing!

Oooohhh, I feel stupid now. The plastic interlock and seal which are missing, are actually part of the bulb. The glass bulb has the interlocking mechanism and seal built into the part one buys. My mistake, thank goodness its not the socket on the wiring loom broken. Ok, easy repair :)
 
Back
Top