To save a copy of your proxi file (before you start changing things that need a proxi alignment)
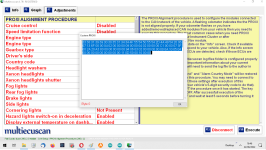
These example screenshots are from the simulation mode. Thanks to the original writer of this text.
With Multiecuscan:
Connect to the body computer using the CAN setup/Proxi Alignment menu.

Go to the "Adjustments" tab.


Press Ctrl+Alt+C on your keyboard.
A window will open entitled "Custom Proxi" containing a string of hexadecimal characters. Be careful not to alter anything in the window, but select the entire contents by dragging your mouse cursor over them to highlight them. (They may already be highlighted when the box opens).

Copy the string of characters into a Hex editor. You can use a simple text editor such as Notepad in Windows, but if not using a Hex editor you need to be certain that the editor you use will not write additional line feeds or other "invisible" characters to the file either on saving it or copying it back.
Save the copied file in your editor of choice to your computer with a suitable name that will help you identify it later.
You can then close the MES "Custom Proxi" window and close MES, or carry on with a Proxi Alignment or whatever else you want to do.
If you've written a new Proxi file to the vehicle and want to revert to the original, repeat the procedure to the point where you have opened the Custom Proxi window in MES. This time, delete the contents. Open you saved file in the editor, copy the contents in a similar way and paste them into the Custom Proxi window in MES.
Close the window and complete a Proxi Alignment to write the file back to the body computer and the slave nodes on the vehicle.
If you open MES in simulation mode without connecting to a vehicle, you can open a specimen "Custom Proxi" window as above and copy and save or paste back the contents as much as you like without changing anything.
These example screenshots are from the simulation mode. Thanks to the original writer of this text.
With Multiecuscan:
Connect to the body computer using the CAN setup/Proxi Alignment menu.
Go to the "Adjustments" tab.
Press Ctrl+Alt+C on your keyboard.
A window will open entitled "Custom Proxi" containing a string of hexadecimal characters. Be careful not to alter anything in the window, but select the entire contents by dragging your mouse cursor over them to highlight them. (They may already be highlighted when the box opens).
Copy the string of characters into a Hex editor. You can use a simple text editor such as Notepad in Windows, but if not using a Hex editor you need to be certain that the editor you use will not write additional line feeds or other "invisible" characters to the file either on saving it or copying it back.
Save the copied file in your editor of choice to your computer with a suitable name that will help you identify it later.
You can then close the MES "Custom Proxi" window and close MES, or carry on with a Proxi Alignment or whatever else you want to do.
If you've written a new Proxi file to the vehicle and want to revert to the original, repeat the procedure to the point where you have opened the Custom Proxi window in MES. This time, delete the contents. Open you saved file in the editor, copy the contents in a similar way and paste them into the Custom Proxi window in MES.
Close the window and complete a Proxi Alignment to write the file back to the body computer and the slave nodes on the vehicle.
If you open MES in simulation mode without connecting to a vehicle, you can open a specimen "Custom Proxi" window as above and copy and save or paste back the contents as much as you like without changing anything.


