Technical 1978 124 Project

Currently reading:
Technical 1978 124 Project

smahaley

Member
Joined
Jan 20, 2025
Messages
122
Points
111
Location
North Carolina
IMG_7266.jpeg

I’ve got another thread on floor panel rust going, but thought I’d start another on other technical issues - this one is about disassembly and reassembly.

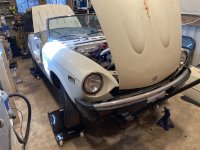
Since I started last month, I’ve removed all of the interior, including the dash. Taking the doors off helped with that, and as the car came with a roll bar (installed in 1978 when it was sold), I had to spend some quality time with sockets, wrenches, penetrating oil and yes eventually a cutoff wheel.

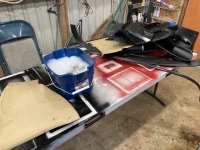
My process has been to bag the salvageable hardware (bolts, nuts washers, clips etc ) and label them by part. In a few cases I’ve been reinserting the bolts into their homes on the body to avoid the bag / label process.

Today I am taking a break from removing the bumpers and am washing removed parts (as possible) with a soap solution, clean water and rags. With radio on and coffee at hand, it is a great way to escape.

And I don’t want to refit dirty parts.

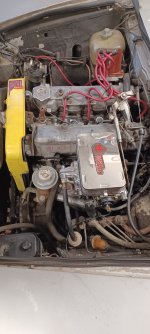
Starting with: hasn’t run in 2 years; engine issues
Goal: driveable car with minimal upgrades.
 
Model
124 CS1
Year
1978
Mileage
58000

Attachments

  • IMG_7641.jpeg
    IMG_7641.jpeg
    2.6 MB · Views: 41
  • IMG_7638.jpeg
    IMG_7638.jpeg
    3.1 MB · Views: 40
  • IMG_7658.jpeg
    IMG_7658.jpeg
    3 MB · Views: 45
A little bit of lube in the cylinders and a compression test might be a good place to start..good "time" for a timing belt. Water pump, thermostat replacement as well...and the coolant hoses, these motors seem pretty durable, mine started for the first time in 12 years yesterday on the first turn of the key on starting fluid... with the fuel system unhooked blowing out the fuel line would be a good thing as well, as you look in to your fuel tank.... I put my endoscope in mine the other day and it looked pretty clean but I'm still considering a new one from vicks...good luck with yours and above all, have fun!
Terry
And a p.s., this would be a good time to drop your radiator off at the shop for a good clean out, mines an automatic model a bit harder to find, and it's what I'm going to do with mine....your making great progress, do you think that first test drive will be this summer? Hope so !
Terry
 
Last edited:
Thanks Terry - I think the radiator is toast; I’ll get into the engine a bit this week I think as I do some floor repairs too. At my rate of work, I’m hoping for a Fall appearance!
 
I used to clean out radiators by filling them with a strong solution of caustic soda aka sodium hydroxide or lye - need to be careful with this stuff, use PPE.
Having flushed the rad, I then tested for leaks, I used to use a cooling system pressure tester, before I had one of these devices, I used to blank off the inlet, and outlet pipes (stubs), fitted a rad pressure cap, then inserted a tire valve into one of the pipe blanks which I pressurised using a foot pump. Any leaks could usually be fixed by soldering, a good clean up and a coat of paint made it good to go.

Or Midwest-Bayless list a new radiator for $289. As I previously suggested, I'd hold off ordering any parts until I needed them and then only after I wasn't able to refurbish them.
 
--------------------------------- fuel tank.... I put my endoscope in mine the other day and it looked pretty clean but I'm still considering a new one from vicks.
Terry
The cheaper fuel tanks seem to not have internal baffles. Without these baffles, the fuel can slosh around possibly causing the fuel gauge reading to keep changing and if the fuel level is very low, might even possibly cause fuel starvation on long fast sweeping bends? I'd go with a baffled tank.
 
Regarding the radiator and gas tank: I have removed the radiator and hoses, and wow - LOTS of rust. I don't even think it's worth testing to see if it would hold water/pressure. Plus with the hoses and thermostat clogged with rust. I started to take out the gas tank, and when i took the tank filter off, it too was clogged with rust. I think I'll be cleaning and/or replacing all the fuel lines.

IMG_7694.jpg

IMG_7695.jpg
IMG_7696.jpg
IMG_7702.jpg
 
Finally today - I got a good look at the front engine cover (yellow) and there is a sticker saying "california" which may mean that this motor had additional emissions controls on it?? In any case, here is a video of my survey before I took the radiator out. I'm wondering if anyone has any thoughts on the wiring anomalies (?) I found....

 
My spider is a 79 California car, thankfully prior to my ownership someone removed the smog pump and bracket, but Willie nilly left vacume sources unplugged that should have been, and plugged things that made no difference...I just finished removing all that junk on the driver's side inner fender that even if hooked up again likely would do nothing..but didn't damage anything, it's in a box for the next owner someday,I would add I upgraded to a 32/36 on the weber, the only place I'm drawing vacume from on the intake is to the power brakes, and the vacume modulator on my automatic trans...wondering why there's that rust In Your cooling system? No matter what you can fix it!
 

Attachments

  • 20250212_153218.jpg
    20250212_153218.jpg
    981.5 KB · Views: 34
Last edited:
My spider is a 79 California car, thankfully prior to my ownership someone removed the smog pump and bracket, but Willie nilly left vacume sources unplugged that should have been, and plugged things that made no difference...I just finished removing all that junk on the driver's side inner fender that even if hooked up again likely would do nothing..but didn't damage anything, it's in a box for the next owner someday,I would add I upgraded to a 32/36 on the weber, the only place I'm drawing vacume from on the intake is to the power brakes, and the vacume modulator on my automatic trans...wondering why there's that rust In Your cooling system? No matter what you can fix it!
Hey thanks for the pic - I’ll compare! Yeah was thinking about the carb, and with all the rusty goodness coming out of the fuel filter I may just have to do all of it (tank, lines, pump, carb). Sheesh. Time to add to the budget spreadsheet …
 
Even if you have another brand of shop manual I recommend you get this one, it's about 2 inches thick and one of the best down to earth manuals I've ever picked up, explains things well, they are on ebay...View attachment 460685
Thanks, Slotman - I was just thinking yesterday as I took out the fuel tank that 'hey, maybe I should get something better than Haynes'!
 
Update: took the trunk lid off; removed the gas tank and it seems like it might be okay on the inside but I need to get a little scope. Lights and bumper off - I’m going to move onto floor panel sanding soon, and engine removal once I get a puller. It will be time to clean and bag/box this latest round of parts so I don’t lose my mind when I get to reassembly.
IMG_7718.jpeg

IMG_7707.jpeg
 
Looking good! I just bought one of those folding engine hoists, mines a light duty with 1000lb capability, most I think are 2000, got it on amazon with free shipping , forgot the price but I think it was just under $200, I'm going to put it to the test lifting a 800lb dodge 440 motor haha, should be fine for small blocks, and fiat motors ect. I just got in the mail 2 gas tank sending unit gaskets from vicks for 10 bucks apiece , when I used my endoscope I went down the filler tube which made it hard to twist around to look so i figure it will be much easier to see with the sending unit removed...good luck with yours!
1000010194.jpg
 
Yes - I have a lead on a puller; what did you do for engine stand? I think I’ll need to buy one…

Meanwhile - here’s the interior of my fuel tank - I actually think this looks pretty good. Some vinegar soak for a few days, rinsing and drying then I think I’ll put it back in…

IMG_7734.jpeg
 
My last engine stand was very well used, 25 yrs old and taking up valuable floor space so I gave it away telling myself the next time I need one I will buy a new one from harbor freight or Amazon, any universal adjustable stand should work fine on a spider motor..please keep us updated on your fuel tank...I'm curious if yours has baffles, the replacements on Vicks have no baffles, when you start Sanding on the floor make sure you have a good mask...not one of the disposable N95 white ones, get a dual canister one like a binks or whatever brand, your lungs will thank you...I punished mine for years working with composites in the aerospace industry as well as my life long automotive hobby but no more do I take chances..P.S. perhaps consider doing a compression test before you pull the motor to have a better idea of its condition and what needs to be done once it's out and super easy to work on..man your tackling your project like a steam roller...keep on keeping on! :)
 
Last edited:
Thanks, Slotman - I did do a first stage POR 15 treatment of the fuel tank today to remove rust. Not sure how effective that will be. It does have baffles, so that confounds the view and treatment some. I actually think it's in pretty good shape on the inside. I did get a talkin-to from a mechanic who happened to be in the parts store at the same time as me - told me I should do new everything or at a minimum reline the tank, etc. etc. I'll give it a look again tomorrow. Thanks for the advice on the respirator: I actually have a 2 can mask that I used years ago; I will look for replacement cartridges.
 
That's a great shop manual! Regarding the por 15 I put 3 thick coats on the front floor of my 55 chevy and it was surprising how much it added strength..haha, but don't get that stuff on you, it has to wear off..:)
 
Back
Top