This guide is an explanation of how I went about changing the cam sensor on my Multipla JTD. With this method, the timing should be held correctly (although I give no guarantees!!!!) Check out my other guide on how to test the sensor first before attempting changing. In the end mine didn’t need changing.:bang:
So, to start, you will need to lift the offside (drivers) wheel of the car and support properly on an axel stand. Remove the wheel and then the plastic cover over the crank pulley. Then set about removing the plastic covers around the cam belt. Not going into this here, check out the guides on JTD cam belt replacement. At this point, you should have clear access to the timing belt, cam pulley, crank pulley etc. Loosen the “ribe bolts” on the crank pulley. I generally find that a sharp knock works well, even with the hand.
Take off the auxiliary belt from the crank pulley to the alternator, power steering pump and AC. Take a good mental image of how it goes back on again as it can be confusing. Better still, take a few photos. Remove the crank pulley by taking off the four “ribe bolts”. Now would be a good time to “crack” the cam bolt. I put a 3/8 socket extension in between the spokes of the cam pulley to hold it fast and use an 18mm (or is it 19mm?) to loosen the bolt. Don’t leave it completely loose, hand tighten up so you can setup the timing marks but still remove when required.
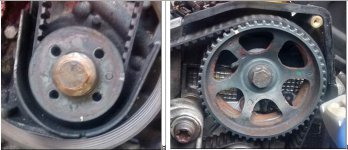
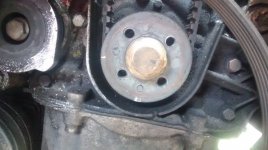
At this stage you will see the timing belt on the crank shaft and what look like timing marks.

If you set up the crank timing marks as in the image, then the cam timing marks on the cam don’t align. And no, the timing is not off. I have found this on all the JTD’s I’ve worked on. The image of the cam pulley shows where the cam marks are when the crank pulley marks are aligned.
I find it best to align the cam mark with the triangular mark on the plastic surround and then make a new mark on the aluminium surround where the crank marking aligns.

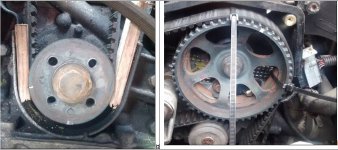
Now, what we want is to remove the cam pulley without removing the belt and changing the timing. To this end I hammered some pieces of wood at either side of the crank and timing belt to ensure the belt wouldn’t slip on the small crank pulley. Obviously, it has to be reasonably tight without damaging the cam belt. Next, the belt has to be held to the cam pulley. For this I used two reasonably sized wire-ties at the extremes of where the belt sits on the pulley - as shown in the image.

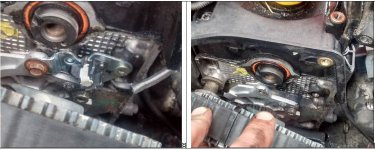
As I did this months ago, I can’t really remember if I loosened the cam belt tensioner or not. Probably not, the small crank pulley and HP pump should hold the tension. Now remove the cam pulley, the bolt should be loose. Inside you will see the cam sensor. This image is of the new one going back on as I forgot to take the image before I took the old one off.

Bolt in the new sensor, trial the cam pulley making sure that the cam pulley “inside ring” fits into the gap in the sensor. At this stage, it would be a good idea to wire the sensor cable back to the connection at the rear of the engine correctly through the plastic cam belt surround.
Once you are happy, tighten the bolts on the sensor, put on the cam pulley and screw in the bolt by hand. Ensure that all your timing marks align and the cam belt tensioner is still in tension - then you can finish tightening the can pulley bolt. After that, once you are happy that the timing marks are all as you set them up and the belt tension is as it should be, you can remove the wire ties and bits of timber around the timing belt/small crank.
The brave could start the engine at this stage although it would be best (and I would recommend) to put the auxiliary pulley back on the crankshaft, tighten the ribe bolts then put on the belt. Connect the new sensor and see if the engine starts.
Assuming all starts and runs as it should, put the cam belt covers back on, then the crank pully cover and the wheel and you are done.
So, to start, you will need to lift the offside (drivers) wheel of the car and support properly on an axel stand. Remove the wheel and then the plastic cover over the crank pulley. Then set about removing the plastic covers around the cam belt. Not going into this here, check out the guides on JTD cam belt replacement. At this point, you should have clear access to the timing belt, cam pulley, crank pulley etc. Loosen the “ribe bolts” on the crank pulley. I generally find that a sharp knock works well, even with the hand.
Take off the auxiliary belt from the crank pulley to the alternator, power steering pump and AC. Take a good mental image of how it goes back on again as it can be confusing. Better still, take a few photos. Remove the crank pulley by taking off the four “ribe bolts”. Now would be a good time to “crack” the cam bolt. I put a 3/8 socket extension in between the spokes of the cam pulley to hold it fast and use an 18mm (or is it 19mm?) to loosen the bolt. Don’t leave it completely loose, hand tighten up so you can setup the timing marks but still remove when required.
At this stage you will see the timing belt on the crank shaft and what look like timing marks.

If you set up the crank timing marks as in the image, then the cam timing marks on the cam don’t align. And no, the timing is not off. I have found this on all the JTD’s I’ve worked on. The image of the cam pulley shows where the cam marks are when the crank pulley marks are aligned.
I find it best to align the cam mark with the triangular mark on the plastic surround and then make a new mark on the aluminium surround where the crank marking aligns.

Now, what we want is to remove the cam pulley without removing the belt and changing the timing. To this end I hammered some pieces of wood at either side of the crank and timing belt to ensure the belt wouldn’t slip on the small crank pulley. Obviously, it has to be reasonably tight without damaging the cam belt. Next, the belt has to be held to the cam pulley. For this I used two reasonably sized wire-ties at the extremes of where the belt sits on the pulley - as shown in the image.

As I did this months ago, I can’t really remember if I loosened the cam belt tensioner or not. Probably not, the small crank pulley and HP pump should hold the tension. Now remove the cam pulley, the bolt should be loose. Inside you will see the cam sensor. This image is of the new one going back on as I forgot to take the image before I took the old one off.

Bolt in the new sensor, trial the cam pulley making sure that the cam pulley “inside ring” fits into the gap in the sensor. At this stage, it would be a good idea to wire the sensor cable back to the connection at the rear of the engine correctly through the plastic cam belt surround.
Once you are happy, tighten the bolts on the sensor, put on the cam pulley and screw in the bolt by hand. Ensure that all your timing marks align and the cam belt tensioner is still in tension - then you can finish tightening the can pulley bolt. After that, once you are happy that the timing marks are all as you set them up and the belt tension is as it should be, you can remove the wire ties and bits of timber around the timing belt/small crank.
The brave could start the engine at this stage although it would be best (and I would recommend) to put the auxiliary pulley back on the crankshaft, tighten the ribe bolts then put on the belt. Connect the new sensor and see if the engine starts.
Assuming all starts and runs as it should, put the cam belt covers back on, then the crank pully cover and the wheel and you are done.

