Panda 100HP Turbo

Currently reading:
Panda 100HP Turbo

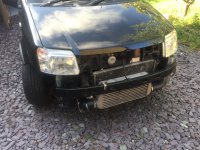
Reinstalling the Turbo was quite easy, but there were a number of steps. When originally installing the turbo Shakey_hand_man cut way the plastic part of the slam panel so that the central part could be removed. This made access a very easy.

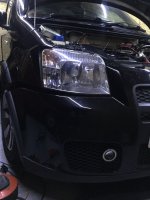
I used copper nuts and new studs to tie the exhaust to the turbo, and took the time to wrap the exhaust down pipe with new heat wrap.

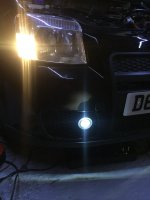
I wanted to check that the oil feed was working, so I connected the top feed, but left off the return. Next I removed fuses that control the fuel pump, coil and injectors. This would allow me to crank the engine, gain some oil pressure without the danger of the engine actually starting when the turbo was 'dry'.

Just to be on the safe side I injected some oil manually using a plastic syringe, before securing the top oil feed.

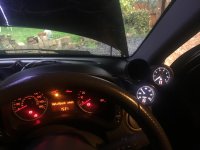
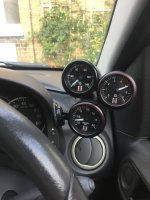
Cranking the engine got me about 0.5bar oil pressure, and more importantly some oil coming out of the bottom of the turbo. Firstly it was gold, being the priming oil, but then turned darker as the older oil from the engine was pumped around. So then I re-connected the return pipe.

I took a brave pill, put the fuses back in, and turned the key...


.. it fired and ran - and I got about 5bar oil pressure. I idled the engine for a few minutes and then switched off. I looks like I got away with it!
 
I put the number plate in the window, as I didn't really want to keep taking the front bumper on and off, and went out for a little spin. Totally paranoid, and spent the entire trip looking at the oil pressure gauge.

No abnormal bangs or whistles, and static oil pressure at about 5bar..


After a few miles allowing the oil to warm up I gave it a gentle boot. Woosh. I've be driving my "standard" 100hp recently, and the difference is bit like night and day. You can spin the wheels very easily on the turbo, but the level of acceleration just makes me laugh. Out loud. Lots.


The pollen filter has been fitted, Abarth badges removed, and blue Fiat ones fitted. Still unsure if I want to put the 100HP badge back on the boot. Sticking a 1.1L would be fun, but the wide tyres and blacked out windows kinda give it away.

A tiny little upgrade, adding some extra LED lights in to the boot, I had some LED waterproof strips left over from a previous project, so I stuck them at the top of the trim, and then connected them to the existing light (which I also put an LED in) - I can now see the contents of the boot..
 

Attachments

  • IMG_5190.JPG
    IMG_5190.JPG
    1.3 MB · Views: 72
Last edited:
Just leave it with no spec badge at all.

The radiators and headlights and slam panel are what looks like a plastic "gate". Cutting out the middle wont affect safety, but it will cause vibration chatter to affect headlights and rads. It would be wise to restore the strength with bolted on metal (angle or whatever).
 
Last edited:
Yup! Keep 'em guessing! If they can catch up, then they can ask! :)

Shakey_hand_man did a good job, there's a big metal bar that goes across the the top of the plastic 'gate' and he upgraded the brace between the metal impact bar at the front and the bit just below the bonnet release catch.

I've had a bit of 're-think' about the gauges, and I've been doing (a lot) of research on the ECU. It's a very power unit, and I could use it to read all the sensors that I could ever need. Then instead of a multitude of dials and gauges, I could have a single "gauge" that showed all the goodies.

However my ECU has never had a firmware upgrade in 10 years!

You can read my dealings with ViPEC (which have been nothing short of amazing) - here - http://forums.linkecu.com/topic/10736-dumb-questions-from-a-newbie/

Panda HP
 
Time to learn a new trade and learn how to program a flat screen to display the info you need. :)

Or put the radio in the glove box and fit a plate on the radio aperture to carry all the normal gauges.

For a really wild idea, use a micro PC running MES and display on your new flat screen. Have I done it? of course not ;) but you could have a go and then buy the screen and micro PC if it looks do-able.
 
Last edited:
Way ahead of you... Upgrade the firmware, run a second Can Bus to an Arduino with a Can Bus Shield and a colour (touch) screen. Redirect all the existing sensors (and some new ones) to inputs on the Vi-PEC. Then I only need one "gauge".

However. just found out tonight that my ECU is so old, that it also needs a hardware update to get the Can Bus functionality to work. So what with the firing order issues, and trying to find someone in the UK to upgrade a 10 year old ECU, I'm thinking it might just be better to leave the ECU well alone, and still with the Stack gauges I have.

Slightly deflated. If the timing gun I've ordered turns up I might have a look at the firing order this weekend, and ask if they still offer upgrades on the Vi-PEC.

PandaHP.
 
So until I figure out what to do with my ECU>CanBus>Arduino solution, I still need to see the output of the engine.

although my custom fit mount worked (ish) I wasn't really happy with the position. So I purchased four 52mm gauge pods with adjustable feet from ebay. I mounted one onto the left hand side of the instrument binnacle. I then hacked off the feet from two others and then stuck and glued those onto the existing one.


So it looks like a bit like mickey mouse, but it's fully adjustable, and kinda out of the way - only the driver can see it.

I just waiting on the delivery of the oil temp gauge, then I can tidy up all the wires.

Panda HP
 

Attachments

  • IMG_5231.JPG
    IMG_5231.JPG
    1.9 MB · Views: 32
Here's a picture of the front end after re-fitting the turbo, but before putting the bumper back on. Adding the intercooler meant that the air con condenser was removed, as well as the pipes into the pump and beyond.

I managed to get a set of pipe from a car that was being broken, and have reinstalled them. There's no chance of getting the original condenser back in, but there is a large area above the intercooler, so if I can get a custom one made up I might be able to get the AC back up and running..

Panda HP
 

Attachments

  • IMG_5163(1).JPG
    IMG_5163(1).JPG
    2.7 MB · Views: 38
A smart looking installation :cool:

The damage cause to mine when a deer took out the front end was particularly bad because the rads are in effect fully exposed. The plastic does nothing more than look good.

You might want to put some steel tube protection around your rads. It should keep impact damage to the plastic only.
 
Yup! he did a very good job, this wasn't something that was just thrown together.

Hmm, adding a little bit of extra bracing at the front wouldn't be that difficult to achieve...

The Oil cooler has been refitted, after being put though the parts cleaner. Once I have the temp gauge fitted and see what figures I get, I'll then see about purchasing a remote head and set of braided pipes to get the oil over there..
 

Attachments

  • IMG_5164.JPG
    IMG_5164.JPG
    2.1 MB · Views: 30
My BMW bike had the oil cooler sat high up under the headlight fed by a scoop. Well away from stones you'd think. A few weeks onto ownership, I noticed a stone dent on one of the cooler ribs. The fix was to protect it with stainless woven wire mesh. I used 4mm x 1mm which gave good impact protection and seemed to have no effect on airflow that I could detect. It's much tougher than expanded metal and less restrictive to airflow than punched or laser cut sheets.

It makes sense on any exposed cooler radiator.

You may need plastic spacers to stand the mesh off the face of the cooler, but basically you have to fold it to fit over the cooler body. It's slipped on and held down with zip cable ties. I added rubber edge trims to the mesh because the cut wire mesh is visciously sharp.

This supplier has it. Ask them for costs on what you need.

https://www.ebay.co.uk/itm/The-Mesh-Companys-Stainless-Steel-Woven-Wire-Range-Huge-Range-Top-Prices/151682102640?var=450885966533&hash=item2350f53570:m:mYZWcPpYg84RB9fHesAmuqw
 
Last edited:
This post contains affiliate links which may earn a commission at no additional cost to you.
...that's not a dumb idea - I could use a sheet of it, and "hang" it off the metal crash bar at the front, and around the back of the plastic wheel arch liner. Might make it a bit trickier to change the oil filter, but I'll be doing that, so Meh. Thanks

PandaHP
 
I have a thing about buttons on the dash that don't do anything. Yup, I know it's a weird one, but.. So the driving lights that were removed had to be re-installed.

They were removed to enable extra airflow into the engine bay/rads - so I tried to find a small replacement, and LED seemed to be the way to go. I managed to find a set about 5cm across - cut a hole in plastic grid, glued the light in, found the original wiring and connected it all up..

Bang! got a button that does something.
 

Attachments

  • IMG_5108 - Copy.JPG
    IMG_5108 - Copy.JPG
    1.9 MB · Views: 26
  • IMG_5109 - Copy.JPG
    IMG_5109 - Copy.JPG
    1.8 MB · Views: 25
I managed to nab a Stack Oil Temp gauge off eBay, and have just finished fitting it.


No real issues as I had all the power and light feeds for the other gauges, I just needed to put an extra 60cm into the sensor lines. I pushed the boat out and got the correct spec and colour wire, all soldered up with heat shrink covers (I hate crimped connectors).


So I think I have all the gauges I need, I know it's not to everyone ones taste, but having them in my sight line just gives me a bit more confidence that all is well with the engine.

PandaHP
 

Attachments

  • IMG_5262.JPG
    IMG_5262.JPG
    1.8 MB · Views: 30
Back
Top