Technical dismantling display cluster

Currently reading:
Technical dismantling display cluster

ktb

New member
Joined
Sep 29, 2017
Messages
9
Points
4
double post..unable to delete

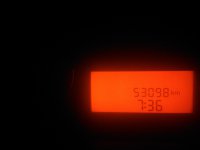
the lcd display in my grande punto stopped working.

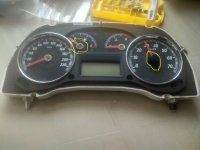
planned to replace the lcd with an used one, and sourced an old cluster. Unable to dismantle it and need some assistance. posting the images below, need to take out the board to access the display lcd.

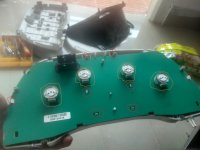
when i push the lugs (circled in red), i could free the board a little, but then the four components (circled in pale orange) are connected to the dials on the front (yellow marked in the 2nd image).

any suggestions?
 

Attachments

  • cluster_back.jpg
    cluster_back.jpg
    1.3 MB · Views: 229
  • cluster_front.jpg
    cluster_front.jpg
    1.1 MB · Views: 115
Last edited:
If it is anything like the Bravo, here is what i did:
-first remove the clock arms/pointers whatever -circled in orange , they just press on to the shaft... they are a bit difficult to remove.
-then i was able to remove the dial faces,
-saw 2 screws hidden underneath, unscrewed those,
-un-clipped the clips /lugs -circled in orange
-
 
  • Thanks
Reactions: ktb
I've just been doing the same thing on mine. The needles for speedo, revs etc are actually push-on although quite tight to get off. I used a couple of flat chisels either side of each needle to gradually lever them off. It's a bit frightening until you've done the first one. Try not to rotate anything at the same time and make sure you put them back pointing the same way as they came off. You can. however, twist them later is they get moved by switching on the ignition and seeing where they point which, with no engine running, is obviously at zero for the speedo and rev counter and probably the temperature. Note when you push them back on, hold the individual units from the back or they will try to push out of the circuit board.
The LCD panel can be released using the bottom catches then it is easier to also release the frame behind it to get it out of the way to unplug the LCD. The connector just pulls out of it's socket but some care is needed not to damage it. Likewise putting the new one in.
Another observation to avoid any arguments, the odometer seems to read with the display cluster NOT the ECU unless, maybe, it can be told to update. This means that if you change the whole display cluster, the Odometer reading does not match the car and will continually flash. For this reason, I changed just the LCD using the original instrument cluster. It now works fine having been a blank display before.
Now can someone tell me why the battery light was on before and the battery wasn't charging but now it has gone off even though the battery is still not charging?? The battery light is off no matter which instrument cluster I try so it's not the light behind it (which are, in fact, surface mount LED's on the board). Then I just have to sort out why it's telling me there's a glowplug fault too. It's been off the road for nine months not used.........
 
  • Thanks
Reactions: ktb
thanks aurick86 and Old-Boy racer. in my case, pulling the dials did the job. once i pulled the dials, and pushed the clips/lugs the board came off.

replaced the lcd and voila..it working :)

now, is there a way to check if the sourced lcd works in a stand alone way. i mean i had to go through the whole process of dismantling my cluster, and replacing with the sourced lcd and luckily it worked.

thanks again. few more diy's remaining to make the car close to stock.
 

Attachments

  • IMG_20170916_193644_BURST3.jpg
    IMG_20170916_193644_BURST3.jpg
    483.1 KB · Views: 52
Last edited:
Don't understand that question I'm afraid. Which LCD are you trying to test now? You can simply swap complete instrument clusters over but that's when I had the odometer reading flashing. Certainly, my old LCD module is not working which, speaking as an electronics engineer, I was a bit surprised about as I've never seen one completely fail before. I did try the usual suggestions of drying it out etc. but it refused to work apart from the backlight.
 
Back
Top