the hobbler
Distinguished member
- Joined
- Jul 25, 2012
- Messages
- 4,084
- Points
- 1,013
Ian, did your "air-flow splitter" come with the fan housing or did you have to get it separately? I will have to obtain one, or make one!


Ian, did your "air-flow splitter" come with the fan housing or did you have to get it separately? I will have to obtain one, or make one!
.......
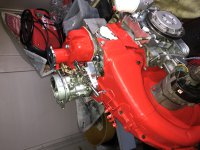
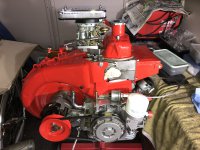
The 'Bambino' two piece fan housing is from a German model 126 and I believe fitted against the late square 126 cylinder head......................................
Been after one of those setups if you see another....
Think I may join the "Modding" group...
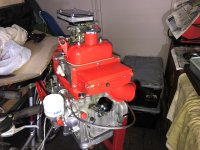
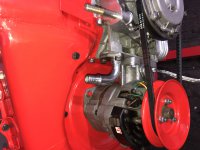
") But, what a job - I don't want or need to do that again as it would be self flagellation Due to the number of odd parts the alternator was fitted first as the mounting is fixed with no adjustment apart from removing the location studs.
But, what a job - I don't want or need to do that again as it would be self flagellation Due to the number of odd parts the alternator was fitted first as the mounting is fixed with no adjustment apart from removing the location studs.Ohh I do keep an eye on ebay..,,,,,,,,,,,,,,,,,,,,,,,,,,,,,,,,,,,,
Regarding the fan housing, I was lucky that it came with a load of bits. I would think that the European (German mainly) shops could obtain one for you, otherwise keep a sharp eye on Ebay
Ian.
Ohh I do keep an eye on ebay..
I believe they were a German 126 only part....
It is “Gebläsekasten Eckkopf”
The shops say just keep an eye on what we have...
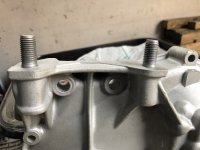
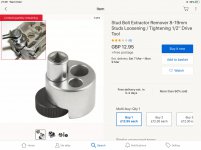
now I know why after all the faffing around my head does feel like it's in a draughty box round the corner - I shall have to go and retrieve it!! The upper pushrod tubes do not leak but one of the old lower ones does so I'll have to replace them eventually. I have been messing around with other parts from my collection and found a late model 126 timing case with pump that can go onto the not so hot engine ( I don't want to keep changing the pump over every time I change the engine!!) - or that was the plan until the fly landed in the ointment I found that although the later helical gear pump worked well the rear mounting had short studs fitted for the later crossmember mount. And that's the problem as I have the early mount on the 'Hot' engine and car - So all you engineer types - your starter for ten - How does one remove Stubborn Studs in 10mm with only some 19mm showing to work with ????? The main problem with this style of stud extractor is that it completely buggers up the thread making it totally unuseable in the future (should it be required) What might be a better option is the stud remover that 'Machine Mart' sells. I believe that it uses vertical pins to hold on to the stud. I have used it very successfully for removing head studs on engines ranging from Lamborghini V12 to Fiat 500. The Part number is:--040213986 It costs about £24 inc VAT.
)As others have said, please be careful about supporting the casing to avoid causing any damage.
Al.
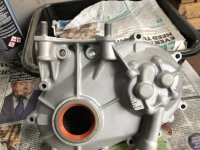
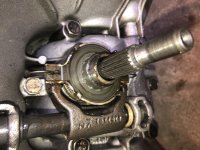
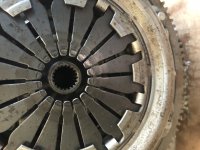
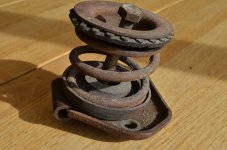
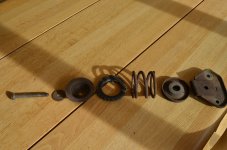
Some things are never easy :bang::bang::bang: Further investigation found the carrier clips had broken allowing the bearing to drop off - bugger !!!! There was also witness marks on the clutch pressure plate fingers When driving there was no indication of any failure and I suppose the assembly was kept together by the unit as a whole until removal. The broken part was from Valeo and was replaced when I upgraded my gearbox not so long ago, no other damage visible so it's keep calm and replace Well, knowing my luck I'll bugger up the casing.................. So I'm going to investigate the differing rear mount on the later 500 (Anyone got a schematic of the late mount parts and crossmember) ???? and if that seems beyond reason I'll fall back on an earlier timing casing and pump
Ian.
Ian, I have a spare engine with a 126 mounting complete, which I removed today to show you the setup. As an aside, I then had a go at the studs you're struggling with because they will eventually need to be removed for the same reason. The engine has been lying around for years so a good test. I can assure you that despite initially giving you the feeling they won't move, by doing it as Dave described and using a length of pipe over the spanner to avoid suddenly jarring the stud, it moved without drama...in fact they both came out easily.