jjacob
Member
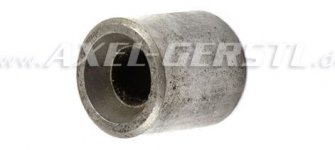
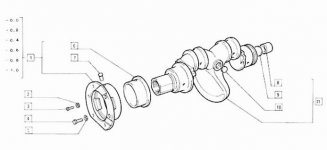
There are numerous posts on the web about how to remove the pilot bushing in the end of the crankshaft at the flywheel end. This is the bushing that the transmission input shaft runs in.
I tried soaking in penetrating oil and using vice grips. Did not work.
Then I tried the grease and drift method! WORKS BEAUTIFULLY!
You pack the bushing with grease and then use a drift or rod that is almost exactly the same diameter as the internal diameter of the bushing. Hit the drift with a hammer and the bushing will magically work its way out. Unbelievable how well it works.
Some guidelines from my mistakes:
-Make sure to pack the grease in tight, making sure there are no air pockets left.
-The drift or rod you use has to be a close fit.
MOST IMPORTANT! Only hit the drift a couple of times. Then withdraw and repack. Repeat. I kept hitting and the drift bottomed out and struck the circular metal disc/plug that seals the end of the crankshaft off. This loosened the disc just enough that it was no longer tight. I was able to fish it out and will replace it. Had I not allowed the drift to bottom out, I would not have damaged it.
I wonder if this is something that causes complaints of low oil pressure when hot for some folks after they do an engine rebuild.
John