Tuning Canterbury 695

Currently reading:
Tuning Canterbury 695

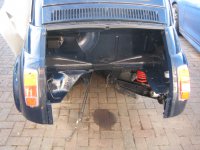
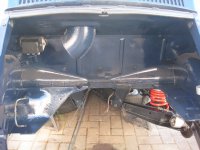
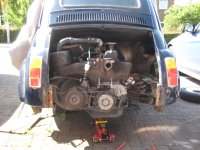
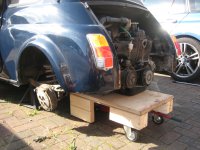
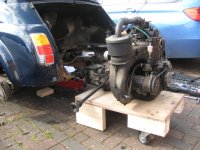
A great afternoon had - great tunes and the removal of a seriously broken power unit.
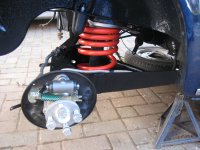
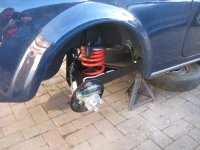
All has gone well - the only snag was the bracket holding one of the over riders has failed and meant that I now have a hole in the bottom of the nearside wing.

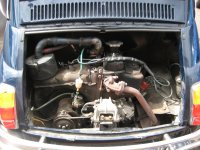
The car is in fantastic condition underneath - and so after a engine bay "refresh" new power unit will be fitted shortly.
 

Attachments

  • IMG_6083.JPG
    IMG_6083.JPG
    3 MB · Views: 47
  • IMG_6085.JPG
    IMG_6085.JPG
    3.2 MB · Views: 42
  • IMG_6089.JPG
    IMG_6089.JPG
    3 MB · Views: 41
  • IMG_6091.JPG
    IMG_6091.JPG
    3.2 MB · Views: 47
As I prepare the engine bay for its new arrival - is it acceptable to remove the over riders on the bumpers?
I'm not that keen- and have some period "half moon" spotlights for the front and don't want it to look too busy
Is it sacrilegious to remove them?
 
Thanks Steve - have sorted the ride height yet? Are you prepared for camber adjustment? And I don't mean a beach resort in Kent.....
 
Thanks Steve - have sorted the ride height yet? Are you prepared for camber adjustment? And I don't mean a beach resort in Kent.....

No not yet, after engine and gearbox came out, I stripped out the interior to runs the news wires through to the engine compartment. While the interior is out it makes sense to finish dash, so that was stripped, prep'd and painted. Next is cavity wax sills, front bulkhead and all inner wings. Then I need to re-wire engine bay, fit engine and gearbox. Once that's done I can refit dash, put tank back in, and re-fit interior. Then tidy up some scratches and chips around the car.

Then finally I should be ready to look at front suspension again. ;)

I did hear back from Middle Barton. They fitted an Abarth spec 5 leaf reverse eye. From this I'm going to assume that there are varying quality of leaf springs. I'm going to try their front spring. If when that's fitted its out by more than half an inch (the max I reckon these springs will settle) then I'll try the flat six leaf one. That's the plan anyway :)

As for camber, it has less negative camber now than before, but actually at a level that's looks acceptable. I'll wait to get everything running again and the reg docs back, so that I can put more miles on before I start tinkering with the shims. How about you?

cheers, Steve
 
We are at similar places in our works - we just have different build specs.

I have a brand new premium loom that I have modified and wrapped in black cloth tape - its ready to install into my refreshed engine bay.

I'm aware that I may have the need to modify the front top suspension arms..oval holes and welded washers appear the way forward....as for the rear......the shims fell out all over the place so I will share them out and get it set up later.
I have some very red - lowered springs with standard shocks on the rear.

Engine is ready for re-assembly this week!!

What engine is going in yours Steve?
 
Regarding the camber adjustment, why not use the "camber adjustment brackets"?
 
What engine is going in yours Steve?
Sorry, I missed this question

I had a new engine and gearbox built. The engine is tweaked using the 650 as a base starting point plus nitride hardened camshaft and reinforced bearings. It's pushing out early 30's with the current carb set up. I'm not sure about fitting the Solex 34 PBIC I have here. I'll see how it drives as is before I start further messing around with it. ;)

The gearbox is a 4 speed syncromesh unit, but I went for the 9/39 final drive, which will hopefully work well with the engine on The road.

cheers, Steve
 
Thanks Steve..........I just been sent pictures of my head being machined..very exciting.
Did you go big valves / balancing, re-enforced clutch, higher compression etc?
Who built it - if you don't mind me asking...
I'm working on multiple pieces of information - to hopefull get the best of all worlds.

Regards

It's nowhere near as tuned as yours is going to be. I just wanted something that was a good increase over stock and that is good on road. I know it has bigger valves, no balancing and I have no idea about the clutch. It's built by JC at RicambiFiat.

Other than remapping, servicing and basic fixes I've never played with engines, so not my area ;)

cheers, Steve
 
what ones do you recommend?


I am thinking about these: "Front Camber Adjustment Brackets":

ImageUploadedByFIAT Forum1435182969.273050.jpg

These Brackets are designed to raise the front Suspension Arms which will give 30mm more Camber at the front of the car

They are a simple 2 Bolt fit, no welding or other modification required

They are especially recommended when you have a lowered Leaf Spring fitted to help the suspension to work better
 
Last edited:
So update time....
Cylinder head all done - bottom end being built to prepare for compression ratio adjustment.
Should have an engine this week!!

Have recieved the alloy fan top that I've had modified for the throttle linkage bracket....its been tricky because I've seen people bolt the original steel bracket on the alloy casting......but it wasn't the finish I wanted.......its being re-delivered tomorrow so will stick a picture up of the result

Built my dash pod and sorted the rev counter issue out........its a four cylinder one and obviously needs some work........

Today re-installed one side of the rear suspension....
 

Attachments

  • IMG_6134.JPG
    IMG_6134.JPG
    3.5 MB · Views: 44
  • IMG_6133.JPG
    IMG_6133.JPG
    3.4 MB · Views: 53
  • IMG_6132.JPG
    IMG_6132.JPG
    3.4 MB · Views: 45
  • IMG_6131.JPG
    IMG_6131.JPG
    3.4 MB · Views: 50
here is the dash pod........its been a bit of a labour of love......but will look the part hopefully.....
I've got loads of gauges left over - because i knew what look I wanted.......if anyone is after gauges - I'm yer man!!!
 

Attachments

  • IMG_6135.JPG
    IMG_6135.JPG
    3.4 MB · Views: 43
Last edited:
Andrew,
Looks great! How was the fit for the rubber washer that sits between the top of the spring and the car body (spring collar)? My new ones were too big and trying to get this washer, spring, and the spring seat that goes over the washer all in place has been the most fiddly project I've done on the car so far...

With the hand brake linkage inside the drum, the green sleeve that looks to be garden hose, is that to prevent rubbing/rattling?

PS: the hand brake linkage looks to in be upside down.

Looking forward to more photos.

Cheers,
 
many thanks for your advice.....the hand brake linkage is just thrown in to prevent my youngest daughter burying it in the garden.....she's more of a keen gardener than engineer - do I need to pull the split pin out and reverse the assembly with the internal arm on top??
The green hose was how it came - the item fitted to the car had a welded "modification"
The spring mount was a right bugger to fit also......I thought it was just me...

Steve do I want the bolt heat visible from engine bay side .......the end of the bolt is pointing away from the box - towards the front of the car.....? Any chance of a picture?
 
Last edited:
many thanks for your advice.....the hand brake linkage is just thrown in to prevent my youngest daughter burying it in the garden.....she's more of a keen gardener than engineer - do I need to pull the split pin out and reverse the assembly with the internal arm on top??
The green hose was how it came - the item fitted to the car had a welded "modification"
The spring mount was a right bugger to fit also......I thought it was just me...

Steve do I want the bolt heat visible from engine bay side .......the end of the bolt is pointing away from the box - towards the front of the car.....? Any chance of a picture?

You want the bolt the other way round facing rearward with the bolt head on the bracket nearest the front. This way you can pull the bolt out and drop the arm with the gearbox in.

For the handbrake, IIRC horizontal piece that pushes the right hand shoe goes on top and you need to flip the other piece so that the slot faces outwards.

cheers, Steve
 
Back
Top