Technical A little experiment - replacing the default boost gauge

Currently reading:
Technical A little experiment - replacing the default boost gauge

Joined
Oct 10, 2021
Messages
614
Points
232
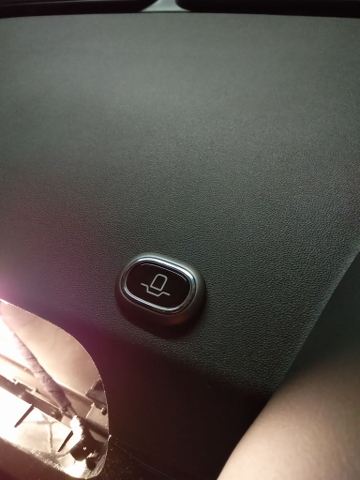
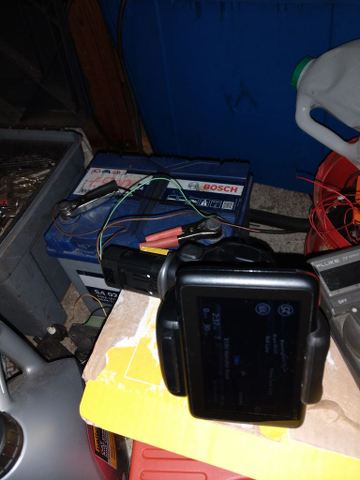
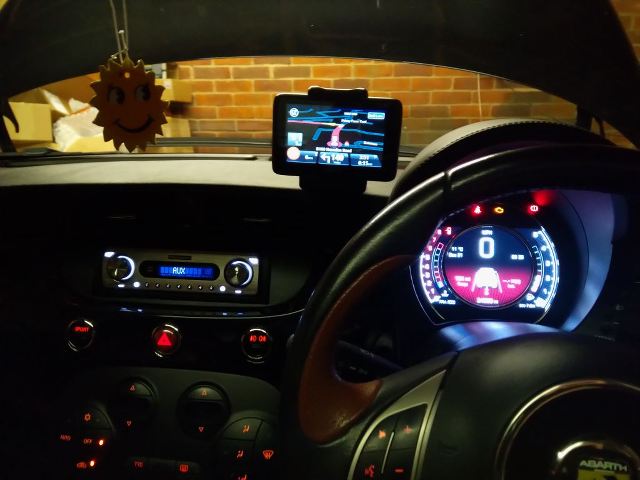
Very early stages in this at the mo, but I'm not a big fan of the standard boost gauge at all. It looks a bit Lego, and in the day time is hard to read because of the lack of illumination and the big blob in the middle obscuring the pointer. So plan is to fit a tiny digital boost gauge (I had similar on my Subarus - v easy to read out the corner of your eye), but that leaves a problem with what to do with the original one.

But anyway, without further ado, boost gauge removal; there are plenty of guides for removing the LHD one but not a lot for the RHD, so I'll give a quick guide on how to remove it prior to my main bit of experimentation.

To remove the original boost gauge you have to take out the radio, and then remove the centre air vents. This will vary depending on the model of radio you have and there are plenty of guides on how to do it, but for the single din like I have, it's a matter of removing the 4 dummy buttons on the radio, putting in 'DIN removal tools' and pulling it out.

Personally I absolutely loathe those DIN mounts because inevitably the stereo sticks in place and then you damage something pulling it out, and the Abarth one was no exception - there are some sticky pads holding the stereo in place, so had to use a butter knife to lever it free even with the tools in place. No chance you'll ever get it out in a million years with home-made tools since you need something which clips into the DIN mount to provide a little leverage in addition to the butter knife, so bought some of these:

Halfords DIN removal tool

Once the darned stereo had been wriggled free (thankfully without too much damage to the dash) it's simply a matter of unscrewing the DIN radio mount (4 obvious screws plus a bolt at the back), and undoing the 2 freshly exposed Philips screws to remove the air vent facia, followed by careful prying from the top (butter knife again) to lever it free. Then the air vent ducting will just pull out.

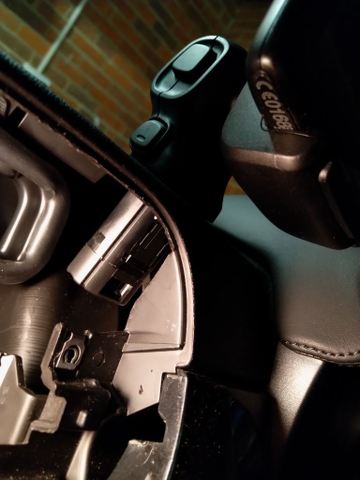
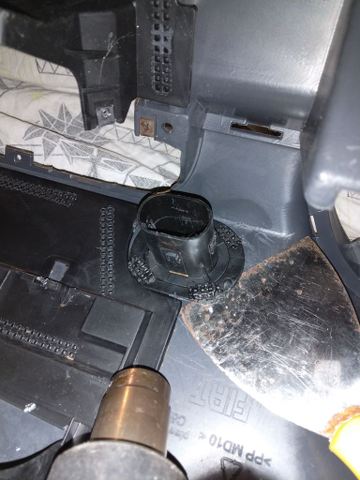
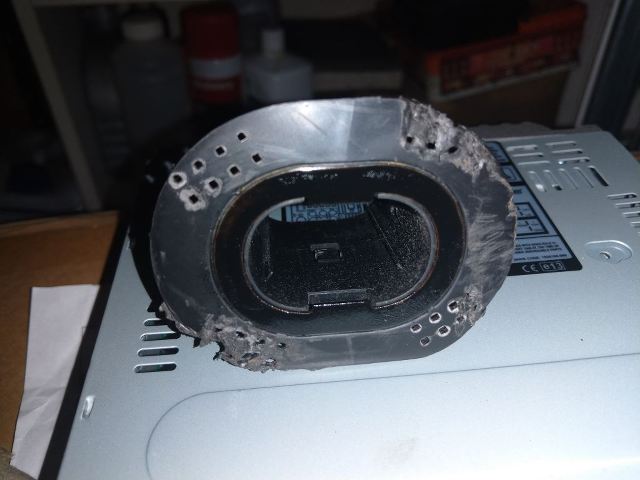
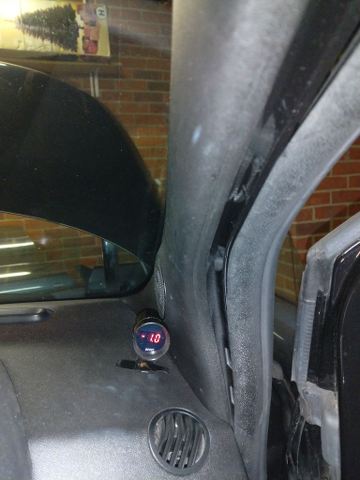
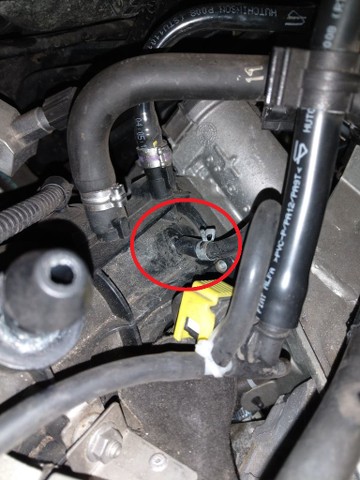
Once the ducting is out, look to the right underside of the dash top and you'll notice a little plate with a 10mm nut on it. Unscrew this nut (be careful not to lose it in the dash innards!) and carefully lever the plate off. Once this is done, the boost gauge can be wriggled free from the top of the dash, and then it's a simple matter of tracing it's cable back a few cm, and unplugging it.

I've not had any issues with the speedo flashing or anything with it unplugged, but still need to take the car out on the road to confirm, as well as putting it in sport mode. That all appears fine though.

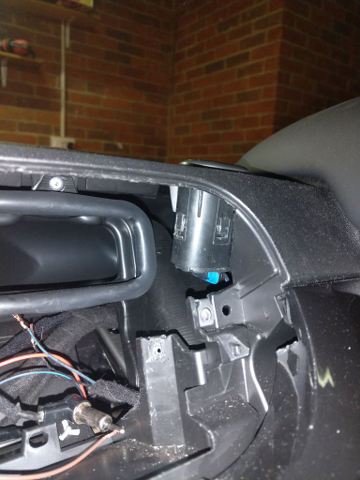
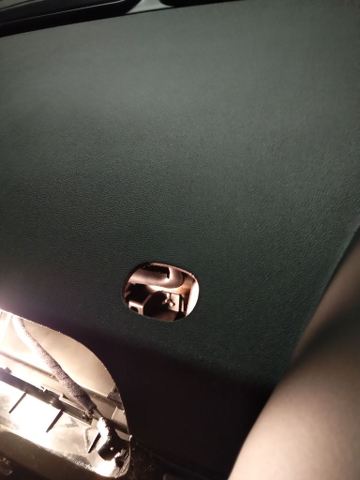
The big issue is you're then left with a hole in the dash, like this:

3J9bMr.jpg


To be continued :)
 
Confirmed on the speedo - took it for a 20 mile spin with the boost gauge sitting on the garage floor, no issues even in sport mode (though the sport button didn't illuminate, which is no big deal since the speedo lets you know)
 
Good so far. Watching with interest as I want to lose the boost gauge in the Abarth and insert the nav socket which I already have so we can plug in the genuine Fiat TomTom unit when we need nav facility. Just need to find that alternative boost gauge now.(y)

Strangely enough that's exactly my plan, I'm guessing you thought exactly the same as me having seen the shape of the hole...

I'm just waiting on a scrap dash with media port to turn up (or for me to go and collect it, it's been over a week now) and I can complete the next stage of this once I know what to do with the media mount. In the mean time I've been adding a new switched power feed so I can power both the media port and the new car stereo, will be updating this radio thread shortly with the details of that.
 
I now have the extra parts I was waiting for, so can continue with this :)

As @RedAbarthMTA noted, I do indeed plan to fill the hole with a media port - it looks 'just right' in position:

Bik8T9.jpg


So if anyone wants to replace the boost gauge and needs to fill the hole, just sticking a media port in place would provide a nice cosmetic solution, and maybe a useful holder for a lightweight phone cradle / holder.

However, I want to get the TomTom navigation working in the media port, and the port as it stands is nowhere near robust enough to support the weight since the factory-fitted bracing is missing so it would soon wobble free of the dash if just glued:


OauXbz.jpg


Since I needed a power supply for the media port too I bought a new 68R media port from a German supplier who had them in stock, and a suitable TomTom plus powered mount from @Farrah

Next stage was to investigate the wiring - no useful power feeds from the boost gauge:

RdZWzz.jpg


And in some other forums it has been suggested the media port needs a regulated +12v supply rather than just a +12v battery feed, however when I explored the below power feed it became obvious it really is just a plain old switched battery feed (it goes to the same fuse / bus bar as the cigarette lighter) so just a plain old switched +12v will do the job, with the ground taken from the radio's ground.

gVqFYq.jpg


And sure enough, when connected straight across a battery, the TomTom powered up :)

k8gRk6.jpg


You just need to make sure the right hand fed goes to +12v with the media port facing forwards, though it does no damage to the power supply if you get it the wrong way round, so even if you get it wrong you can simply swap the wires around and everything will be fine.

The trickier part was the bracing for the media port - Fiat do not sell this separately and since it's firmly stuck to the dash the only way to get one was to buy a 2nd hand dash with the media port fitted, and cannibalize it.

Once I'd got the spare dash, getting the media port out was relatively straightforward - drill out the pop rivets to remove the heater ducting, and a few minutes with a heat gun (heat until the underside of the dash looks slightly shiny) and then carefully work a paint scraper under the fixings one by one (do not lever!) to cut it away from the dash:

YFVx51.jpg


Note - I'm just showing the heat gun from the side for clarity here, really do it from overhead directly onto the plastic crimped bits unless you want to melt the holder...!

And then came the surprise. Once I'd got the holder off I discovered the part doing the 'heavy lifting' was a rusty mild steel plate, which the media port clips into, and the plastic part just provides a little extra strength for the media port. So a simple tube to support the port araldited to a suitably cut mild steel plate would be plenty strong enough to support the media port, without needing to cannibalize a dash.

Next part hopefully later today - I've de-rusted the piece of metal and given it a coating of Hammerite, so need to wait for that to dry before completing everything
 
Little bit further in my lunch time:

This is the bit of metal I mentioned, probably all you need for a firm media port:

eoDNcX.jpg


But I had the rest, so a little bit of Araldite to stop it wobbling around, clipped the media port in from above so it engaged with the metal ring, and job's a good'un:

swIfyj.jpg


Rest of lunch time was spent searching through my stash of old plugs and sockets to find suitable things so I don't have to butcher my loom to fit the media port. And finding a nice blue wire to go in the ISO plug so I can power the aerial booster from the power aerial connection so it's not "always on" when the car's running but just turns on when the radio's on.
 
Finished wiring it in last night and got Blue & Me working with the Tom Tom; waiting for advice before saying how I did that because it has the potential to brick your car's Blue & Me connection, but I wasn't too bothered if it did die so went for it :)

Simply wired up the green wire to my switched +12v power feed (added in My howto) and the black wire to the radio ground, plugged the TomTom into the top and away it went...

zxwb9w.jpg


Couldn't get the TomTom to put sound out through my new stereo so not sure how valuable having Blue&Me is, but it's there :)

Also added the feed to my 'new' (I actually rescued it from my Subaru) boost gauge, and wired in the dash side at least. Easy enough to do - just ran the power wires through from the right side beneath the nav mount, fed it behind the dash and left them there for the gauge. Then unclipped the right hand windscreen pillar trim, fed the boost gauge's wire down the hole, clipped it backup again and connected the wires:

jrgX5H.jpg


I like those tiny boost gauges - unobtrusive, easy to read at a glance and accurate, so perfect for what I need. Final stage will be wiring up the sender under the bonnet, the hardest part will be working out where to feed the wires through the bulkhead. The connection for the sender's t piece is a no-brainer - between the inlet manifold and the boost solenoid. As long as the connections are nice and secure so it doesn't affect boost solenoid operation it's about the best place for accuracy, and easy to reach too.

Final pics to follow once I've wired that side in, though that might have to wait 'til after xmas (I'm banned from getting covered in oil 'til the new year in case I accidentally-on-purpose ruin my enforced xmas jumper ;) )
 
Doesn't sound like I'm doing anything particularly dodgy or unknown, so should be quite safe to post a 'howto' for connecting the Blue&Me Tomtom to an Abarth or any other Blue & Me Fiat (or Alfa) which hasn't been set up for connecting to a TomTom.

Howto

Once done, you'll be able to view the nav directions on the dashboard, see how much fuel you've got left on the TomTom, and according to the Blue&Me site use it to select which media files you play, etc. Note - the port in the dash isn't required for this since all it does is charge the satnav, any old charger which plugs into the cigar lighter will do just as well (but not the car's USB socket - too confusing!).

VxHPXs.jpg
NmBuBI.jpg
 
Ireckon one would need at least CAN high and CAN low.

gr J
It connects via Bluetooth to the car, but can would have been quite a good thing to run through that socket, except you'd have to do that can bus relearn thing every time you added or removed something. I suspect that's what Fiat originally planned though, the socket's ridiculously over complex to just supply a +12v / gnd feed.

Merry Xmas by the way
 
My media port has a sprung loaded lid that the carrier pushes down when you plug it in. I know the numbers from the drawing but I can find no clues on the media port itself as to which is pin 1. They normally have a triangle or notch next to pin 1 but can't see anything. Any chance you have a picture or give me a clue which wire goes where? Thanks.
 
My media port has a sprung loaded lid that the carrier pushes down when you plug it in. I know the numbers from the drawing but I can find no clues on the media port itself as to which is pin 1. They normally have a triangle or notch next to pin 1 but can't see anything. Any chance you have a picture or give me a clue which wire goes where? Thanks.

Annoyingly I did have a nice pic of the wires and which go where after my 1st post, but it got deleted in the intervening time and I didn't end up recreating it because I got the proper connector (with it's 2 wires connected) with the dashboard I cannibalized.

I do remember the connectors are 1 pin in from either end with the front of the carrier facing towards you, best to test it with the wires across a car battery to check out which side is + and which side is -, looks like there's polarity protection built into the Tom Tom so even if you do get it the wrong way round it won't do any harm, it simply won't work.
 
Took me a time to fit since I needed to find somewhere to route the boost gauge wiring without drilling a hole in the bulkhead, but finally got the boost gauge fitted. Turns out there's just enough room inside the grommet the windscreen washer hose goes through the bulkhead to push through a couple of wires, and they can then be easily picked up if the parcel shelf in front of the BCU / fusebox is removed (think it's a glovebox on facelifts).

Once I'd got that sorted I tried a couple of locations for picking up boost, installing it near the inlet was pointless (as expected) and there's nowhere to install it near the MAP sensor so the only other location available without drilling a hole in the inlet manifold is the fuel pressure regulator pipe:

Q8Kpef.jpg


Note - since any leaks could affect fuel pressure (which could lead to detonation!) make sure you use good quality hose, use an electronic boost sensor rather than an analogue one (pipe would be too long and may chafe where it goes through bulkhead) and keep the pipe run as short as possible. Also be very careful if you do fit it here - the connector on the manifold is plastic, and the hose may go a bit stiff with age, so if you pull the hose too hard it might snap the connector off the manifold, and Superglue won't help much fixing it...! So best to cut that pipe laterally with a Stanley knife rather than taking a risk if it doesn't come off easily.

'true' boost figure is a little disappointing on mine running on standard 95 RON in 'non sport' mode with a real boost gauge - seems to settle at about 0.5 bar. But having read through the spec for the IHI turbo (mine's a 160) it appears it's only rated for maximum 1.2 bar (at which point it's life will be very, very short) so 0.5 bar probably is about right for standard operation, whereas the TD05-16g in my last Subaru recorded a steady 1.5 bar on the same gauge. Pulls great so it doesn't really need more, but if that steady 0.5 bar starts to annoy me I might end up putting in a Garrett after all. On the other hand engine longevity's going to be great at max 0.5 bar :D
 
Last edited:
The 0,5 may be atmospheric pressure + 0,5 bar. The 1,5 in the Subaru may have been the total. Something with potatoes and tomatoes...

gr J

It's the same boost gauge, I've had it for a few years now. The Subaru was a bit of a special case, I'd got a bit 'over enthusiastic' when I was doing the turbo conversion and 'accidentally' built a 500bhp race engine (it's still sitting in my garage) which was waaay too powerful for the roads around here. That made it quite unpleasant to drive since I could only use about 1/4 throttle, and made it quite thirsty - it would do around 6km/l! Most turbos will do around 1.1 to 1.2 bar when they've stabilized (all turbos can spike a bit higher), but the IHI in the 130 / 160 bhp Abarth is absolutely tiny so the stable boost it can manage is very small.

There's a tradeoff though unless you go for sequential twinturbos - the higher the boost they can do, the longer they take to spool up, so the more turbo lag you get. And twinturbos, where you have one smaller turbo and one larger turbo, have a flat spot when the turbos swap over which can catch you out when overtaking, so that's not ideal either (though getting two kicks in the back is rather fun :D).

So I think the Abarth's tiny turbo, which spools up very quickly and gives the car it's pretty-much instant acceleration, suits the car rather well. As I discovered to my cost (both financial and because I didn't like what I had built) bigger turbos aren't always the best idea :)
 
Did a bit of experiment tonight when there wasn't any other traffic on the road - when in sport mode with 'proper' petrol it'll boost to 1 bar before settling to 0.7-0.8 bar, though the boost cut (i.e. wastegate open) comes in at quite low rpm so achieving maximum boost involves changing up early, and having quite a heavy right foot. So it could probably just about hold 1-1.1 bar with a remap to stop the boost cut happening so early, though that would effect the turbo's longevity given how tiny it is.

Also proves normal mode has quite an effect on the amount of boost the car's developing and therefore acceleration, though for me normal mode's quite sufficient for the roads around here. Driving too fast in the dark is likely to leave you with a badger, fox or deer embedded in the front of the car; I was very glad of the Brembos a few days ago when a large female deer jumped out of the undergrowth to admire my Abarth from close up...

Which reminds me, the Abarth also earned itself a couple more pats this week - one for not scrapping itself on a deer, and one for how nice it felt in the corners with a round steering wheel and gear knob :)
 
Last edited:
Back
Top