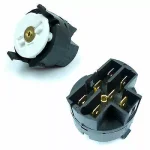
Technical Ducato 250 Ignition switch

Currently reading:
Technical Ducato 250 Ignition switch

Saltpeter

Member
Joined
Jun 8, 2018
Messages
16
Points
57
Hi, I am trying to replace the ignition switch on my 2006 2.3 multijet but the new switch does not seem to work. Is there some trick to align the switch mechanism to the steering lock actuator? I assembled the new ignition switch to the steering lock but when I connected it and turned the key nohing happened at posn MAR until I got to AVV and then the normal dash/engine lights came on but no start. I assumed that the switch is not correctly aligned with the actuator in the steering lock?
Any help / advice would be really welcome.
Thanks in advance.
 
I had a similar problem when changing the ignition switch insert on my x244 a few months ago. After several attempts with a cheaper one from Ebay, I eventually gave up. (I am proficient with electromechanical devices.) A second much more expensive replacement again from Ebay, just dropped in at first attempt. Lesson learnt.
For the unsuccessful module see attached photo. This has two raised bars at the rear which I assume should engage with two pins on the actuator, but only one can drive at a time. The correctly fitting part had a Fiat part number, 1389442080, on the box. The driven end was light grey with two slots reminiscent of the hands of a clock. Both slots can share the drive from the actuator in either direction.

My application was as stated for the x244. The centre pin of connector A, is a 6.25mm blade, while all other pins are 2.8mm. The switch has 4 positions, as it includes a parking lights facility. The above part may also be used in the x250, but this application is not confirmed.
 

Attachments

  • Ignition Switch (2).webp
    Ignition Switch (2).webp
    14.3 KB · Views: 8
I had a similar problem when changing the ignition switch insert on my x244 a few months ago. After several attempts with a cheaper one from Ebay, I eventually gave up. (I am proficient with electromechanical devices.) A second much more expensive replacement again from Ebay, just dropped in at first attempt. Lesson learnt.
For the unsuccessful module see attached photo. This has two raised bars at the rear which I assume should engage with two pins on the actuator, but only one can drive at a time. The correctly fitting part had a Fiat part number, 1389442080, on the box. The driven end was light grey with two slots reminiscent of the hands of a clock. Both slots can share the drive from the actuator in either direction.

My application was as stated for the x244. The centre pin of connector A, is a 6.25mm blade, while all other pins are 2.8mm. The switch has 4 positions, as it includes a parking lights facility. The above part may also be used in the x250, but this application is not confirmed.the
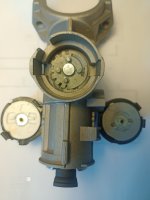
Thanks C, that's very helpful. My concern is that the registration of the circular actuator that turns when the key is turned seems not to be engaged properly with the switch.It seems this can be moved relative to the key position and I am not sure where the circular revolving part should sit when the key is removed. 2 pics attached show what I mean. Where should the rotating part sit?
 

Attachments

  • IMG_20250605_085526_401~2.jpg
    IMG_20250605_085526_401~2.jpg
    5.7 MB · Views: 8
  • IMG_20250605_091914_042.jpg
    IMG_20250605_091914_042.jpg
    9.5 MB · Views: 7
Thanks C, that's very helpful. My concern is that the registration of the circular actuator that turns when the key is turned seems not to be engaged properly with the switch.It seems this can be moved relative to the key position and I am not sure where the circular revolving part should sit when the key is removed. 2 pics attached show what I mean. Where should the rotating part sit?
I am sorry but my experience with the first switch module that I eventually abandonned was similar to yours. I set the switch to the off position, and tested for no connections. The actuator was in the key off position, with key removed. It was only after many attempts that I gave up, which I do not do easily. Here is a link to the one that I eventually fitted at first attempt, without any problem. Note that it may not be suitable for your x250., which seems to have 4 drive pins on the actuator, as I recall, my x244 has only two pins.

I case it may help, I am attaching functional diagram of the x244 switch which I believe will be similar to yours. It may help to confirm initial position. Utilisation of PARK connection is different on x250. To understand my diagram, there is a connection across the digram is indicated by a black square.
 

Attachments

  • x244 Ignition Switch.pdf
    48.7 KB · Views: 6
This post contains affiliate links which may earn a commission at no additional cost to you.
I am sorry but my experience with the first switch module that I eventually abandonned was similar to yours. I set the switch to the off position, and tested for no connections. The actuator was in the key off position, with key removed. It was only after many attempts that I gave up, which I do not do easily. Here is a link to the one that I eventually fitted at first attempt, without any problem. Note that it may not be suitable for your x250., which seems to have 4 drive pins on the actuator, as I recall, my x244 has only two pins.

I case it may help, I am attaching functional diagram of the x244 switch which I believe will be similar to yours. It may help to confirm initial position. Utilisation of PARK connection is different on x250. To understand my diagram, there is a connection across the digram is indicated by a black square.
Thanks for your help, I have managed to assemble the key switch / actuator and re-fitted it and it works! so far..........fingers crossed.
 
This post contains affiliate links which may earn a commission at no additional cost to you.
Thanks for your help, I have managed to assemble the key switch / actuator and re-fitted it and it works! so far..........fingers crossed.
I noticed that you had removed the complete lock assembly. I changed my switch module with the lock in situ. This avoided removing, and replacing the shear bolts. Good luck.
 
Back
Top