Technical 1970s Spider seat issues

Currently reading:
Technical 1970s Spider seat issues

Slotman

Established member
Joined
Dec 1, 2024
Messages
267
Points
172
Location
Usa
Hi everyone! Not all, but the majority of spiders like mine (1979) or in my body style, that ive seen have an issue with the seats where it seems something has cracked or broken allowing the seat back to recline nearly to touching the back seat...both mine are like that and I keep a towel rolled up between the seat back, and bottom so I can sit up straight...seems like I read years ago this is due to a manufacturing defect...my question to anyone who might know is, is the defect in the seat back?, or the seat bottom? I'm imagining a thin piece of metal cracked somewhere and if so I would like to carefully disassemble mine and weld it up with reinforcing metal, would be great if someone can shed some light on what the fix is...thank you and cheers all!
Terry
 
I don't have info on the 124 Spider but here's an image of the seat used in the 124 Coupe - I believe they're very similar.

Scan_20250114.png


I can recall that there are 2 meshing gears inside the seat back angle adjuster (i.e. seat back hinge) that has the round adjusting knob but I'm not sure if the seat back adjuster on the other side also has 2 internal gears but likely does have. There's also a connecting bar/rod between the 2 adjusters that has a square formed on each end that synchronises the movement of the 2 adjusters. So, it's possible that one or more of these gears has stripped teeth if the seat back is not being firmly held at the chosen angle. The (124 Coupe) seat back adjusters had a plastic cover plate that could be gently prised off to view the gear teeth. Iirc, removing the adjusters from the seat requires the use of a No.4 Philips screwdriver/drive bit, a size that's not often called for and therefore many don't have (iirc, this size of Philips screwhead is also used on the 124 door hinges).
I've seen these broken seat adjusters 'repaired' by someone having welded the 2 damaged gears together with the seat now being held securely in a fixed, i.e. no longer adjustable, position. To each his own, cheap too...

midwest-bayless.com have some seat adjusters listed for the 124 Spider, click on 'Interior', then page 2. They also show an image of the seat components for the 124 Spider on their image for the 'connecting bar' I mentioned above.
 
As an update I went out and cycled the adjuster knob on mine all the way both directions and it moved smoothly the entire time and tilted the seat as it should, what I did notice is about 6 inches from the bottom of the seat back it acts liked its "hinged" In other words it seems like the frame has cracked and it can be bent forward or backwards...that's what I thought I heard years ago about the seats, I will update this thread later once I get the seat apart...right now I'm working on the motor...:)
 
The seat back angle adjusters are attached to the seat back on each side by 2 screws - is it possible that lower screw has simply fallen out or it's thread has failed? This might explain why the adjuster works but the seat hinges at about 6 inches from the bottom.
Iirc, the seat back adjuster has to be moved through part of it's range of adjustment to reach one of these screws.(having removed any cover plate).
 
Last edited:
124BC1, thank you again for your advice! I've made a list of your suggestions to check, last night I took a closer look and I no longer think there's any issue with cracking on the seat back frame 6 inches up...on the "outside" of the seat frame by the black knob as I cycle thru the positions it locks firmly on the seat back as it should and supports my weight, however from about the middle of the seat back to the "inside" edge it appears nothing is securing the seat back and all the play seems to be coming from the bottom of the back on the inside edge so I'm beginning to suspect the bar might not be meshing on the inside edge for some reason..right now I'm fighting trying to get the lower alternator bolt to go in the last half inch after a belt replacement. The new belt is tight to the point I think I'm out of alignment to come out the back of the alternator, once I tackle that then I'm going to remove the seat...I do have the large Phillips bit and an impact driver so I can't wait to start on it..it will also be interesting to see what's under the seat after 45 years hehe, thank you again for your help! Terry
 
I don't understand why you're struggling to refit the alternator bottom bolt?
Is there not an adjuster bracket on the top of the alternator that you release, slacken the lower bolt, push the alternator towards the engine, fit the new belt, swing the alternator outwards to tension the belt and then lock up the bolt on the adjuster and tighten the lower bolt?
In other words, I'm confused as to why you removed the lower alternator bolt.
Are you sure the new belt is correct for your engine and it's ancillaries?
Have you removed the belt and tried refitting the lower alternator bolt to verify that the bolt can be refitted easily?

Nice to hear that you're getting closer to figuring out what has gone wrong with your seat, hopefully when you get time to remove the seat, the problem will be apparent
(and fixable :) )
 
Regarding the alternator its much like you said...I checked the number on the belt 3 times but it always came back correct even though it seemed a bit small, with the upper bolt out the alternator moves in as far as it can until it rests against the block and can't go any farther and it wasn't even close to being enough to get the belt on, took the lower bolt out , got the belt on, then the Alignement of the lower bolt was off enough that it couldn't center it self enough to go all the way thru..the belt was a bit too small it seemed even though it was the correct one. Perhaps in the belt factory the tolerances they work with are a bit off, and my was on the too small side, I ended up removing the belt and putting the lower bolt back, then prying, while turning with a rachet and pushing with a screw driver and finally got it on bleeding with bruises all over my arm but I got it, by the time both upper and lower bolt were tight there was 1/2 inch Play up and down on the belt just about what the play should be and im sure it will strech a bit when ran..the belt was a Gates/ continental a fairly decent brand so im surprised at the fitment...
so happy ending, but hope I don't have to do that task again for a while!...on to the seat now!
 
Last edited:
Sorry to hear of your ordeal in doing what should have been a fairly straightforward task :(

I doubt the belt tolerances were off, the types of belt I've seen being made use a reinforcing fibre (like a string) that is wrapped repeatedly around the belt until it has reached the required width, perhaps someone listed it as fitting all engines of a certain make when it doesn't. It's also possible that there were changes to some parts during production of your car (these would be shown in the parts manual showing the engine or chassis number when the changes took place) or perhaps someone fitted a different pulley to one of the units.(e.g. replacement alternator fitted that was supplied with a pulley already fitted).

[ I once did a cylinder head rebuild (timing belt failed > bent valves) on a car visiting Ireland from France, the crankshaft V pulley was slightly smaller than the original which wouldn't have been a problem as regards changing the timing belt, except it had no timing mark (no idea what it came off but the owner said the car had sustained front-end crash damage and was repaired in France...]

Sometimes the choice of the last pulley to fit the belt over can make a difference, I've noticed that some water pump or alternator pulleys grooves have deeper sides than the crank pulley, so I'd fit the belt over the crank pulley last (shouldn't make much difference though).

Belts can be measured or compared if unsure you've been supplied with the correct one. In the 'good ol' days', auto factors often had a device for measuring belt size - it consisted of 2 half round discs over which the belt was fitted and then the belt was tensioned by pulling the moveable half disc and the belt size could be read off the device scale.

Iirc, the number of the original Fiat belt size (e.g. 850 x 9.5) indicates the internal diameter in mm and the 2nd number is the max belt width in mm. I've encountered some cases where an aftermarket supplier might show a 9mm belt as being correct instead of 9.5mm, afaik the narrower belt will sit lower in the pulleys possibly using up more or all of the available adjustment, a wider than correct belt will likely sit higher in the pulley grooves and be difficult or impossible to fit. Of course different manufacturers have different numbering systems, I haven't seen a belt marked simply with the size in years...

I compare belts by placing both original and replacement belts over a large round item (e.g. socket or pipe ) held in a bench vice and the tension both belt using a length of pipe and then compare them. Modern belts don't really stretch due to the reinforcing fibres mentioned above, but the sides of the belt can wear resulting in the belt requiring re-tensioning after some initial use but the tension should then remain correct for a considerable time.

[Recently, I was about to renew a 'PolyVee' (serpentine) belt, part supplier's website showed 2 belt lengths - one for cars with ac, the other for cars without ac. I ordered the shorter belt i.e. for car without ac. Fortunately, I did a comparison before trying to fit it and found the new belt was approx. 25mm shorter than the original. Did a further internet search among other parts suppliers and found there were actually 2 shorter belts specified for non ac cars, 1 for U.K. built cars and the other (25mm longer) for Japanese built cars. My car was Japanese built. By checking the belt first, I saved myself time and aggravation plus was able to return for refund the incorrect belt (would not have gotten a refund if I had messed up/ marked the belt in trying to get it to fit.]
 
Again, excellant advice! And thank you for sharing it! I don't doubt there could have been a variable like an alternator replacement or who knows, my car just came out of a 12 year storage, it's a low mileage car, (60k) and I wouldn't be surprised if the belt i took off was original to the car, it was delaminating around its periphery and even it was a bit difficult to slip off..I'm thinking the new belt might have been a bit thicker possibly on the inside diameter and much stiffer, it was cold enough in my shop to freeze water and that likely didn't help, I now wonder if I would have used my heat gun on the belt first if it would have helped...
I wanted to mention I found a 3 part video on YouTube of repairing a broken spider seat back and they use a 1979, the same year as mine...I have only watched part one so far, in part one they remove the drivers seat, then separate the seat back from the seat bottom, then remove the upholstery and the foam pad from the seat back, and then display the metal frame to the seat back showing many cracks that require welding...this is what i recall hearing about the seats years ago and I'm thinking it's the same fate mine has suffered possibly worse..perhaps the original owner was a big person, unless I find something obvious in the track and latch I'm pretty sure a cracked frame is my problem, I'm a fairly decent welder and will be sure to make it stronger than it was originally in the stress area..I will update once I've watched part 2 and part 3, and will be sure to post pictures when I start...cheers! Terry
 
I'd be interested in what you find when you dismantle the seat (don't forget to post pics, if you can). I stripped and repaired lots of seats on various Fiat models, 'back in the day' and subsequently, it's not difficult.

I think the seats are able to cope with big owners, the problem is when big people flop down hard into the seat, overstressing it until it fails.

One tip I came across recently concerns the old problem of seat base cushions becoming flattened when old, apparently the foam/sponge can be rejuvenated by applying steam to the foam from a steam generator e.g. domestic (floor etc.) steam cleaner. (I'm aware that new replacement seat cushions are available but they're a little pricy). Another option is to swop the seat base cushion over from the passenger seat, which is usually in much better condition.

There was a tv car series on Discovery, you may have heard of, called Wheeler Dealers 'starring' Mike Wheeler and Ant Anstead. They did a lot of repair work on a 124 Spider incl. fitting replacement seat covers, final drive(rear axle) pinion oil seal replacement etc. Afaik, it's available on youtube etc. look for Series 18 Episode 04, Fiat 124 Spider.
 
I’ll be interested in the seat reno as well, as I have just removed mine (78 spider) and there is all sorts of interesting stuff to sort out :)
 
When removing and stripping down seats on old cars, I'd recommend wearing gloves and a breathing mask as a minimum.
Some cars I've seen 🤢, would warrant donning full Hazmat protection.

And even then you might not be safe.. 🤮
 
With out going in to too much detail my first car, a 1956 hemi Chrysler after driving it home at age 15 came with a pair of spoiled underwear under the driver's seat as an option I guess..
I never liked stripping out cars that had been home to mice or rats, although there's probably worse kinds of wildlife in your part of the world...

Worked for a while in the Middle East, I wasn't too worried about what I'd find dead under a seat, or while reaching up behind a dashboard, it was what might be still alive (and hungry) that bothered me. You no doubt have heard the term 'swatting a fly' - out there, the flies and other flying insects aren't deterred by attempts to swat them, in fact it's just makes them more determined to bite, sting or try to eat you.

The worst vehicle cleaning job I encountered working in the M. East (while supervising a fleet maintenance workshop), concerned the 'cleaning' of a Range Rover that had been borrowed from the fleet by a VVIP for a weekend. Said individual had hosted a celebration of some kind with his family in the desert, which involved slaughtering a goat and cooking the meat. Fine you might say. Except he chose to slaughter the goat on the carpet in the trunk of the R-R. And then left the car sitting somewhere for 2 weeks in the hot sun with the windows closed before I was informed that he had finished with the car and it needed to be collected...
 
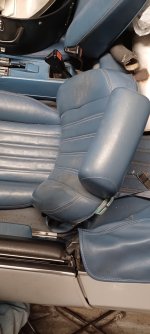
We have Flys here like the ones you speak of, "deer flys" you swat one biting your arm and they only move over a few inches and bite again..thought I would post this pic of the condition of my seat, I hope it can be noticed the "twist" of the seat back, I thought I remembered seeing this before in other spiders so what ever happened might be a somewhat common problem? I'm sort of stuck at the moment until I shift a couple project cars around so I can fully access my spider and get access to it 360 degrees, currently in the spot where it's slept 12 years I can only access the front, I'm hoping soon to have pics of the seat apart...Terry
 

Attachments

  • 20250202_163606.jpg
    20250202_163606.jpg
    825.7 KB · Views: 19
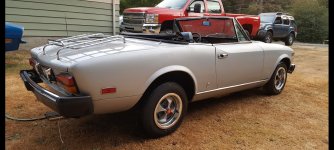
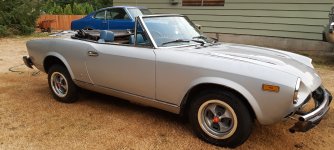
This is my spider, was a California car prior to my ownership, automatic trans, 60k miles, no rust to my knowledge, been stored indoors so the seat issues I guess are structural..
 

Attachments

  • Screenshot_20241205_143150_Photos.jpg
    Screenshot_20241205_143150_Photos.jpg
    906.8 KB · Views: 20
  • Screenshot_20241205_143048_Photos.jpg
    Screenshot_20241205_143048_Photos.jpg
    911.1 KB · Views: 19
Haha, I found an old paper I had printed back in 2006...at the end of the paragraph at top it explains about the seat frame breaking especially the 1979 model (mine)...
1000010083.jpg
 
Back
Top