Retro Pedro
Member
- Joined
- Apr 24, 2011
- Messages
- 233
- Points
- 56
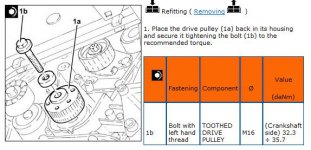
As title, can anybody confirm if the crankshaft bottom pulley bolt is left hand or right hand threaded.
As you can probably guess, I'm having a right bitch getting mine undone - I need to address the leaking crankshaft oil seal.
I'm convinced it must be a right hand thread because the engine direction is clock wise and if the impact socket on a breaker bar with engine crank had been successful, the pulley bolt would have had to undo anti clockwise (right hand thread for doing up).
I've made up a locking tool for the flywheel which - touch wood - seems to be holding. I've purchased a 19mm 3/4'' drive impact socket so that I can bring my 3/4'' drive breaker bar/T bar and racket but it's not even touching it. Even gingerly put a short scaffold poll on the T bar and still it's not budging. I've taken the top engine mount off and bodged/bolted a substantial puller tool in place to the engine mount so that it holds alot more rigged. I'm going to make up a 10mm plate and bolt in so it's totally solid with no flexing when trying to undo the bolt. I've even tried tapping the T bar with a lump hammer to see if that will jolt it loose.
I have got an impact driver (the sort you hit with a hammer face on) but a bit loughed to use it because of fear of the crankshaft taking the impact and I don't really want to risk damaging bearings, further seals and liners etc.
Have thought about hiring a 610Nm cordless impact driver but the cheapest I can find is £30 a day. Another thought is perhaps trying to find a mobile tyre fitter with a powerful air driven impact driver and see if they will have a go for beer tokens.
After three full Saturdays of trying to get this bolt undone I'm beginning to come to the end of my tether with it but giving up is not an option. The auxilliary belt is all removed along with the timing belt covers so I really want to do this myself rather than putting it back together and taking it to a garage. Hence me having a horror thought that maybe I've been trying to tighten it up further rather than undo. Don't think so, but the thought as crossed my mind.