

Grande Punto T Jet Sporting Mud Flaps
I have a Grande Punto 1.4 T Jet Sporting and have fitted both rear and front mud flaps.
Rear Mud Flaps:-
Managed to fit these without the need to remove the wheels. It's a little bit fiddly but can be done - took about 1 hr to fit both.
Front Mud Flaps:-
According to the Fiat website, front mud flaps are not compatible with cars equipped with sideskirts. This is true, however, if you are prepared to undertake a minor modification to the mud flaps then they can indeed be fitted.
For anyone who is interested the process is as follows and was done without the need to remove the wheels (simply rotate the steering lock as required to improve access):-
In all the front mud flap installation took approx 3 hrs. Most of this was figuring out what I was going to do and then carefully trimming the excess material from the mud flaps - it's worth taking your time here, as get it wrong and you've just wasted your money.
Good luck to anyone who fancies trying this. It shouldn't really be necessary if only Fiat could be bothered to design and sell mud flaps for cars with sideskirts.
I have a Grande Punto 1.4 T Jet Sporting and have fitted both rear and front mud flaps.
Rear Mud Flaps:-
Managed to fit these without the need to remove the wheels. It's a little bit fiddly but can be done - took about 1 hr to fit both.
Front Mud Flaps:-
According to the Fiat website, front mud flaps are not compatible with cars equipped with sideskirts. This is true, however, if you are prepared to undertake a minor modification to the mud flaps then they can indeed be fitted.
For anyone who is interested the process is as follows and was done without the need to remove the wheels (simply rotate the steering lock as required to improve access):-
- Hold the mud flap in position on the car and using a pencil, trace around the profile of the sideskirt - you need be careful here, as get the position wrong and you will trace the profile in the wrong place on the mud flap.
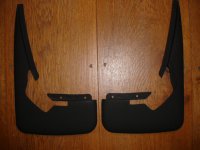
- Using a Stanley knife, cut out the profile that you have traced onto the mud flap. Be sure not to cut off any material from the vertical or horizontal tabs and remove less material than you think necessary and then offer the mud flap up to the car - this allows you to ensure that you only remove the material necessary and ensure that you achieve a good fit. Repeat this process, trimming the mud flap until you are happy with the fit. I have attached a picture showing the mud flaps that I modified, prior to fitting them to the car. With the horizontal and vertical tabs left untrimmed, these can then be slipped between the black plastic wheel arch liner and the side skirt (provides additional support to the mud flap - the horizontal tab fits on the front side of the wheel arch liner and not the reverse side as shown in the Fiat mounting instructions).
- Offer the mud flaps to the car and using a braddle (or other sharp pointy thing), mark the position of the inner most hole of the horizontal tab on the mud flap on the black plastic wheel arch liner - you can then 'drill' the required mounting hole. I only used the inner most mounting hole as the outer most hole is covered by the side skirt. I used a small 'watchmakers' screwdriver to make the first small hole (just held it against the wheel arch liner and rotated it until went through and made a small hole). I then used a couple of drills which I held by hand and used these to increase the hole size to that required by the 'self-tapping' attaching screw.
- Attach the 'screw clip' to the outer hole of the horizontal tab on the mud flap and offer the mud flap to the car - ensuring that the horizontal tab is located on the front side of the black plastic wheel arch liner. Using a screw driver (there is enough room) screw the self tapping screw from the rear side of the black plastic wheel arch liner and into the screw clip on the mud flap (don't forget the washer under the screw head). This basically attaches the horizontal tab in the reverse method to that shown on the Fiat instructions but means that you can slide the untrimmed horizontal tab between the wheel arch liner and the sideskirt (giving additional support in place of the omitted second horzontal screw - as this hole is covered by the sideskirt).
- Secure the vertical tab to the wheel arch using the two clips provided as shown on the Fiat instructions - this is really simple and hopefully very obvious.
- Repeat for the other mud flap.
In all the front mud flap installation took approx 3 hrs. Most of this was figuring out what I was going to do and then carefully trimming the excess material from the mud flaps - it's worth taking your time here, as get it wrong and you've just wasted your money.
Good luck to anyone who fancies trying this. It shouldn't really be necessary if only Fiat could be bothered to design and sell mud flaps for cars with sideskirts.
 , so i now have one spare front mudflap for a GP, as i dont need i anymore, if anybody wants it they can have it for free so long as they pick it up.