Technical Timing belt for 2.5td (8140.27)

Currently reading:
Technical Timing belt for 2.5td (8140.27)

perkins248

New member
Joined
Nov 23, 2013
Messages
8
Points
2
Hi All
Are there timing belts with different no of teeth for this engine? My problem is I bought a 1991 Hymer on which the timing belt had been changed a year before.
The engine was running lumpy, smokey and no power. I checked the timing marks and timing was out. I bought a new Gates kit and installed same. However I cannot get the Fuel pump and the crank pins to line up. It is half a tooth out. The pump is either too far advanced and rattles like a transit or one tooth back makes it dead. 3-4 seconds to rev up. I tried to adjust the injector pump on the slots, but with the 3 nuts loose it will not rotate. Has anyone come across this?
Rdgs
 
Had a garage do similar to my old boxer, another garage had to remove the lot and spin the pulley 180 degrees to get them to line up. Do forget the woodruff can snap back as well so keep it secured.
 
I have just (3500 km Easter trip across Europe ago) changed my timing belt with a Gates kit too.
The kit is a quality one, and the belt correct for the 8140.27 engine (Gates part: Gates Peugeot Boxer Renault Master 2.5 2.8 Diesel Timing Cam Belt Kit K015335XS)
The number of teeth on the belt are exactly the same as the belt I took off - 153 by 30 wide.
Seach Goolgle for: gatesautocat.com/drive/FIAT/Ducato-10/290EHJ/814027/06-90_05-94/8643
(I cannot post URL's yet)

But like you I cannot get Cam, Pump and Crank aligned to the marks, Cam and Pump are fine, but crank seems to be advanced slightly (my crank fan pulley has a hole drilled, with a matching hole in the metal cover... and a matching lug about 5 degrees or so clockwise from the hole. The lug (also with a hole) is (I think) where the timing should align.
This puts the engine too far advanced - that "Transit" sound, and underpowered when the wind is against you and revs are low.
Gates_Cam_Belt_Kit_K015335XS.png

So I am keen to find out why a new belt with new idler and tensioner (same sizes) should make this difference.
I am about to dive back into the engine to take a look - time willing I'll post back here my findings in a week or two (mechanics is my hobby - sadly my job now demands my time!).
 
One other thing to point out - these are timed using a custom Fiat / Bosch / Roto Diesel DTI - before you get the pump to move if I were you I would make a very precise alignment marks, otherwise you may well have to visit a workshop with the correct kit to time exactly.
 
With the pins in the crank pulley and injector pump and the belt fitted there is too much slack on the belt between these two pullies. The number of teeth per inch seems to be slightly too high. I agree with 153 teeth but is the old belt shorter by any chance? There is also a 2.4td called a 8144.21. Would we have the belt for this or for the 2.5 non turbo? or are they the same. I have the same gates kit you listed. Regards
 
Got there in the end!
First to answer - nope both belts were 153, and same length within the bounds of possibility to measure.
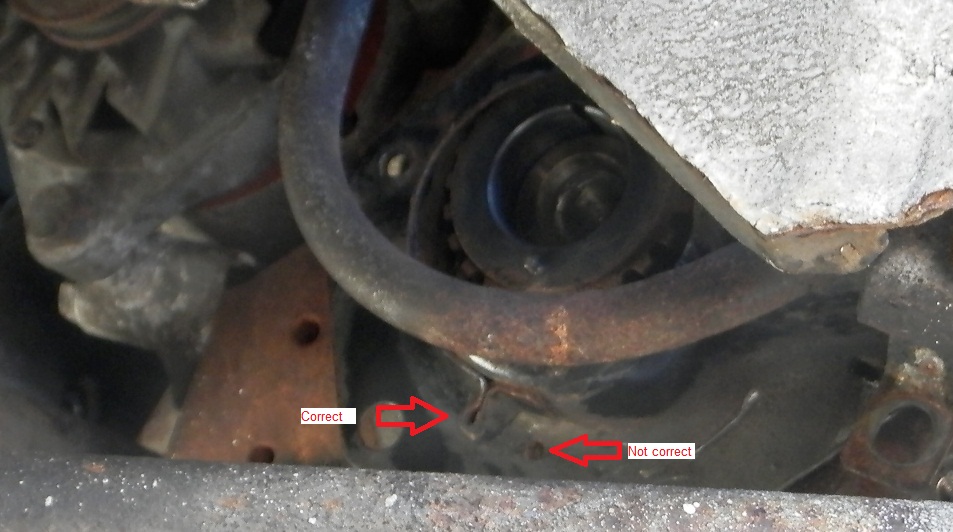
However when I used mark A, it now lines up, and the engine is back to her good old self.
So when you set you may find it challenging to line up until the belt has done a few miles (perhaps a tiny stretch / bedding in?)
0: Loosen all the injectors so you can turn the engine with relative ease.
1: Line up the bottom pulley at A above, then put a block of wood on a jack and carefully jam the bottom pulley from turning.
2: Loosen the tensioner centre nut, and carefully lever back, locking in place using the centre nut again (lightly tightened enough to hold it from springing back)
3: Undo the idler, 3 bolts into the side of the block / head - not the centre bolt. This will give you room to rotate the pump and cam - hopping notches on the belt.
To set:
I started on the pump, keeping the belt between the pump and bottom pulley as taut as possible insert a 5/6 mm drill bit at 6 pm - the hole in pump pulley and pump body should align, the drill bit should hold it still, using all 8 of my hands (just joking) I then held the belt on the pump, whilst aligning the cam, this time keeping the tension between can pulley and tensioner as taught as possible (now the 8 hand bit)
Keeping both taught, you need to get the idler back into place.
Actually I pushed hard on the belt more or less where the idler pushes, which held both pump and cam in place, as I then negotiated the idler back into place.
With idler in place, double check the cam mark at 12 o'clock against the corresponding notch on the head / rocker top and the belt between pump and lower pulley is still taut.
Now release the tensioner, and rock the pump to remove the drill bit.
I gently levered the tensioner into the belt to make sure it held.
Drop the jack so you can turn the motor.
Now rotate the engine clockwise using the crank (lower pulley) bolt, this puts all the slack into where the tensioner can take it up. keep going until you have cycled back to the marks. Nip up the tensioner to make sure it doesn't move too easily.
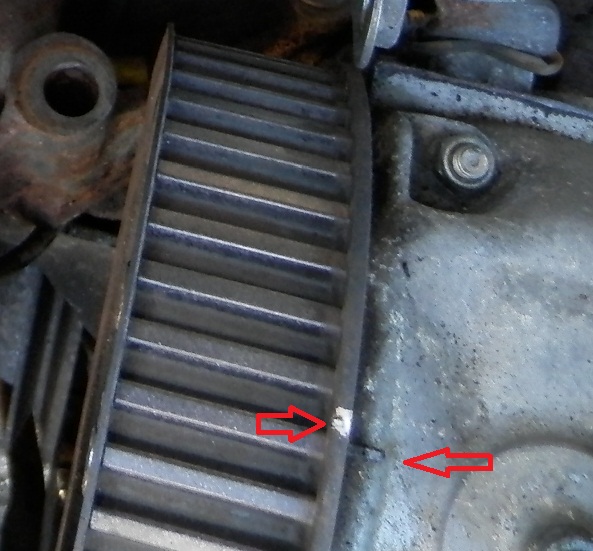
Check your alignment, pump 6pm drill bit aligns, cam 12 o'clock and crank pulley mark at about 26/ 27 minutes to the hour - between 6 and 7 o'clock (mark A above).
I repeated the rotation 3 times, loosening the tensioner, rotating clockwise, nip up, check.
Finally torque up the the tensioner and make sure not to forget torquing the 3 bolts on the idler, and the injectors.
I fired up the engine with covers off, and with a great deal of care cleaned the rotating belt outside.
The motor started first time, and ran as smooth as a nut, where previously it started after 10 -15 revolutions and rattled like a transit!

So the conclusion it is possible to be 1 tooth out on the crank, as long as pump and cam are set the motor will run - like a transit!
New Gates belts are tough enough to make it look more correct to align the markings with Cam 12 O'Clock, Pump 6 O'Clock and Crank 6 O'clock - its that crank mark that is all critical, just past 6 pm.
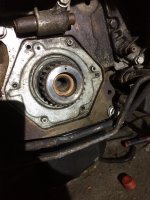
I have a couple of photos from when I originally dismantled to change the belt. I'll try and post them!
 
Cam
Cam_mark.jpg

Crank, with fan pulley in place, there should be a 5 - 6 mm hole when a drill is inserted, with luck it should fit into the hole in the bent piece of metal. Mine is too bent to allow a drill bit, so a sensible guess was necessary.
Crank_mark.jpg


Sorry I have no shots of the pump marks, but the 5 or 6 mm hole has a corresponding hole in the pump body at 6pm. A drill bit inserted should fit snugly - holding the pulley in place.

The original of this seems to have vanished above so here it is again:

Gates_Cam_Belt_Kit_K015335XS.png
 
Last edited:
Thanks for your very detailed reply. I am sure it will be used as a reference by a lot of people doing their timing belt replacements.

However my problem is different but I think I may have it solved. There is another Gates belt same length , same no of teeth, same width but the height of the teeth is different. The Gates 5113 tooth height is 4.5mm and the 15335 is 5.3mm. The 5113 belt is listed for the 8140.27 up to 1990. My wagon is a 1991 but may have been built on a 1990 base. I have the 5113 belt and will be putting it on at the weekend using your detailed procedure. Will post how I get on. Thanks again for all the work you put in.
Regards
 
And for you guys, I have much to thank for. I have been searching so much for this information, although I have a Renault Master T35 -98 with a S9w-702 2.8 engine that is probably the same as yours. Provided is the missing crank shaft photo... Hope this helps someone in future.
 

Attachments

  • 124.JPG
    124.JPG
    1.6 MB · Views: 1,153
And for you guys, I have much to thank for. I have been searching so much for this information, although I have a Renault Master T35 -98 with a S9w-702 2.8 engine that is probably the same as yours. Provided is the missing crank shaft photo... Hope this helps someone in future.
hi thanks for the detailed information just one question is the crank shaft bolt right or left hand thread/
thanks bill
 
A trick that I learned many years ago was to cut the belt along its length (a sharp Stanley knife and a trustworthy person in charge of cranking the engine!!). Once the belt is cut all the way round you remove the outer half and slip the new belt on. All that's left is to slice through the remaining half, push the new belt fully home, and fit the new ancillaries and voila, 'tis done
 
A trick that I learned many years ago was to cut the belt along its length (a sharp Stanley knife and a trustworthy person in charge of cranking the engine!!). Once the belt is cut all the way round you remove the outer half and slip the new belt on. All that's left is to slice through the remaining half, push the new belt fully home, and fit the new ancillaries and voila, 'tis done
what a fantastic idea thats got to be idea of the year thanks man.
 
Back
Top