

OK, I needed an excuse to do a mini project on the car over the winter and this was it: install rear seat belts a) for general safety and b) so that sometime (subject to parental approval!) I might take my grandchildren - currently aged 4 and 2 - out for a ride every now and then... we'll see!
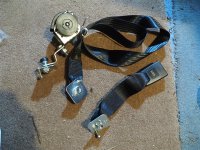
I decided that if I was going to fit seat belts, it would have to be the inertia reel versions - manual ones are too much of a faff to adjust and lap belts IMHO are not a huge improvement. Also, the price difference for full inertia reel 3-point belts is not huge.
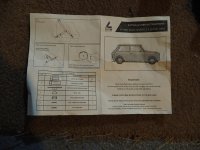
I looked around for kits - Ricambio does one but it doesn't actually include all the required mounting plates, so I went with a kit from Belt-Up Safety in the UK (beltupsafety.com). They are described as '3 Point Rear Inertia Seatbelt (Parcel-Shelf Mount)' (part number 73E2-268-00A for the black ones) for classic Minis without any existing rear mounting points. The reels are intended to fit on the rear shelf and are 'horizontal mount'. Each belt comes with one mounting plate, so I bought 2 extra mounting plates for each belt 'Reinforcing Plate 55 x 55mm (7/16 UNF Captive Nut)' (part number 60-0765-00A), making 6 in total. I also used some seat belt adapter mounts that I already had to bring the reels up to horizontal on the slightly angled shelf of the 500, plus relevant high tensile bolts , washers and nuts for the adapters, plus a few normal nuts and bolts to hold the plates in place.
Note: in some of the photos you can see the underneath of the mounting plates where the bolts are hardly through the nuts - these were taken when I had only test fitted the bolts; at the end, the bolts were properly tightened and come through the nuts to a decent depth.
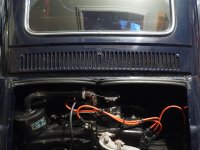
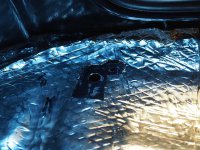
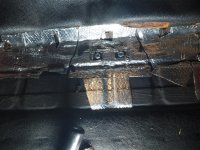
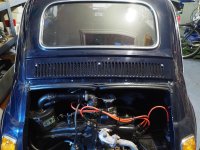
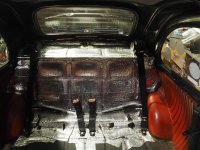
I took out both parts of the rear seat and the insulation (which had what looked like a bitumen layer cracking apart, so I decided to replace it). In the pics you can see the additional adhesive insulation/sound damping sheet that I previously put in.
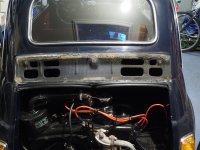
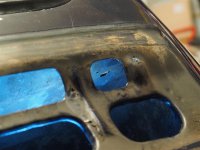
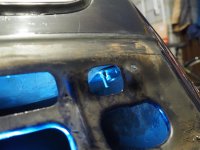
For the rear shelf mounts, I checked several times where they would fit: note that you can't put the plates right over next to the rear pillar because below the shelf there is an extra panel (inner quarter) preventing access to the underneath in that position. Having measured several times, I drilled a pilot hole in the shelf for the main bolt and used a stepper drill bit thingy to widen out the hole to the appropriate diameter (12mm, from memory). I then marked and drilled a hole for the single bolt to hold the plate in place. I had to have a helper in order to tighten this bolt up, as it would be impossible to do with one person unless you have huge, long gorilla arms! It was a little bit of a fiddle to put a spanner on the nut through the grill slots, but not too bad.
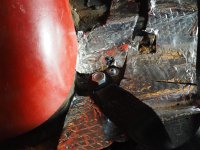
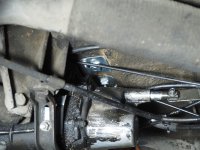
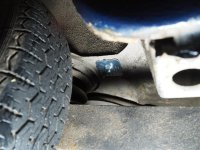
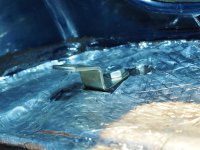
The outer mounting plates were placed as close as possible to the angles of the floor and the wheel arch, to minimise flex on a larger section of floor. Again, I had to check several times to make sure there was clearance on top and underneath.
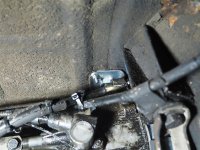
The central plates (for the buckle parts) were a bit more difficult - I found that there was no fully flat section of floor in the right general position that would allow for the 55x55mm plates to fit, so I ended up bending two edges on each plate so that they would fit between the pressed moulded sections of the floor. It needed a bit of care to find a position that was OK and would give access underneath to fit them with the holding bolts. In the end, they worked out fine.
Note: Not shown in the photos, but before refitting the seat base I rotated the bottom ends of the main belt and buckle on the bolts to more suitable positions.
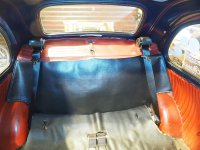
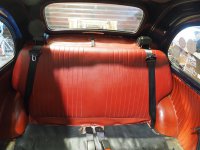
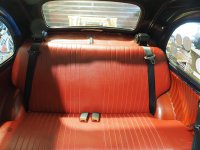
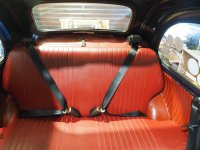
I cut down the old rear shelf insulation to make a piece for the floor under the seat for a bit of extra soundproofing (I actually had to cut it a bit after the photo to give access to the fixing tangs for the bottom of the seat back). I got a new rear shelf/bulkhead insulation mat from Ricambio and fitted my previously-made shelf cover on it, cutting holes where needed for the seat belt brackets to push through. Inertia reels bolted to the brackets, seat back and base refitted, and Bob's your uncle!
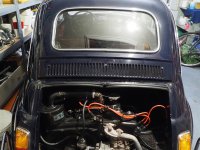
The final job was to rivet the rear grill back in place and use some touch up paint to cover the rivet heads.
The reels are a little low for an adult shoulder, but that's no worse that the front belts, so I think it is still safer than no belts. Not sure how often I will actually have rear passengers, but I enjoyed the day or so it took me to do the job")
I decided that if I was going to fit seat belts, it would have to be the inertia reel versions - manual ones are too much of a faff to adjust and lap belts IMHO are not a huge improvement. Also, the price difference for full inertia reel 3-point belts is not huge.
I looked around for kits - Ricambio does one but it doesn't actually include all the required mounting plates, so I went with a kit from Belt-Up Safety in the UK (beltupsafety.com). They are described as '3 Point Rear Inertia Seatbelt (Parcel-Shelf Mount)' (part number 73E2-268-00A for the black ones) for classic Minis without any existing rear mounting points. The reels are intended to fit on the rear shelf and are 'horizontal mount'. Each belt comes with one mounting plate, so I bought 2 extra mounting plates for each belt 'Reinforcing Plate 55 x 55mm (7/16 UNF Captive Nut)' (part number 60-0765-00A), making 6 in total. I also used some seat belt adapter mounts that I already had to bring the reels up to horizontal on the slightly angled shelf of the 500, plus relevant high tensile bolts , washers and nuts for the adapters, plus a few normal nuts and bolts to hold the plates in place.
Note: in some of the photos you can see the underneath of the mounting plates where the bolts are hardly through the nuts - these were taken when I had only test fitted the bolts; at the end, the bolts were properly tightened and come through the nuts to a decent depth.
I took out both parts of the rear seat and the insulation (which had what looked like a bitumen layer cracking apart, so I decided to replace it). In the pics you can see the additional adhesive insulation/sound damping sheet that I previously put in.
For the rear shelf mounts, I checked several times where they would fit: note that you can't put the plates right over next to the rear pillar because below the shelf there is an extra panel (inner quarter) preventing access to the underneath in that position. Having measured several times, I drilled a pilot hole in the shelf for the main bolt and used a stepper drill bit thingy to widen out the hole to the appropriate diameter (12mm, from memory). I then marked and drilled a hole for the single bolt to hold the plate in place. I had to have a helper in order to tighten this bolt up, as it would be impossible to do with one person unless you have huge, long gorilla arms! It was a little bit of a fiddle to put a spanner on the nut through the grill slots, but not too bad.
The outer mounting plates were placed as close as possible to the angles of the floor and the wheel arch, to minimise flex on a larger section of floor. Again, I had to check several times to make sure there was clearance on top and underneath.
The central plates (for the buckle parts) were a bit more difficult - I found that there was no fully flat section of floor in the right general position that would allow for the 55x55mm plates to fit, so I ended up bending two edges on each plate so that they would fit between the pressed moulded sections of the floor. It needed a bit of care to find a position that was OK and would give access underneath to fit them with the holding bolts. In the end, they worked out fine.
Note: Not shown in the photos, but before refitting the seat base I rotated the bottom ends of the main belt and buckle on the bolts to more suitable positions.
I cut down the old rear shelf insulation to make a piece for the floor under the seat for a bit of extra soundproofing (I actually had to cut it a bit after the photo to give access to the fixing tangs for the bottom of the seat back). I got a new rear shelf/bulkhead insulation mat from Ricambio and fitted my previously-made shelf cover on it, cutting holes where needed for the seat belt brackets to push through. Inertia reels bolted to the brackets, seat back and base refitted, and Bob's your uncle!
The final job was to rivet the rear grill back in place and use some touch up paint to cover the rivet heads.
The reels are a little low for an adult shoulder, but that's no worse that the front belts, so I think it is still safer than no belts. Not sure how often I will actually have rear passengers, but I enjoyed the day or so it took me to do the job
Attachments
-
 2024-02-09 01 Fiat 500 (Large).JPG246.9 KB · Views: 53
 -
 2024-02-09 02 Fiat 500 (Large).JPG238.1 KB · Views: 39
 -
 2024-02-09 03 Fiat 500 (Large).JPG366.7 KB · Views: 37
 -
 2024-02-09 04 Fiat 500 (Large).JPG207.7 KB · Views: 37
 -
 2024-02-09 05 Fiat 500 (Large).JPG273.7 KB · Views: 37
 -
 2024-02-09 06 Fiat 500 (Large).JPG185.5 KB · Views: 37
 -
 2024-02-09 07 Fiat 500 (Large).JPG181.5 KB · Views: 39
 -
 2024-02-09 08 Fiat 500 (Large).JPG254.8 KB · Views: 37
 -
 2024-02-09 09 Fiat 500 (Large).JPG347.2 KB · Views: 39
 -
 2024-02-09 10 Fiat 500 (Large).JPG248.9 KB · Views: 38
 -
 2024-02-09 11 Fiat 500 (Large).JPG210.2 KB · Views: 41
 -
 2024-02-09 12 Fiat 500 (Large).JPG206.6 KB · Views: 42
 -
 2024-02-10 01 Fiat 500 (Large).JPG213 KB · Views: 38
 -
 2024-02-10 02 Fiat 500 (Large).JPG270 KB · Views: 39
 -
 2024-02-12 01 Fiat 500 (Large).JPG305.5 KB · Views: 38
 -
 2024-02-13 01 Fiat 500 (Large).JPG293.2 KB · Views: 37
 -
 2024-02-13 02 Fiat 500 (Large).JPG255.7 KB · Views: 36
 -
 2024-02-13 03 Fiat 500 (Large).JPG229.1 KB · Views: 41
 -
 2024-02-13 04 Fiat 500 (Large).JPG239.1 KB · Views: 40
 -
 2024-02-13 05 Fiat 500 (Large).JPG249.8 KB · Views: 37
Last edited:
 Nice job!